Everything You Need to Know About wp-config.php
The wp-config.php file is a significant part of a WordPress installation. Created during the WordPress installation process, the file contains database configuration items. In short, it allows WordPress to establish a connection with the database.
That said, a webmaster should know how to manage it properly to ensure the site’s security. Without it, your WordPress site wouldn’t be able to store and retrieve data from its database.
This article will explore the functionality of the wp-config.php file and how to locate it in your WordPress site’s directory. We will also show you how to edit the wp-config.php file and implement custom settings on your website.
Download all in one WordPress cheat sheet
What Is the wp-config.php File
The wp-config.php file is a configuration file created during the WordPress installation process. It stores database information such as the database name, username, password, and host.
In addition to establishing a connection between your WordPress site and its database, WordPress also uses the wp-config.php file to implement advanced settings on the site.
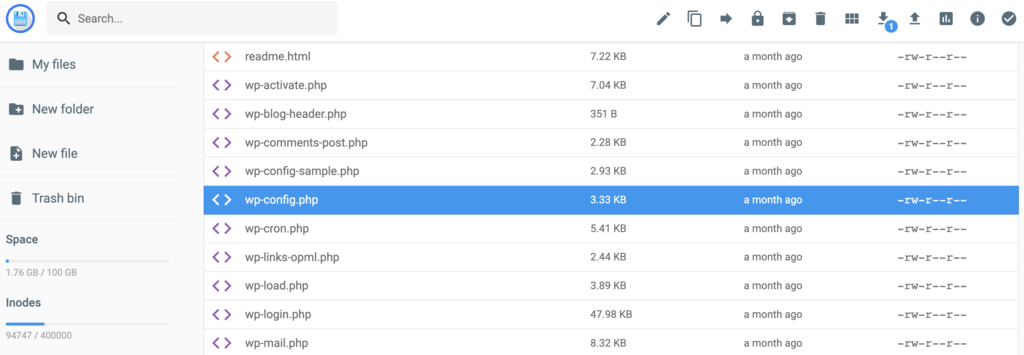
This configuration file is stored within the root folder of your website. Access the wp-config.php file via an FTP client like FileZilla or your web host’s File Manager. The following example shows the wp-config.php file in the /public_html directory:
In case you need to create the wp-config.php file manually, WordPress provides a sample file called the wp-config-sample.php file within the root folder.
It contains all the necessary information, ideal for WordPress beginners who aren’t familiar with the file yet. Keep in mind not to change the order of the code as it may cause errors on the site.
Here’s the content of the wp-config.php sample file:
<?php
/**
* The base configuration for WordPress
*
* The wp-config.php creation script uses this file during the
* installation. You don't have to use the web site, you can
* copy this file to "wp-config.php" and fill in the values.
*
* This file contains the following configurations:
*
* * MySQL settings
* * Secret keys
* * Database table prefix
* * ABSPATH
*
* @link https://wordpress.org/support/article/editing-wp-config-php/
*
* @package WordPress
*/

// ** MySQL settings - You can get this info from your web host ** //

/** The name of the database for WordPress */
define( 'DB_NAME', 'database_name_here' );

/** MySQL database username */
define( 'DB_USER', 'username_here' );

/** MySQL database password */
define( 'DB_PASSWORD', 'password_here' );

/** MySQL hostname */
define( 'DB_HOST', 'localhost' );

/** Database Charset to use in creating database tables. */
define( 'DB_CHARSET', 'utf8' );

/** The Database Collate type. Don't change this if in doubt. */
define( 'DB_COLLATE', '' );

/**#@+
* Authentication Unique Keys and Salts.
*
* Change these to different unique phrases!
* You can generate these using the {@link https://api.wordpress.org/secret-key/1.1/salt/ WordPress.org secret-key service}
*
* You can change these at any point in time to invalidate all existing cookies. This will force all users to have to log in again.
*
* @since 2.6.0
*/
define( 'AUTH_KEY',         'put your unique phrase here' );
define( 'SECURE_AUTH_KEY',  'put your unique phrase here' );
define( 'LOGGED_IN_KEY',    'put your unique phrase here' );
define( 'NONCE_KEY',        'put your unique phrase here' );
define( 'AUTH_SALT',        'put your unique phrase here' );
define( 'SECURE_AUTH_SALT', 'put your unique phrase here' );
define( 'LOGGED_IN_SALT',   'put your unique phrase here' );
define( 'NONCE_SALT',       'put your unique phrase here' );

/**#@-*/

/**
* WordPress database table prefix.
*
* You can have multiple installations in one database if you give each
* a unique prefix. Only numbers, letters, and underscores please!
*/
$table_prefix = 'wp_';

/**
* For developers: WordPress debugging mode.
*
* Change this to true to enable the display of notices during development.
* It is strongly recommended that plugin and theme developers use WP_DEBUG
* in their development environments.
*
* For information on other constants that can be used for debugging,
* visit the documentation.
*
* @link https://wordpress.org/support/article/debugging-in-wordpress/
*/
define( 'WP_DEBUG', false );

/* Add any custom values between this line and the "stop editing" line. */

/* That's all, stop editing! Happy publishing. */
/** Absolute path to the WordPress directory. */
if ( ! defined( 'ABSPATH' ) ) {
   define( 'ABSPATH', __DIR__ . '/' );
}

/** Sets up WordPress vars and included files. */
require_once ABSPATH . 'wp-settings.php';
WordPress uses PHP constants, which are identifiers for values that cannot be modified when executing a PHP script. These identifiers define the database settings within the wp-config.php file. Each setting comes with instructions, making it easier to use the code template.
Where Is the wp-config.php File in WordPress
To locate the PHP file within your WordPress site’s root directory, either use the File Manager provided by your web hosting provider or an FTP client. The following section will show you how to find the wp-config.php file in Hostinger’s hPanel, cPanel, and via FTP.
Locating the wp-config.php File in the hPanel
Hostinger’s File Manager provides access to all WordPress files, including wp-config.php. This method requires login credentials to your hosting dashboard. Here’s how to locate the wp-config.php file in hPanel:
- Navigate to File Manager under the Files section of your hPanel.
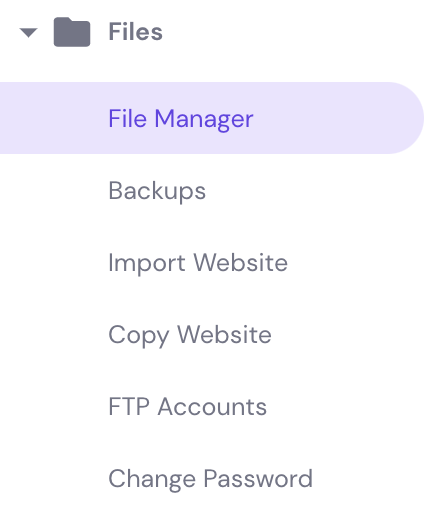
- Click on the public_html folder located in the sidebar.
- Scroll down until you find the wp-config.php file.
Locating the wp-config.php File in cPanel
cPanel also comes with a File Manager. Follow these steps to locate the wp-config.php file in cPanel:
- Navigate to File Manager under the Files section of your cPanel.

- Access the public_html → wp folder from the sidebar.
- Scroll down until you locate the wp-config.php file.

Locating the wp-config.php File via FTP
You may also use an FTP client to find the wp-config.php file. If you need help, we have a tutorial on how to configure FileZilla.
Here’s how to locate the wp-config.php file via an FTP client:
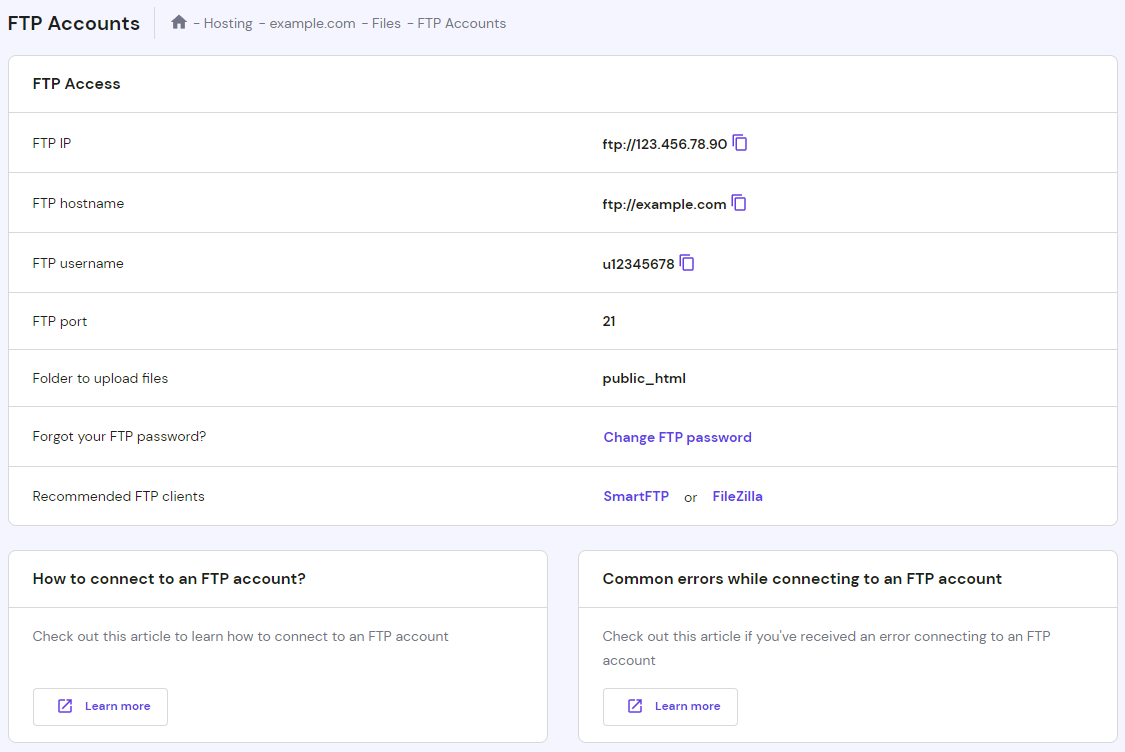
- Collect your FTP credentials from your hosting provider. If your website is running on Hostinger’s managed WordPress or any other type of hosting services, this information is available in FTP Accounts, under the Files section of your hPanel. Alternatively, send an information request to your hosting provider.
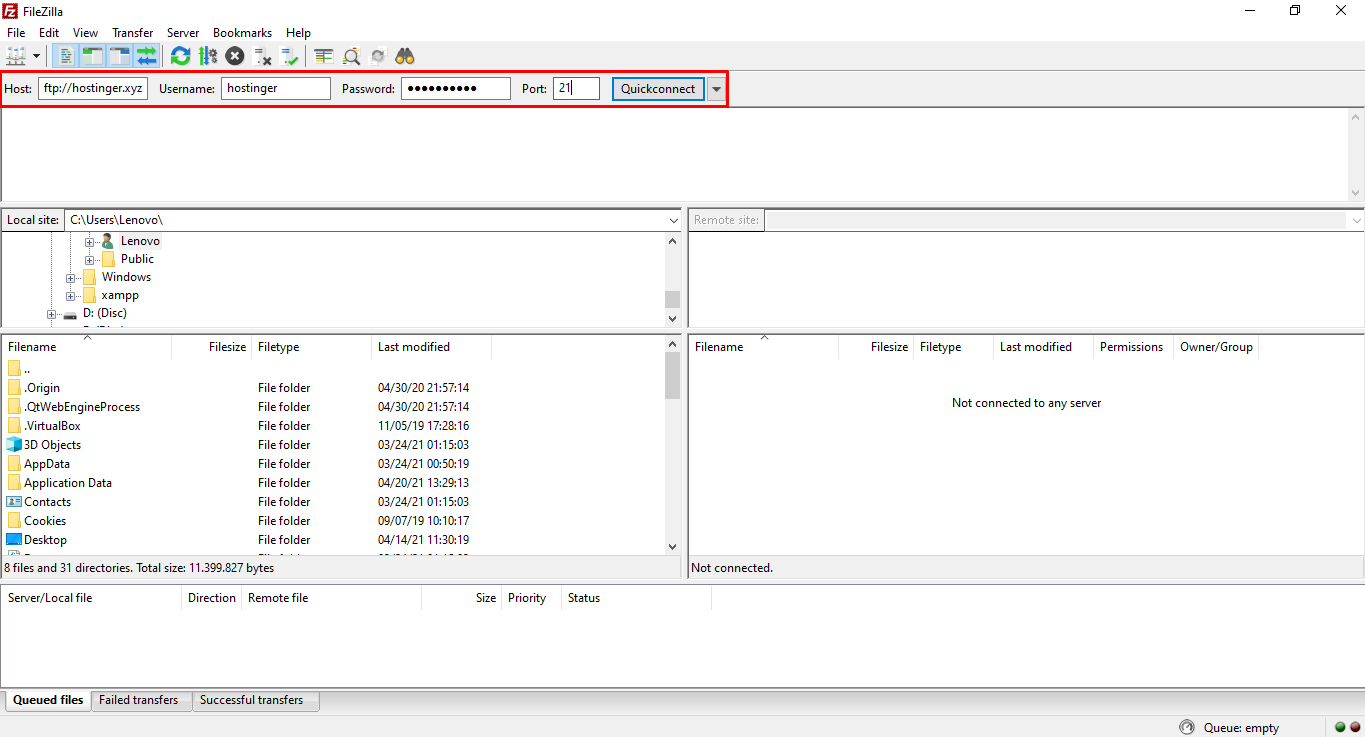
- Open FileZilla and enter your FTP credentials. Click Quickconnect.
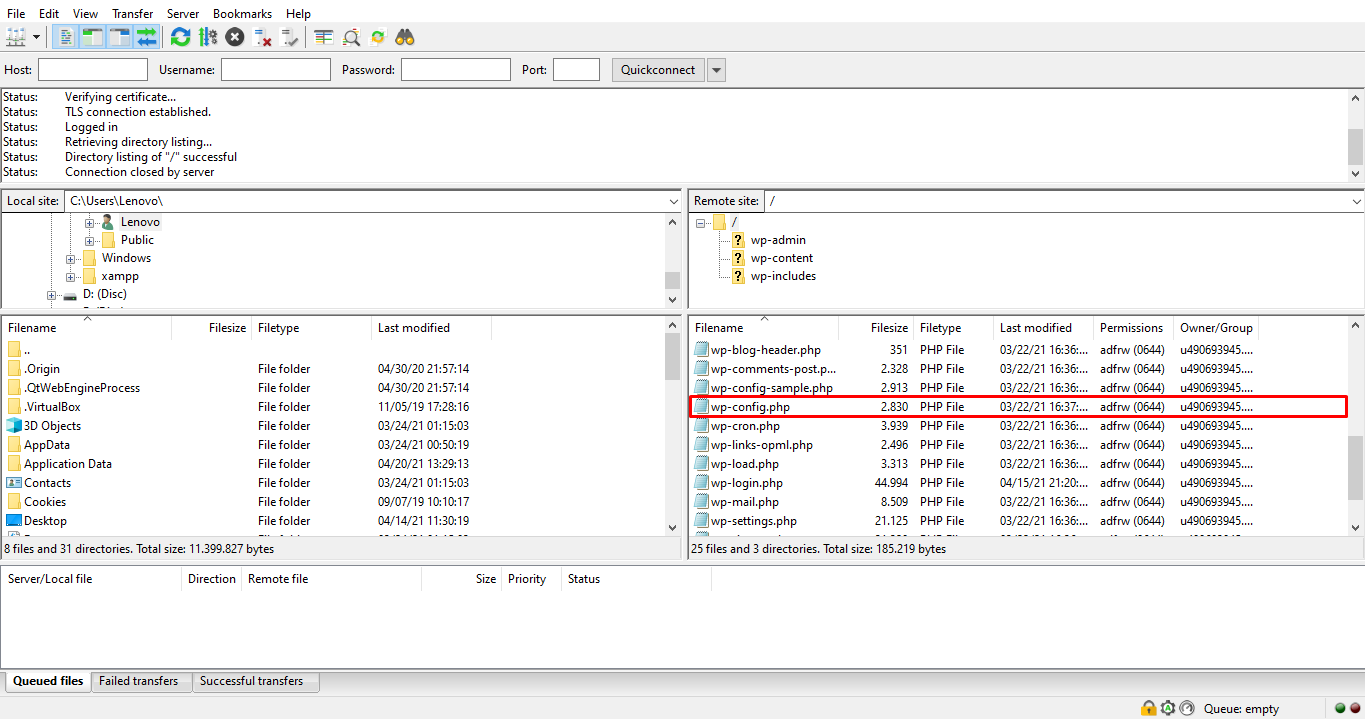
- Navigate to the root directory of your site (public_html). The wp-config file should be there.
Relocating the wp-config.php File
Since your WordPress website configuration file is stored within the root folder, the file becomes susceptible to malware attacks.
In addition to configuring file permissions, we recommend relocating the file from its default location to harden your WordPress website security.
Follow these steps to relocate the WordPress wp-config.php file using the File Manager:
- Locate your wp-config.php file in the root directory of your WordPress website.
- Copy and paste the wp-config.php file to another directory of your choice. In this example, we will put it inside /public_html/wp-admin/user.
- Change the name of the new wp-config file. The goal is to disguise it as an unimportant file so hackers won’t recognize it.
- Navigate back to the original wp-config file and replace its entire content with the following code:
<?php
include(‘/domains/yourdomain.com/public_html/wp-admin/user/new-wp-config.php’);
?>
Make sure to replace the directory with the file’s new location, new-wp-config.php with your new file name, and add your own domain.
- That’s it. The original wp-config file will now serve as a shortcut that redirects your server to the actual wp-config file.
The wp-config.php File Sections
As mentioned earlier, the WordPress wp-config-sample.php file can be modified to create a custom configuration for your WordPress website. Therefore, it’s important to know the purpose of each section and how to change it.
This section will provide a breakdown of the sections within the wp-config file and code snippets to add for advanced WordPress website customization.
MySQL Settings for wp-config.php
The MySQL settings section consists of your WordPress database configuration ‒ MySQL hostname, database name, username, and password. We recommend changing this section if your hosting provider uses an alternate port number or you’re moving to a different web server.
Here’s a snippet of the MySQL settings section taken from the wp-config-sample.php file:
// ** MySQL settings - You can get this info from your web host ** //

/** The name of the database for WordPress */
define( 'DB_NAME', 'database_name_here' );

/** MySQL database username */
define( 'DB_USER', 'username_here' );

/** MySQL database password */
define( 'DB_PASSWORD', 'password_here' );

/** MySQL hostname */
define( 'DB_HOST', 'localhost' );
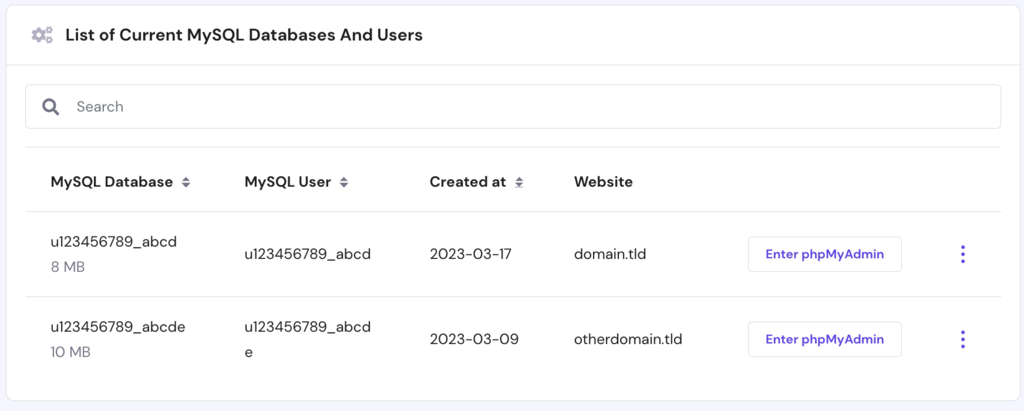
All the information required by this section is available in your hosting control panel. For example, Hostinger displays the user’s database information in MySQL Databases under the Databases section of the hPanel.
WordPress puts the name of your database within the DB_NAME variable upon installation.
Database Character Sets
WordPress configures the database character set and database collation values in the configuration file. Its purpose is to define database tables with the appropriate charset settings, such as:
/** Database Charset to use in creating database tables. */
define( 'DB_CHARSET', 'utf8' );
/** The Database Collate type. Don't change this if in doubt. */
define( 'DB_COLLATE', '' );
By default, WordPress assigns UTF8 as the default charset as it supports all internet-friendly languages, making it ideal for modern data.
Meanwhile, the value of the database collation mostly depends on the charset because it determines how the WordPress database sorts and compares your data.
MySQL automatically assigns the database collation value based on the assigned character set, hence the blank default value. If your WordPress database uses UTF8, then the default collation value is utf8_general_ci.
However, it’s possible to manually assign a collation value if the language character set isn’t the same as the ones being displayed, such as the Japanese language.
We recommend not modifying this section unless you have an excellent understanding of SQL, MySQL, and MariaDB. Using the wrong combination of charset and collation values will cause various database errors in WordPress.
Security Keys
Your wp-config file stores a set of authentication keys and WordPress salts, providing an extra layer of security for your website against brute force attacks. These random strings of data contain eight variables, all of which encrypt the login information kept by the cookies upon logging in to the WordPress website.
Considering their purpose, changing your authentication keys and salts periodically is one of many ways to improve WordPress security. We recommend using a password generator or testing the ones you’ve created with a password checker to ensure its durability against password-guessing attacks.
Alternatively, install a WordPress security plugin like Salt Shaker to automatically generate the salt keys for you.
Once you have your passwords, paste them one by one inside the apostrophe to replace the value “put your unique phrase here”.
/**#@+
* Authentication Unique Keys and Salts.
*
* Change these to different unique phrases!
* You can generate these using the {@link https://api.wordpress.org/secret-key/1.1/salt/ WordPress.org secret-key service}
*
* You can change these at any point in time to invalidate all existing cookies. This will force all users to have to log in again.
*
* @since 2.6.0
*/
define( 'AUTH_KEY',         'put your unique phrase here' );
define( 'SECURE_AUTH_KEY',  'put your unique phrase here' );
define( 'LOGGED_IN_KEY',    'put your unique phrase here' );
define( 'NONCE_KEY',        'put your unique phrase here' );
define( 'AUTH_SALT',        'put your unique phrase here' );
define( 'SECURE_AUTH_SALT', 'put your unique phrase here' );
define( 'LOGGED_IN_SALT',   'put your unique phrase here' );
define( 'NONCE_SALT',       'put your unique phrase here' );

/**#@-*/
After implementing the new security keys and WordPress salts, WordPress will log out all users and make current cookies invalid. Users will need to make another login attempt to access your site, consequently flushing out those with malicious intent.
Database Table Prefix
WordPress sets a predefined wp_ database prefix in the wp-config file. Similar to your security keys, we recommend changing your database prefix at the earliest opportunity. Doing so will improve your database security against SQL injection attacks.
The following code snippet is the section within the wp-config file that stores your database prefix:
/**
* WordPress Database Table prefix.
*
* You can have multiple installations in one database if you give each
* a unique prefix. Only numbers, letters, and underscores please!
*/
$table_prefix  = 'wp_';
As mentioned above, WordPress accepts a custom database prefix consisting of underscores, letters, and numbers. Make sure that it’s unique enough that other users cannot guess it easily. For example:
$table_prefix = 'wp_customprefix_';
Verify whether you have successfully changed the table prefix by checking your WordPress database via phpMyAdmin. If you access your database structure, the tables’ names should start with your assigned prefix. Here, we replace the default table prefix with wp_customprefix_.

Debugging Mode
If you’re a WordPress developer, you’ll find this wp-config setting useful for debugging WordPress sites. The debug mode is responsible for notifying you whenever the WordPress site executes PHP code, allowing you to check if there’s a bug in your code.
The following code snippet is the section within the WordPress wp-config file that stores your debug mode preference:
/**
* For developers: WordPress debugging mode.
*
* Change this to true to enable the display of notices during development.
* It is strongly recommended that plugin and theme developers use WP_DEBUG
* in their development environments.
*
* For information on other constants that can be used for debugging,
* visit the documentation.
*
* @link https://wordpress.org/support/article/debugging-in-wordpress/
*/
define( 'WP_DEBUG', false );
WordPress turns off its debug mode by default. To turn this mode on, replace the false value with true.
define( 'WP_DEBUG', true );
Keep in mind that enabling the debug mode will make your WordPress website display all PHP errors and warnings instead of showing a white screen of death for fatal errors only.
Absolute Path
The absolute path section states the location of a folder or a file within a computer. It determines the relationship between folders and files as well as the foundation of your site URL.
That said, you shouldn’t change the information within the following code snippet:
/* That's all, stop editing! Happy publishing. */
/** Absolute path to the WordPress directory. */
if ( ! defined( 'ABSPATH' ) ) {
   define( 'ABSPATH', __DIR__ . '/' );
}

/** Sets up WordPress vars and included files. */
require_once ABSPATH . 'wp-settings.php';
WordPress URL
Changing your WordPress URL is a necessary step if you want to move the site to another server or domain. It can be done via the Settings → General menu on your WordPress dashboard.
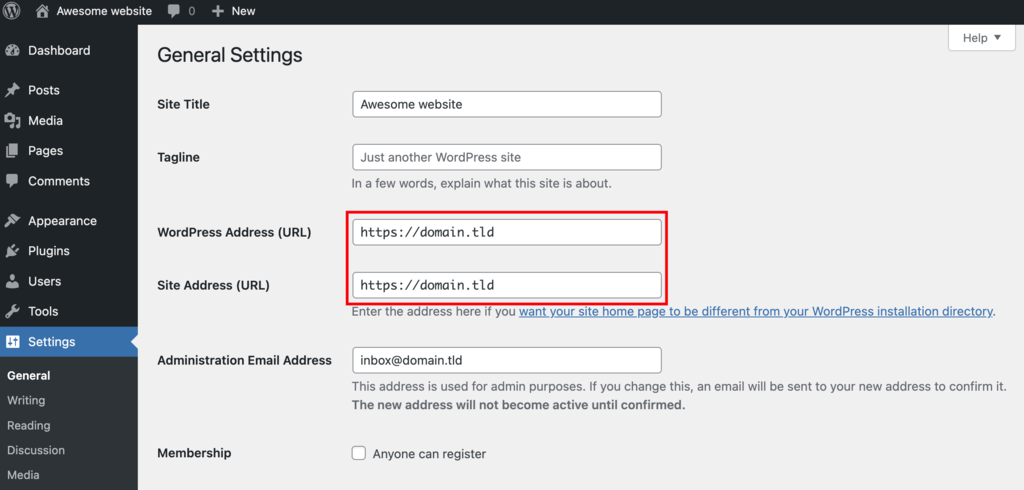
Sometimes, you may be unable to edit these WordPress address and site address values due to the ERR_TOO_MANY_REDIRECTS error. In that case, you can change your WordPress URL by adding the following code snippet to your wp-config.php file.
define( 'WP_HOME', 'http://example.com' );
define( 'WP_SITEURL', 'http://example.com' );
Make sure to replace the http://example.com value with your domain name and place the code above the line /* That’s all, stop editing! Happy publishing. */.
Include the www version of your website if you’re using a www URL.
Memory Size Limit
WordPress requires PHP memory to execute scripts. The amount of memory you get depends on your web hosting. For instance, Hostinger allocates 512 MB of maximum memory limit for basic web hosting plans.
If there’s not enough memory for WordPress to use, it will display the memory exhausted error message. To solve this problem, set your own PHP memory limit value by adding the following code snippet to your wp-config file before the line /* That’s all, stop editing! Happy publishing. */.
In this example, we’ll increase the memory allocation amount to 256 MB per PHP script.
define('WP_MEMORY_LIMIT', '256M');
We recommend setting the PHP memory limit value based on your needs while enforcing the maximum memory limit per script. WordPress will enforce this memory limit only if the script requires more memory than the allocated one.
define('WP_MAX_MEMORY_LIMIT', '512M');
Pro Tip
Don’t go overboard with the memory limit value, as having excessive PHP memory increases the possibility of having rogue PHP scripts consuming the server’s RAM.
Upload Directory
WordPress redirects all your media uploads to the /wp-content/uploads/ directory. To improve your files’ security, you may redefine the upload path on your WordPress site.
Add the following code snippet below the WP_DEBUG code of your wp-config.php file:
define( 'UPLOADS', 'wp-content/media' );
This code will make WordPress store all media uploads in the new media directory within the wp-content folder. Feel free to change the new directory’s name as desired.
If you want WordPress to store your media files in a directory outside wp-content, use the following code snippet to define the upload path.
define( 'UPLOADS', ''.'media' );
Keep in mind that both code snippets only work for defining a new uploads folder inside the root directory or the absolute path (ABSPATH).
Pro Tip
Make sure to move the uploads folder content and change each upload file’s URL in your WordPress database tables to avoid having broken links on your site.
wp-content Directory
Besides media files, WordPress also stores your plugin and theme files in the wp-content folder. Since this folder path is a default WordPress setting, it’s highly prone to malware injection attacks. Therefore, it’s best to change the location of your wp-content folder.
Edit the wp-config.php file by adding custom code after the following line:
/* Add any custom values between this line and the "stop editing" line. */
You need to define WP_CONTENT_DIR and change the location of your wp-content folder. Here’s how you can do it:
define( 'WP_CONTENT_DIR', $_SERVER['DOCUMENT_ROOT'] . '/blog/content/wp-content' );
To change the location of the wp-content URL, there is another variable you need to define:
define( 'WP_CONTENT_URL', 'yourdomain.com/blog/content/wp-content' );
Don’t forget to replace yourdomain.com with your own URL.
Plugins Directory
If moving the WordPress content folder seems like a hassle, consider relocating the plugin folder instead. To do so, you need to define the WordPress constant variable wp_plugin_dir by adding the following code snippet below the wp-settings section:
define( ‘WP_PLUGIN_DIR’, $_SERVER[‘DOCUMENT_ROOT’] . ‘/blog/content/wp-content/plugins’ );
Make sure to change the plugin folder’s URL within the variable wp_plugin_url by adding the following code:
define( ‘WP_PLUGIN_URL’, ‘yourdomain.com/blog/content/wp-content/plugins’);
Some plugin developers use the variable plugindir to run their programs. Don’t forget to change it as well to avoid plugin conflicts within your WordPress site. Here’s the code you need to add to the wp-config.php file:
define( 'PLUGINDIR', $_SERVER['DOCUMENT_ROOT'] . '/blog/content/wp-content/plugins' );
Theme Directory
We don’t recommend moving your themes folder as doing so may cause plugin conflicts. If you need an additional theme directory, create one by using the register_theme_directory function:
function register_theme_directory( $directory ) {
    global $wp_theme_directories;

    if ( ! file_exists( $directory ) ) {
        // Try prepending as the theme directory could be relative to the content directory.
        $directory = WP_CONTENT_DIR . '/' . $directory;
        // If this directory does not exist, return and do not register.
        if ( ! file_exists( $directory ) ) {
            return false;
        }
    }

    if ( ! is_array( $wp_theme_directories ) ) {
        $wp_theme_directories = array();
    }

    $untrailed = untrailingslashit( $directory );
    if ( ! empty( $untrailed ) && ! in_array( $untrailed, $wp_theme_directories, true ) ) {
        $wp_theme_directories[] = $untrailed;
    }

    return true;
}
Keep in mind that the new theme directory has to be within the root directory. This is because your server needs to have access to the website’s theme files for them to work.
Error Logging
Turning on the debug mode in WordPress only flags errors on the back-end and front-end of your site. To log the errors, you need to add its companion code below the line define(‘WP_DEBUG’, true);.
define( ‘WP_DEBUG_LOG’, true );
If you want to save the errors in a file, use this code instead:
define( 'WP_DEBUG_LOG', '/tmp/wp-errors.log' );
To turn off the error output, meaning that your browser won’t display any information during the debugging process, use this code:
define( 'WP_DEBUG_DISPLAY', false );
WordPress Auto Updates
WordPress provides the option to enable the auto-update feature during the installation process, saving you the time from having to do it manually. However, it can backfire if you install a custom theme since there’s no telling which update may affect your website’s look.
To disable the auto-update feature, above the line /* That’s all, stop editing! Happy publishing. */ add the following code:
define( ‘AUTOMATIC_UPDATER_DISABLED’, true );
Replace the value true with false or delete this code if you want to re-enable auto-updates in the future.
WordPress Core Updates
WordPress version 3.7 and higher comes with automatic background updates for minor core releases and translation files to ensure optimal performance. In some cases, the updates may include theme and plugin development files.
As this feature keeps your site up to date and secure, we recommend leaving it as default.
To blanket-enable development, minor, and major core updates, add the following code above the line /* That’s all, stop editing! Happy publishing. */:
define( 'WP_AUTO_UPDATE_CORE', true );
Change the constant value to false to disable development, minor, and major core updates:
define( 'WP_AUTO_UPDATE_CORE', false);
Alternatively, enable auto-updates for minor releases only by changing the constant value to minor:
define( 'WP_AUTO_UPDATE_CORE', ‘minor’);
Custom User Table
By default, WordPress provides you with a wp_users table to store user data. In case you need a custom user table post-installation, add the following code to your wp-config.php file:
define( ‘CUSTOM_USER_TABLE’, $table_prefix.’my_users’ );
Usually, developers use this code to share user tables between WordPress installations, which is useful for maintaining the same userbase across multiple websites.
Custom User Meta Table
If you decide to create a custom user table, you have to create another one to store your user metadata. The following code lets you create a custom user meta table:
define( ‘CUSTOM_USER_META_TABLE’, $table_prefix.’my_usermeta’ );
A custom user meta table is useful for collecting and sharing user information across multiple WordPress installations. Membership plugins also use custom user meta tables to store membership information.
Language and Language Directory
The default language for WordPress installation is U.S. English. WordPress version 4.0 and higher lets users change it on Settings → General in their admin dashboard. It’s also possible to change the default language during the installation process.
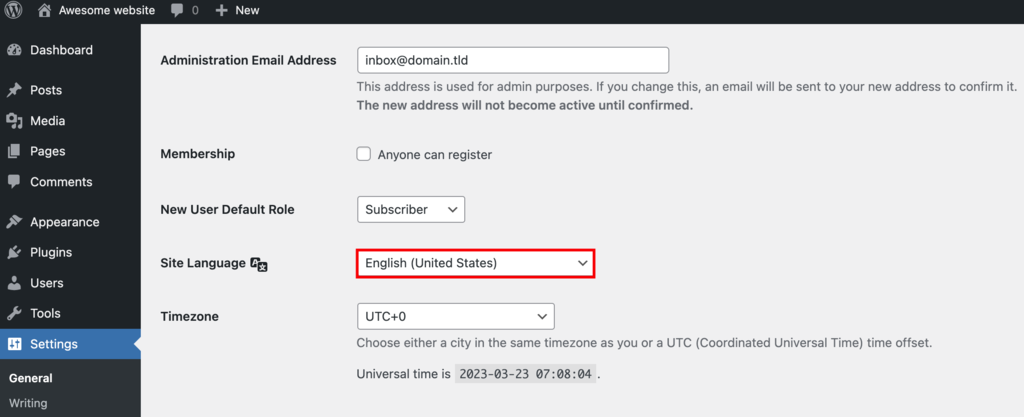
If you want to switch to a different language, add the following code to the wp-config file:
define( ‘WPLANG’, ‘de_DE’ );
define( ‘WP_LANG_DIR’, dirname(__FILE__) . ‘wordpress/languages’ );
The first line of code states which .mo language file to install, while the second one defines the language directory where the language file is stored.
The naming convention of the language files is based on the language code followed by the country code. For example, de_DE refers to the German language. Look up your desired language and country code on the GNU gettext utilities page.
If you enter the wrong combination of country and language code, WordPress will default to using U.S. English.
File Permissions
Configuring file permissions is another essential step to secure your website. The setting determines which users can view, modify, and execute core files and folders within your site.
Most hosting providers let you change file and folder permissions through the File Manager. Here’s what the setting popup window looks like on Hostinger:
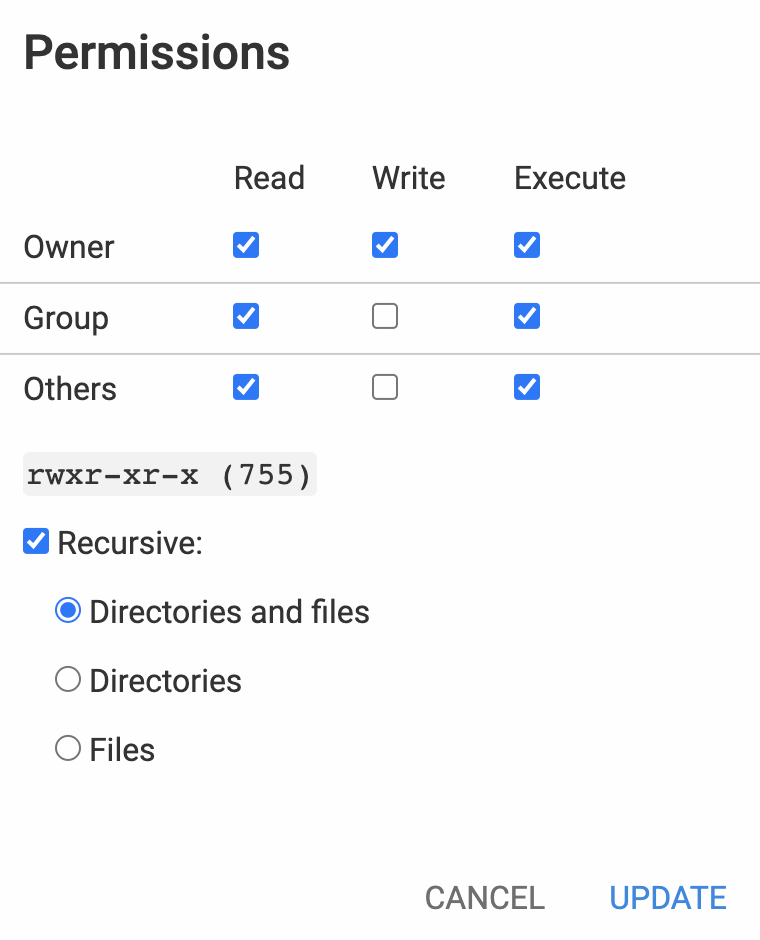
Each permission level for the corresponding user is represented by a three-digit code consisting of:
- 0 ‒ no access
- 1 ‒ execute
- 2 ‒ write
- 4 ‒ read
- 3 (a combination of 2 and 1) ‒ write and execute
- 5 (a combination of 4 and 1) ‒ read and execute
- 6 (a combination of 4 and 2) ‒ read and write
- 7 (a combination of 2 and 3) ‒ read, write, and execute
If you cannot access the File Manager to change your file permissions, modify the wp-config file using a combination of the code above. Add the following code above the line /* That’s all, stop editing! Happy publishing. */:
define( 'FS_CHMOD_DIR', ( 0755 & ~ umask() ) );
define( 'FS_CHMOD_FILE', ( 0644 & ~ umask() ) );
chmod 644 wp-config.php
chmod 644 .htaccess
The 644 file permissions for wp-config, .htaccess, and other files make them visible to all users but are only modifiable by their owner. Meanwhile, the 755 file permissions for WordPress directories and subdirectories mean that everyone can read and execute them, but only the owner can make changes.
Warning! Never set your file permissions to 777, as it will give everyone access to read, write, and execute your files. On the other hand, 000 and 444 file permissions will break your website as they prevent WordPress from editing and executing theme and plugins files.
Editing the wp-config.php File
If you want to edit the WordPress configuration file, it’s best to back it up first. Keeping an extra copy of the information helps you fix any misconfigurations that may break your website.
The next step is to decide the tool you want to use. Developers usually use a text editor or an HTML editor program. This method requires downloading the WordPress configuration file and then re-uploading it to the same directory once you make the changes.
Alternatively, use the code editor that your web hosting’s File Manager provides. Here’s how to edit the wp-config.php file via Hostinger’s File Manager.
- Navigate to File Manager from your hPanel.
- Click on the public_html folder in the sidebar.
- Double click the wp-config file and make the necessary changes.
- Once you’re done, click Save.

Conclusion
Wp-config.php is a core WordPress file created during the website installation process. It establishes a connection between your WordPress website and its database as well as implements advanced settings on both.
You can find it within the root folder of your website using an FTP client or your hosting provider’s File Manager.
The WordPress configuration file consists of several sections:
- MySQL settings ‒ WordPress database configuration.
- Database character sets ‒ used for defining tables with the appropriate charset settings.
- Security keys ‒ responsible for encrypting user information.
- WordPress database table prefix ‒ set the table prefix for better security.
- Debugging mode ‒ helpful in tracking PHP errors.
- Absolute path ‒ states the location of a folder or a file within a computer.
While WordPress wp-config.php is editable using a text editor, make sure to back up the file before making any changes. Even the smallest misconfiguration can disrupt the connection between the database and your WordPress website.

Jordana is a Senior Content Writer at Hostinger with a background in Information Systems. She has over five years of experience in WordPress and is casually dabbling with PHP and MySQL. Her passion for writing and technology drives her to create tutorials for anyone wanting to build their online presence. Follow her on LinkedIn.