What Is Gravatar? Adding and Customizing an Avatar for Your Website
When visiting a website and scrolling down to its comments section, you may notice that some people have an icon, logo, or picture next to their comments.
While it might seem trivial, this element helps with branding, especially for users looking for better visibility and reach. However, re-uploading the same image for each site you visit can take a lot of time.
Here is where Gravatar, which stands for globally recognized avatar, comes in handy, allowing people to use the same profile picture across multiple websites.
This article will cover everything there is to know about Gravatar, including its definition and functions. Then, we will walk you through how to create a Gravatar account, customize it, and enable it on your site.

What Is Gravatar?
Gravatar stands for globally recognized avatar. It is a free online service that allows users to upload a personal online avatar and associate it with their email address. With it, people can establish a consistent identity across different websites that support the Gravatar service.
Why Use Gravatar
Some websites offer a way to add a profile picture to your comments by default. However, using Gravatar offers additional benefits, such as:
- Greater exposure and credibility. Using a consistent image across all platforms makes it easier for others to notice you and interact with your content.
- Better traffic and engagement. Displaying a picture helps other people recognize and remember you, building a stronger connection. This may lead to more traffic on your website and social shares.
- Streamlined process. Setting up a Gravatar account will display your selected profile picture on all Gravatar-enabled websites. This saves you the hassle of uploading images to each site separately.
- Easy setup and use. It offers a user-friendly interface to create custom avatars easily. Moreover, Gravatar APIs (Application Programming Interfaces) provide seamless integration with other web services.
Suggested Reading
How to Set up a Gravatar Account
Now that you know what is Gravatar and its benefits, let’s go over the steps of creating a Gravatar account:
1. Go to the Gravatar website and click Create Your Own Gravatar.
2. Sign up for Gravatar with a WordPress.com account or log in with an existing one.
3. Next, the Manage Gravatars page will prompt you to upload an image. Note that the maximum file size is 10 MB.
5. Click Next and crop the image to the desired size.
6. Select an appropriate rating according to the image’s content. Click on the Set Rating button to save your changes.
Once your image is ready, all that is left is to complete your profile details.
To do this, navigate to My Profile and fill in your personal information, including your display name and a short bio, then click on Save Profile.
Next, add a custom background image and color to create a profile page that reflects your personal brand.
Lastly, include links to your website and social media accounts to drive more traffic to them.
Pro Tip
If the site fails to display your Gravatar image, try clearing your browser cache and history. Also, make sure you are using the same email registered on Gravatar to comment on the site.
How to Enable Gravatar on Your Site
WordPress websites have built-in support for Gravatar – you only need to enable default avatar settings. This adds a personal touch to user interactions, helping to create engaging conversations on the site.

To enable Gravatar on your WordPress website, follow the steps below:
1. Log in to your WordPress admin area and navigate to Settings → Discussion.
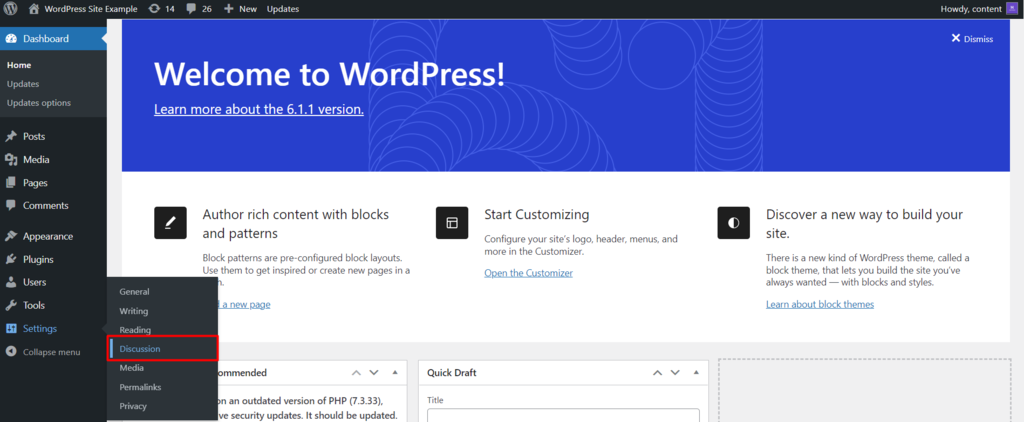
2. Scroll down to the Avatars Display section and check the Show Avatars option.
3. Set a maximum rating and choose a default avatar for users who don’t have their own – you can even choose Gravatar’s logo.
4. Hit Save changes.
To add a different default avatar option, you need to tweak the functions.php file.
Important! Before proceeding further, back up your WordPress site in case something goes wrong.
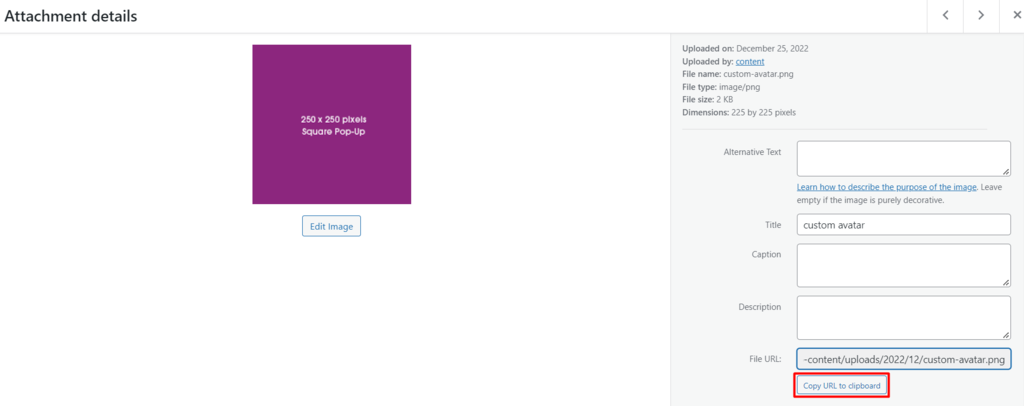
- Upload the new default avatar to the WordPress Media Library by going to Media → Add New.

- After that, copy the image URL from the attachment details.
After that, head back to the dashboard:
- Navigate to Appearance → Theme File Editor.
- Open the functions.php file and paste the following code snippet, replacing the placeholder value in $new_avatar = ‘URL’ with the URL of the new default profile avatar.
* Adds a custom avatar to the list of default avatars.
 *
 * @param array $avatar_defaults The list of default avatars.
 * @return array The updated list of default avatars.
 *
 * @package thewpx
 */
function thewpx_new_avatar( $avatar_defaults ) {
  $new_avatar = 'URL';
  $avatar_defaults[ $new_avatar ] = 'My Avatar';

  return $avatar_defaults;
}
add_filter( 'avatar_defaults', 'thewpx_new_avatar' );
- Click Update File and head back to the WordPress admin area.
- Go to Settings → Discussion. If the process was successful, the custom profile picture will be available on the Default Avatar options.
- Select the avatar and save the changes.
How to Change and Manage Your Gravatar Image
WordPress doesn’t allow you to change the image directly on the dashboard. Instead, you need to log in to your Gravatar account and add a new image from there.
However, there are many WordPress plugins that allow you to customize your Gravatar image, such as:
- Simple Local Avatars ‒ a lightweight plugin that lets users add an avatar upload field to their profiles and customize the size of their Gravatar images.
- Author Avatars List/Block ‒ a free plugin for creating role-based avatars and inserting them into site pages or posts using a WordPress block or the plugin’s shortcodes.
- Basic User Avatars ‒ another free plugin that supports front-end avatar management and enables users to upload a custom profile image.
The following tutorial will show you how to upload an avatar directly on WordPress using the Basic User Avatar plugin:
- From the WordPress dashboard menu, navigate to Plugins → Add New.
- Use the search box to locate the plugin.
- Install and activate the plugin.
- Head back to the dashboard and navigate to Users → Your Profile.
- Once you have found the Upload Avatar field, choose the new image file from your computer.
- Click Update Profile to save the changes.
Conclusion
In this article, we covered how to set up a Gravatar account, customize your profile image, and integrate Gravatar with WordPress.
Using Gravatar, users can create consistent online profiles across multiple websites, which helps to increase their brand recognition.
All you need to access the Gravatar service is a WordPress.com account. When you use the same email address to comment on a Gravatar-enabled website, your public profile and unique avatar will appear next to your post.
We hope this article has helped you understand more about Gravatar and its benefits. If you have any questions or remarks, don’t hesitate to leave them in the comments section below.

Wanda enjoys helping people become more successful online by sharing her expertise in digital marketing and website development. In her free time, she loves reading mystery books, thrifting for vintage clothes, and exploring aesthetic cafes.