How to Use SCP Command to Copy and Transfer Files in Linux
Secure copy protocol (SCP) is a command that enables efficient and secure file transfers between two systems over a network. It uses Secure Shell (SSH) to authenticate the systems and encrypt your data.
The SCP command streamlines data transfer between Linux systems since administrators don’t need to log in to both servers. In addition, it is more secure than other methods like file transfer protocol (FTP), which is also commonly used for managing a remote system.
In this article, you’ll learn how to use the SCP command on a remote host, such as a virtual private server (VPS). We will break down the command’s syntax and provide SCP examples to help you better understand how it works.

SCP Command Syntax
The basic SCP syntax for transferring a file between two different remote servers is as follows:
scp [options] [source username@IP]:/[directory and file name] [destination username@IP]:/[destination directory]
Here’s the command breakdown:
- [options] ‒ modifiers to alter the SCP command’s behavior.
- [source username@IP] ‒ the source system’s username and IP address.
- :/ – the system address and directory path separator.
- [directory and file name] ‒ the file’s location and name.
- [destination username@IP] ‒ the destination system’s user account and IP address.
- [destination directory] ‒ the transferred files’ target directory.
Here’s an example of an SCP command for copying files between two remote systems:
scp root@162.168.1.1:/media/scp.png hostinger@162.168.1.2:/desktop/destination
Ensure to enable root access on the remote machine. If you use another account, check whether it has the write permission for the target folder. Otherwise, you can only transfer files to the user’s home directory.
If you’re copying to or from a local host, omit the IP address and the path like /desktop/folder_name. The command will look as follows:
scp scp.png hostinger@162.168.1.2:/desktop/destination
How to Copy Files Using the SCP Command
The following sections will explore some SCP practical usage examples for transferring files between different systems.
Warning! Be careful when using SCP commands since you may overwrite files and directories with the same name.
Using SCP Command with Hostinger VPS
You must access the source machine’s bash shell to run the SCP command. For a remote server like a VPS, connect via SSH using PuTTY or your computer’s Terminal.
If you use Hostinger’s VPS hosting, utilize the Browser terminal feature in the server overview menu of the Members Area. It lets you connect and run commands on a remote server directly via a web browser, making the task more efficient.

Moreover, our Browser terminal uses the VNC protocol to access the remote server, letting you run SSH commands like SCP even when the target system closes the connection port.
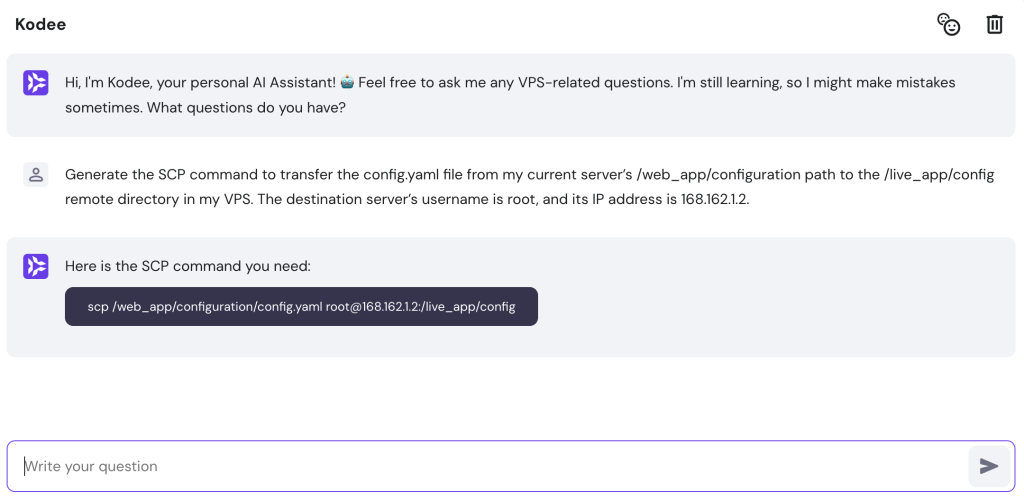
Kodee, Hostinger’s AI assistant, is accessible from the server overview menu. This feature lets you use simple prompts to generate ready-to-use SCP commands based on your needs, improving management efficiency.
For example, you can input “Generate the SCP command to transfer the config.yaml file from my current server’s /web_app/configuration path to the /live_app/config remote directory in my VPS. The destination server’s username is root, and its IP address is 168.162.1.2.”
Kodee will output the complete command, which you can copy and paste into the Browser terminal, like the following:
Copying From a Local Server to a Remote Host
Using the SCP command to copy files from a local system to a remote host like a VPS helps streamline web application deployment processes. It lets you quickly push the updated files from a local development environment to the live server.
For example, we’ll copy the scp.zip local file to a remote server with the root user. To do so, specify the remote username and IP address:
scp /users/Hostinger/desktop/scp.zip root@162.168.1.2:/writing/article
Terminal will ask you to enter the remote machine’s user password if you haven’t set up an SSH key pair. It will also show a progress meter, like the following:

Once finished, you can use the Linux unzip command in the destination system’s Terminal to extract the file
The SCP command relies on the default SSH port 22 to securely copy files. However, server administrators may set up another listening port to avoid unauthorized access. In this case, add the -P option to enable the SCP custom port:
scp -P 2322 /users/Hostinger/desktop/scp.zip root@162.168.1.2:/writing/article
To change the transmitted file name, specify the new value in your destination directory. Here’s an example of the SCP command that renames scp.zip to howtoscp.zip:
scp /users/Hostinger/desktop/scp.zip root@162.168.1.2:/writing/article/howtoscp.zip
Moreover, the SCP command lets you copy directories recursively, allowing you to transfer multiple files within a folder simultaneously. To do so, use scp -r and specify the folder you want to transfer:
scp -r /users/Hostinger/desktop root@162.168.1.2:/writing/article
The command example above will copy the desktop folder’s content to the /writing/article remote directory, including the subfolders. Alternatively, copy multiple files using their names like the following:
scp file1.txt file2.txt file3.txt root@162.168.1.2:/writing/article
Pro Tip
To find a directory’s full path, navigate to the appropriate directory and use the pwd command.
Transferring a Remote File to a Local Machine
To initiate SCP data transfer from remote to local systems, switch the source and destination placement in the syntax. It improves your application development efficiency as you can easily download and work on the project file offline.
For example, use the following command to pull the scp.zip file from a remote VPS to a local machine:
scp root@162.168.1.2:/writing/articles/SCP.zip Users/Hostinger/Desktop
Running this command will prompt the SSH login output, which requires the user password. If you disable the authentication using sudo privileges on the remote server and enable the public key authentication, the prompt won’t appear.
Safely Moving a File Between Remote Hosts
In addition to transferring to or from the current server, use SCP to move files between two remote Linux machines. To do so, run the command on your local computer with their address as the source and destination.
If you have multiple projects hosted on different remote machines, doing this helps improve efficiency. Instead of logging in to multiple systems individually, you can transfer files between them directly from your current computer.
For instance, run the following to transfer the scp.zip remote file from root@162.168.1.2 to hostinger@162.168.1.1:
scp root@162.168.1.2:/writing/article/scp.zip hostinger@162.168.1.1:/publishing
Copying files between two remote servers requires both accounts’ SSH passwords.
By default, the SCP command transmits the data directly from the first remote computer to the second one. If you want to reroute the operation through your current local system, add the -3 option as shown in the following command:
scp -3 root@162.168.1.2:/writing/article/scp.zip hostinger@162.168.1.1:/publishing
Use this option if you encounter a network error during the transfer. It usually occurs when the source system can’t access the target system to copy data due to the lack of direct connection.
Rerouting the SCP command to the local host prompts the target server to receive files from your computer instead of the source system. However, this process will take longer and omit information like the progress bar.
How to Use the SCP Command With Options
There are several SCP command options, which are parameters for modifying the data transfer behavior. They are helpful for users with advanced technical knowledge who want to copy the file in a specific manner according to their needs and security requirements.
Options can come in a single-character form (-o) and their descriptive equivalent (–option). Both work similarly, but some command utilities may not provide the short version.
Unlike other Linux commands, you can’t use the –help parameter to display SCP’s manual and acceptable options. Instead, you can do so by running it without any parameters:
scp
A commonly used SCP command option is -q, which prompts the system to copy the file in quiet mode. It disables the progress meter output, warnings, and diagnostic messages. Here’s an example command:
scp -q /users/Hostinger/desktop/scp.zip root@162.168.1.2
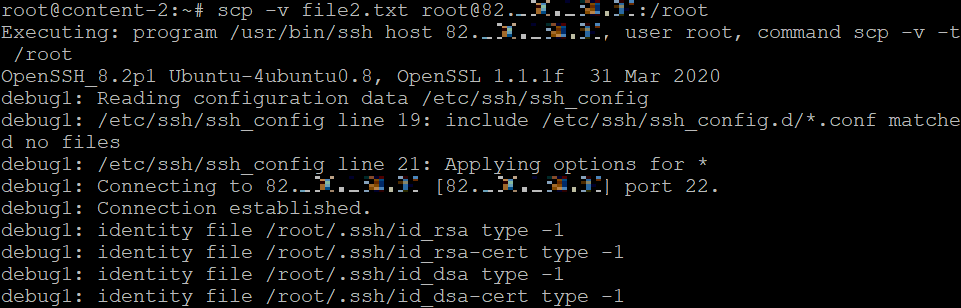
Use the -v parameter to enable verbose output. It shows detailed debugging messages about the copying process for easier error troubleshooting. Here’s how the command looks:
scp -v /users/Hostinger/desktop/scp.zip root@162.168.1.2
The -4 and -6 options determine the internet protocol version used for data transmission – IPv4 or IPv6. When using them, change the remote locations’ address accordingly, like the following example:
scp -4 root@162.168.1.2:/users/Hostinger/desktop/scp.zip
Use the -p option to preserve the source file data, like mode, modification, and access times. Note that it differs from the uppercase -P option for changing the transfer port. Here’s the syntax:
scp -p /users/Hostinger/desktop/scp.zip root@162.168.1.2
Important! Be careful when using the SCP command options as they are case-sensitive.
The -C option compresses the copied files or directories during the transfer process. It works with all files except archives, such as .zip and .rar. Here’s how the command looks:
scp -C Folder root@162.168.1.2
Meanwhile, the lowercase -c option lets you specify the client machine’s encryption algorithm. It is set to AnyStdCipher by default, but you can use other values like aes256-ctr, aes256-cbc, and 3des-cbc.
To check all the available values, refer to the Ciphers section in the SSH_config manual. Here’s an SCP command example with 3des-cbc encryption:
scp -c 3des-cbc /users/Hostinger/desktop/scp.zip root@162.168.1.2
If you want to copy a file in a particular manner but the SCP command doesn’t have a suitable option, use the -o option. It lets you apply the SSH options in the configuration file to your SCP command.
To use the option, add the setting’s key and value pair in quotation marks, like the following syntax example:
scp -o "option=value" /directory/path/file
Each -o option only takes one pair as its value. If you want to pass multiple SSH settings, add more options. For example, the following SCP command will connect to the destination system a maximum of two times and timeout the attempt after five seconds:
scp -o "ConnectionAttempts=2" -o="ConnectTimeout=5" /users/scp.zip root@162.168.1.2
This won’t change the configuration file when passing the SSH settings, as it will apply only to your current SCP session. To learn more about the full keys and their values, refer to the SSH_config manual.
Discover Other Linux Commands for Server Management
How to Check Disk Space on Linux
How to Transfer Data With Curl Command
How to Calculate Process Execution With Time Command
How to Monitor Changes With Watch Command
How to Shutdown and Restart the Server
How to Transfer and Synchronize Data With Rsync
How to Kill a Process in Linux
The Tee Command for Efficient File Writing
Conclusion
The Linux SCP command enables secure file copying between systems through encrypted SSH, offering a more efficient and safer alternative to FTP. Its syntax involves options, system addresses, file location, and target path, with address and directory omission for local transfers.
SCP not only allows file transfers between local and remote systems but also between two remote systems via a local machine. Options like -P and -C customize the transfer process.
Hostinger users can benefit from our AI assistant, Kodee, for easy SCP command generation and a Browser terminal for executing remote server commands via web browsers.
How to Use SCP Command for File Transfer FAQ
In this section, we will answer several questions about the SCP command in Linux.
How Do I Run SCP on Windows?
You can run SCP on Windows using PuTTY’s PSCP command-line utility, which comes pre-installed with the SSH client. To use the command utility, open the Windows PowerShell command line interface. It has a similar syntax to SCP but starts with pscp -scp.
Can I Pass Password in SCP Command?
Yes. You can pass a password with SCP in Linux using the sshpass command utility with the -p option or pscp with the -pw option for Windows. Add your SSH password after both options. The rest of the syntax stays the same as a regular SCP command.
How Do I Stop or Pause SCP?
Pause a process by passing the terminal stop signal (SIGTSTP) using the Ctrl+Z shortcut. To resume the process, send the SIGCONT signal by typing fg. If SIGCONT doesn’t work, use the rsync utility to check whether content disparities exist between the systems and copy only the files missing in the target directory

Aris is a Content Writer specializing in Linux and WordPress development. He has a passion for networking, front-end web development, and server administration. By combining his IT and writing experience, Aris creates content that helps people easily understand complex technical topics to start their online journey. Follow him on LinkedIn.