How to Use Linux Time Command: All You Need to Know
Whether you’re a system administrator or a virtual server hosting (VPS) user, learning various Linux commands will help you execute tasks more efficiently.
In this tutorial, you will learn about the Linux time command – what it is, its purpose, and how to use it.

What Is Linux Time Command?
The Linux time command measures how long a specific command takes to run. It is commonly used by developers, system administrators, and anyone who wants to evaluate a process or script’s performance.
You can start the command with ‘time’, like: time
In addition, the time command can also display the process’s system resource usage, making it a helpful tool for reviewing the efficiency of a specific command.
For example, you want to choose between two cron jobs that can run the same task. You can determine how long each cron job will take to complete the tasks by running the time command.
However, before we begin talking about how to use the Linux time command, keep in mind that it differs depending on the shell you use. There are three different versions of the time command in the Linux system:
- Bash – already built into the shell and can be run by typing time.
- Zsh – like Bash, it’s also already built into the system, run by typing time.
- GNU Default Linux (GNU) – available by typing the explicit path to the command, usr/bin/time.
To check which Linux time command version applies to your system, enter the following in your shell program:
$ type time
- If you get the output time is a shell keyword, you’re using the Bash time command.
- If you get the output time is a reserved word, you’re using the Zsh time command.
- If you get the output time is usr/bin/time, you’re using the GNU time command.
Alternatively, you can simplify the GNU time command in Linux by creating an alias command for usr/bin/time.
Suggested Reading
Check out our guide on bash scripting.
Using the Time Command in Linux
In this section, you will learn the syntax of the Linux time command and how to read its output.
Getting to Know the Syntax of the Linux Time Command
Using the time command is very simple – all you have to do is open your shell program and enter:
$ time
To take full advantage of the time command, you have to understand its syntax:
$ time[arg1] [arg2] ... [argN] time [options][arg1] [arg2] ... [argN]
Time runs the given command with any given arguments (arg). Once the command finishes its task, time outputs information which includes the duration it took to run the command and the resources used by it.
If the program command exits with a non-zero status indicating failure, time will output a warning message and the exit status.
By entering the string format used by the command, you can determine which information to display in the system resource usage section.
If the user doesn’t specify any format, but the time environment variable is set, its value will be used as the format. Otherwise, the default format built into time will be used.
Options are resource specifiers that change the output of time. They must appear before the command. Anything entered after the command will be regarded as an argument.
To view all the options you can use for time, enter the following into the command line:
$ man time
You will see a list of options you can use to modify the Linux time command output. However, keep in mind that these options may vary depending on the specific operating system and the version you are using.
Let’s begin with a simple first example. To find out how long it takes to run the command ls used to display the content of a chosen directory enter the following into the shell:
$ time ls

You will see the output of the ls command and the time it took to complete it.
Now, let’s try to incorporate an argument. In this example, we’ll try to find out how long it will take to move a file to a different directory:
$ time mv example.txt example-dir
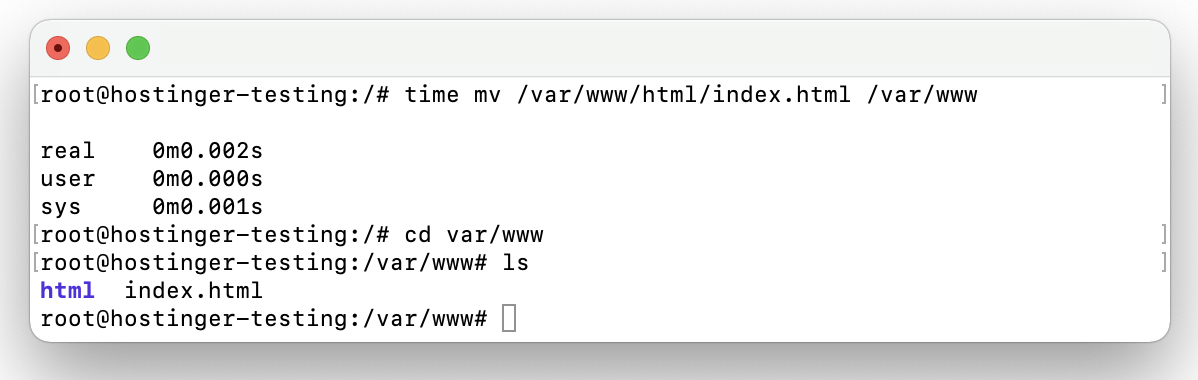
As a result, the example.txt file has been moved to example-dir, and you will see the time taken to complete the process.
Understanding the Output
To fully understand the benefits of the Linux time command, you have to know how to read its output.
Reading the Output in Terminal
The default output of the built-in time command contains the following information:
- Real-time (real). The real-life time it takes for the process to run from start to finish. This includes any time taken by other processes and the time spent waiting for them to be complete.
- User time (user). The amount of CPU time spent in user mode during the process. Other processes and blocked time are not included.
- System time (sys). The total CPU time spent in kernel mode during the process. Similar to user time, other processes and time spent blocked by other processes are not counted.
Here’s an example. If we enter the command below into the command line, the system will download the installer for the open-source virtual machine program VirtualBox:
$ time wget https://download.virtualbox.org/virtualbox/6.1.28/virtualbox-6.1_6.1.28-147628~Ubuntu~eoan_amd64.deb
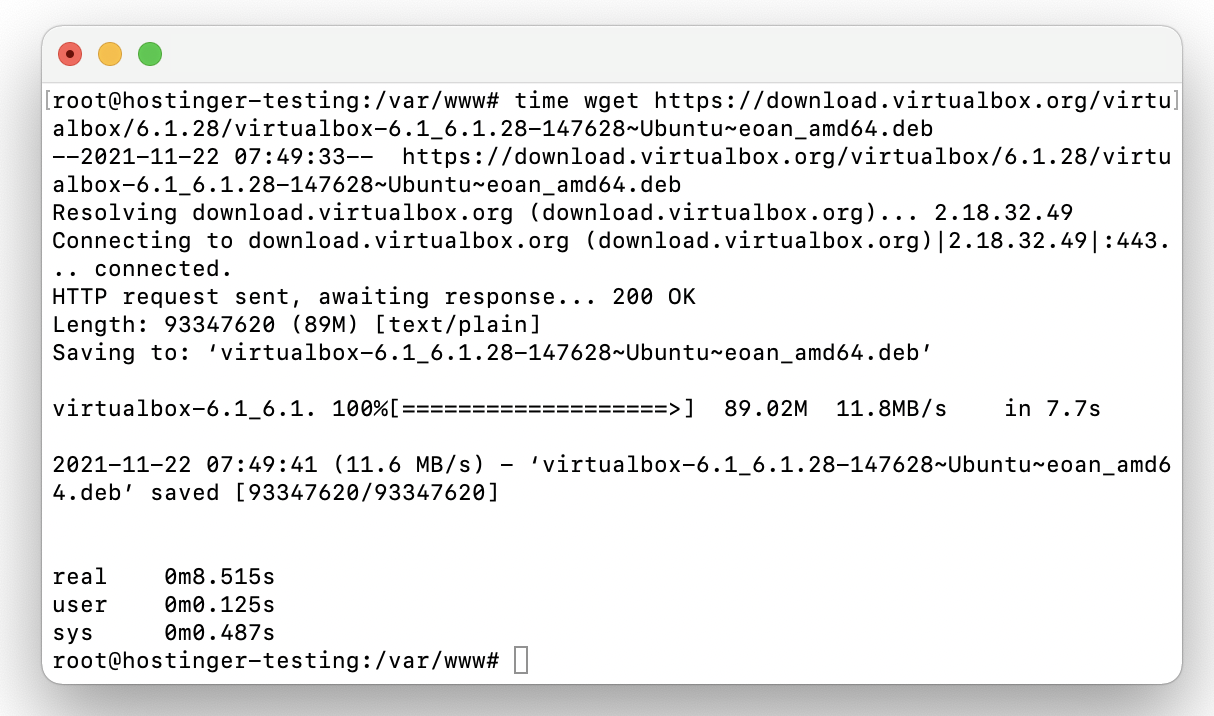
After the download is complete, you will see three figures – real, user, and sys. As you can see, they show time elapsed in real, user, and system modes during the download in minutes and seconds.
Writing the Output to a File
At times, you might want to save the information you received using time. Fortunately, there is a format option that lets you write the command output to a file.
If you use the GNU time command, the -o option will let you do just that – it will create a new output file containing information on the other command.
For example, enter the following command to save the ping information of hostinger.com and details about its process into a new file:
$ time -o hostinger-ping-info.log ping hostinger.com
Note that if you use the Bash shell and want to use -o or any other option, you’ll have to summon the external time command by using the explicit path usr/bin/time instead of just time.
$ usr/bin/time -o hostinger-ping-info.log ping hostinger.com
To check the content of hostinger-ping-info.log, use the Linux cat command:
$ cat hostinger-ping-info.log
Getting Detailed Output in a File
The default time command output might not include all the details you want to know about a particular process. To display detailed output, add the -v option to the time command in Linux.
For example, if you want to run the Linux ping command to find the response time of hostinger.com and view detailed information about the process, enter the following:
$ time -v ping hostinger.com
If you don’t use the GNU time command or have encountered a standard error stream, try triggering the external time command by entering the full path usr/bin/time instead:
$ usr/bin/time -v ping hostinger.com
Alternatively, users can customize the types of information they’d like to see in the output when entering the time command by using these output format options:
| % | A literal `%’. |
| C | Name and command line arguments of the command being timed. |
| D | The d average size of the process’s unshared data area, in kilobytes. |
| E | The elapsed real (wall clock) time used by the process, in (hours:)minutes:seconds. |
| F | The number of major, or I/O-requiring, page faults that occurred while the process was running. These are faults where the page has migrated out of primary memory. |
| I | The i number of file system inputs by the process. |
| K | The average total memory usage of the process in kilobytes. |
| M | The maximum resident set size of the process during its lifetime, in kilobytes. |
| O | The number of file system outputs by the process. |
| P | Percentage of the CPU that this job got. This is just the user and system times divided by the total running time. It also prints a percentage sign. |
| R | The number of minor or recoverable page faults. These are pages that are not valid but which have not yet been claimed by other virtual pages. Thus the data on the page is still correct, but the system tables must be updated. |
| S | The total number of CPU seconds used by the system on behalf of the process (in kernel mode) in seconds. |
| U | Total number of CPU-seconds that the process used directly (in user mode) in seconds. |
| W | The number of times the process was swapped out of the main memory. |
| X | The average amount of shared text in the process in kilobytes. |
| Z | The z system’s page size, in bytes. As a per-system constant, it may vary between systems. |
| c | The number of times the process was context-switched involuntarily (because the time slice expired). |
| e | Elapsed real (wall clock) time used by the process, in seconds. |
| k | The number of signals delivered to the process. |
| p | Average unshared stack size of the process, in kilobytes. |
| r | The number of socket messages received by the process. |
| s | The number of socket messages sent by the process. |
| t | Average resident set size of the process, in kilobytes. |
| w | Number of times that the program was context-switched voluntarily, for instance, while waiting for an I/O operation to complete. |
| x | The exit status of the command. |
For example, if you want to display the number of socket messages received by the command, enter the following into the shell:
$ /usr/bin/time -f "Socket Messages Received: %r" command
Alternatively, if you use the Bash shell, you might prefer the built-in time command’s TIMEFORMAT. TIMEFORMAT uses a particular format string to let users specify how the timing information should be displayed.
Here’s a list of the TIMEFORMAT parameter values:
| %% | A literal %. |
| %[p][l]R | The elapsed time in seconds. |
| %[p][l]U | The number of CPU seconds the process spent in user mode. |
| %[p][l]S | The number of CPU seconds the process spent in system mode. |
| %P | The CPU percentage, computed as (%U + %S) / %R. |
Conclusion
The time command in Linux is an excellent tool for checking the execution time and overall performance of a particular process. In this guide, you have learned the Linux time command, its purpose, syntax, and output.
We hope that this guide has helped you learn how to navigate the Linux system more efficiently.
Discover Other Linux Commands for Server Management
How to Check Disk Space on Linux
How to Transfer Data With Curl Command
How to Transfer Files Using Scp Command
How to Monitor Changes With Watch Command
How to Shutdown and Restart the Server
How to Transfer and Synchronize Data With Rsync
How to Manage and List Services in Linux
How to Use the tar Command: Useful Examples for Archiving and Compressing Files in Linux

Edward is a content editor with years of experience in IT writing, marketing, and Linux system administration. His goal is to encourage readers to establish an impactful online presence. He also really loves dogs, guitars, and everything related to space.

Hasna is passionate about tech, culture, and the written word. She hopes to create content that helps people succeed on the web. When not writing, rearranging, or polishing sentences, she enjoys live music and overanalyzing movies.