How to Use Unzip Command in Linux
To unzip, Linux users can apply a command utility similar to other compression formats, such as tar and gzip. Understanding how to use the unzip command helps improve efficiency with various tasks, including software distribution or data archiving.
Unlike the two utilities, unzip is not installed by default. It also has different options to change the extraction behavior and is suitable for a particular development scenario.
Continue reading as we explain how to install and use unzip to extract zip files in a Linux virtual private server (VPS). We will also discuss how it differs from other unpacking commands and its best practices.

How to Install Unzip
In this section, we will go over the steps to install unzip in popular Linux distributions like Debian and CentOS. To run the commands remotely, connect to your VPS using an SSH client like PuTTY.
Debian Derivatives
For Debian-based operating systems like Ubuntu, use the APT package manager to install unzip in Linux. Before doing so, update and upgrade the repository with the following command:
sudo apt update && sudo apt upgrade
Then, install unzip using this:
sudo apt install unzip
If you use an older operating system, apply the following command instead:
sudo apt-get install unzip
Red Hat Linux Enterprise (RHEL) Derivatives
Commands for RHEL-based operating systems like CentOS, AlmaLinux, and Rocky Linux differ depending on their version. The older releases use the yum package manager, while the newer ones utilize dnf.
Read their documentation or use websites like DistroWatch to check your operating system’s package manager. That said, the commands are similar:
sudo yum update && sudo yum upgrade
sudo dnf update && sudo dnf upgrade
Likewise, the unzip utility installation commands are as follows:
sudo yum install unzip
sudo dnf install unzip
After the process is finished, check whether unzip is successfully installed using the following command. It is the same for every distribution:
unzip -v
If the utility is configured correctly, your command-line interface should show the version number.

How to Zip and Unzip Files in Linux
After the unzip utility is installed, you can start extracting files on the Linux system. In this section, we will explain how to use the tool for several common use cases.
Important! The size limit setting in the file system might trigger an error when you unzip a file in Linux. If you encounter the issue, increase the threshold accordingly.
How to Unzip a File
To unzip a file in Linux, use the command with the item name you want to unpack. Remember that the archive must also be in your current directory. Here is an example:
unzip archive_file.zip
It will extract the ZIP archive content into the current working directory if you have read-write permissions.

You can also unzip zip files in a different directory by specifying the path like the following command:
unzip path/to/the/archive_file.zip

How to Unzip Multiple Files
To simultaneously extract multiple zip files in the same folder, use a wildcard like the following:
unzip \*.zip
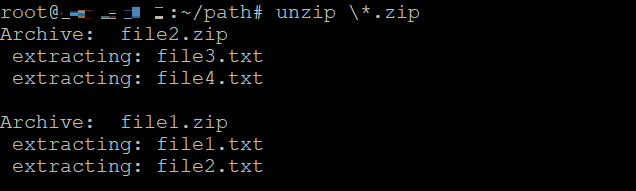
The asterisk (*) symbol represents any character. For instance, run the following to unzip archive files with similar names, like file-1.zip, file-2.zip, and so on:
unzip file-\*.zip
When extracting multiple ZIP files using a wildcard, ensure to use the backslash escape character (\) to prevent Terminal from unpacking an archive from another.
How to Extract Files to a Specific Directory
Instead of using the cd command, use the -d option to unzip to a folder in another location. For example:
unzip archive_file.zip -d /target/folder/destination

The destination can be absolute or relative to the present working directory. For instance, if you are in the /target directory, enter the following to extract the archive file to the same destination:
unzip archive_file.zip -d /directory/destination
This command also lets you unzip a file from one location to a different directory path without moving to either. The command looks like the following:
unzip /origin/path/archive_file.zip -d /target/folder/destination
How to Do Partial Extraction For Specific Files or Folders
A ZIP file usually comprises several files or folders. In Linux, you can choose to extract a specific item by specifying their names after the ZIP archive like:
unzip file_archive.zip file1.txt

To unpack multiple files, simply list their names after the command. You can also extract a specific folder:
unzip file_archive.zip folder_name
However, if you want to unpack a particular folder or file inside a directory, specify the full path. For example, to extract /path inside the /directory folder, enter:
unzip file_archive.zip /directory/path
You can also exclude specific files from the extraction using the -x option. For instance, we will keep file_1.txt and file_2.txt archived using this command:
unzip file_archive.zip -x file_1.txt file_2.txt

Server administrators usually exclude files if the archive has a lot of content. They also do so to partially update a specific item, making the process more efficient since they don’t have to work with much data.
How to Unzip a Password-Protected Zip File
If you unzip password-protected ZIP files without entering the identification key, Terminal will ask for the credential.

You can type the password manually and hit Enter. However, the Linux unzip command lets you enter the credentials directly using the -p option:
unzip -p password file_archive.zip
It makes the extraction process more efficient. However, we advise you to avoid this method when multiple users work on the same system since it will expose sensitive credentials in the command logs.
The -p option is useful if you use the unzip command in automation scripts. It lets you extract a password-protected ZIP file by passing the credentials automatically instead of entering them through the command line.
How to Use Unzip in Automation Scripts
Server administrators commonly export products from processes like backup or event logging as ZIP archives to save storage space. They must unpack these files to extract the data for other purposes.
For example, extracting a ZIP log lets you read the event history or pass it to another command to filter the data. Instead of running unzip for each archive, use an automation script to run the same command on a single execution.
To create one, use a text editor like Nano. Enter the name with .sh as the file extension like the following example:
sudo nano unzip_log.sh
Enter the command inside the file. For example, the following script will unzip a new log file in a folder and automatically remove the older ones once they exceed a specific number:
#!/bin/bash
#Log archive files location
log_archive="/path/to/logs/log_archive.zip"

#Destination for extracted files
log_destination="/path/to/extracted/logs/"

#Maximum number of log files to keep
max_logs=5

#Use the unzip command to extract files
unzip "$log_archive" -d "$log_destination"

#Log rotation
cd "$log_destination" || exit

# List and sort log files
log_files=($(ls -1t *.log))

# Check if log rotation is needed
if [ ${#log_files[@]} -gt $max_logs ]; then

# Delete files and keep the recent ones
excess_logs=$(( ${#log_files[@]} - max_logs ))
for ((i = 0; i < excess_logs; i++)); do
rm "${log_files[$i]}"
done
fi
Press Ctrl + X, Y, and Enter to save the changes. Run these commands subsequently to make the script executable and run it:
sudo chmod +x unzip_log.sh
./unzip_log.sh
Currently, the command extracts the log only when you run it. To execute it regularly, set a schedule using a cronjob. For instance, the following will apply the script daily at 2 AM:
0 2 * * * /path/to/unzip_log.sh
How to Combine Unzip With Other Linux Commands
Linux lets you combine several utilities to complete a specific task in a single execution. It makes server administration more efficient since you don’t need to run the commands individually.
For example, combine the unzip command with find to locate multiple archives and extract them simultaneously. Here is an example:
find /path/to/zips -type f -name "*.zip" -exec unzip {} -d /path/to/destination/ \;
In the snippet, the find command locates ZIP files in the /path/to/zips directory. Then, it passes the retrieved items into the unzip command, which the curly brackets represent.

You can also add the grep command to unzip files containing a particular pattern. Consider the following example:
unzip archive.zip $(unzip -l archive.zip | grep "pattern" | awk '{print $4}')
In the command, we specify the items to extract from archive.zip within the parentheses. The -l option lists all the ZIP file’s content, which grep will filter based on the given pattern.
Then, the pipe (|) passes the items containing the pattern to the awk command, extracting the fourth column containing the file name.
You can incorporate unzip with various other utilities specific to your tasks. Read our Linux commands article and check their documentation on GNU’s website to learn more about the potential combination.
Comparing the Unzip Command With Alternative Methods
In Linux, there are several other archive and compression formats, like tar and tar.gz. The tar command lets you create an archive without reducing the file size, while gzip enables compression.
Unlike the zip command, these two utilities don’t support password protection by default and might be incompatible with non-UNIX operating systems like Windows.
That said, these compressions are more common in Linux systems since they are pre-installed, and most installation packages come in a tar.gz or tar file. In addition, these utilities offer more modularity and flexibility.
To unzip tar.gz or tar file, use the following commands:
tar -x archive.tar
gunzip archive.tar.gz
For desktop Linux distributions, you can also use a ZIP file viewer and extractor with a graphical user interface like PeaZip. It is simpler than the command-line interface but might be inefficient since you can’t combine utilities or use script automation.
Best Practices for Managing Zip Files in Linux
In this section, we will explain how to manage ZIP files securely and efficiently in a Linux system.
Check Archive Files Integrity
Cyber criminals often inject a ZIP archive with malicious code or malware. Since a ZIP file comprises multiple items, users usually can’t notice oddities even after unpacking compressed files.
To avoid the security risk, list the contents of a ZIP file before unzipping using the -l option:
unzip -l downloaded_file.zip
In addition, ensure the file’s checksum matches the download source’s to ensure its integrity. To do so, run:
md5sum downloaded_file.zip

Also, use the -t option to check the archive’s structural consistency:
unzip -t downloaded_file.zip
Preserve Existing Files and Permissions
Extracting can overwrite existing files with the same name in the destination, resulting in a data loss. Use the -n option to force unzip to skip already present items:
unzip -n archive.zip
You don’t need to confirm the ZIP file extraction if the same item already exists in the target folder since unzip will skip them automatically.
Aside from overwriting, files’ or folders’ permissions might differ from the ones in the original ZIP file after extraction.
While you can change the file permissions manually using chmod, it is inefficient if you extract many files from a ZIP archive. To preserve these properties, use the -o option:
unzip -o archive.zip
Leverage Kodee
For VPS beginners, using the command-line interface to unzip files in Linux might be difficult due to the lack of graphical UI. Moreover, writing automation scripts or specific commands for particular tasks is complicated.
With Hostinger’s VPS hosting, you can use our AI assistant, Kodee, to easily generate unzip commands and bash scripts using simple prompts. They can then copy-paste the output to save time and effort.
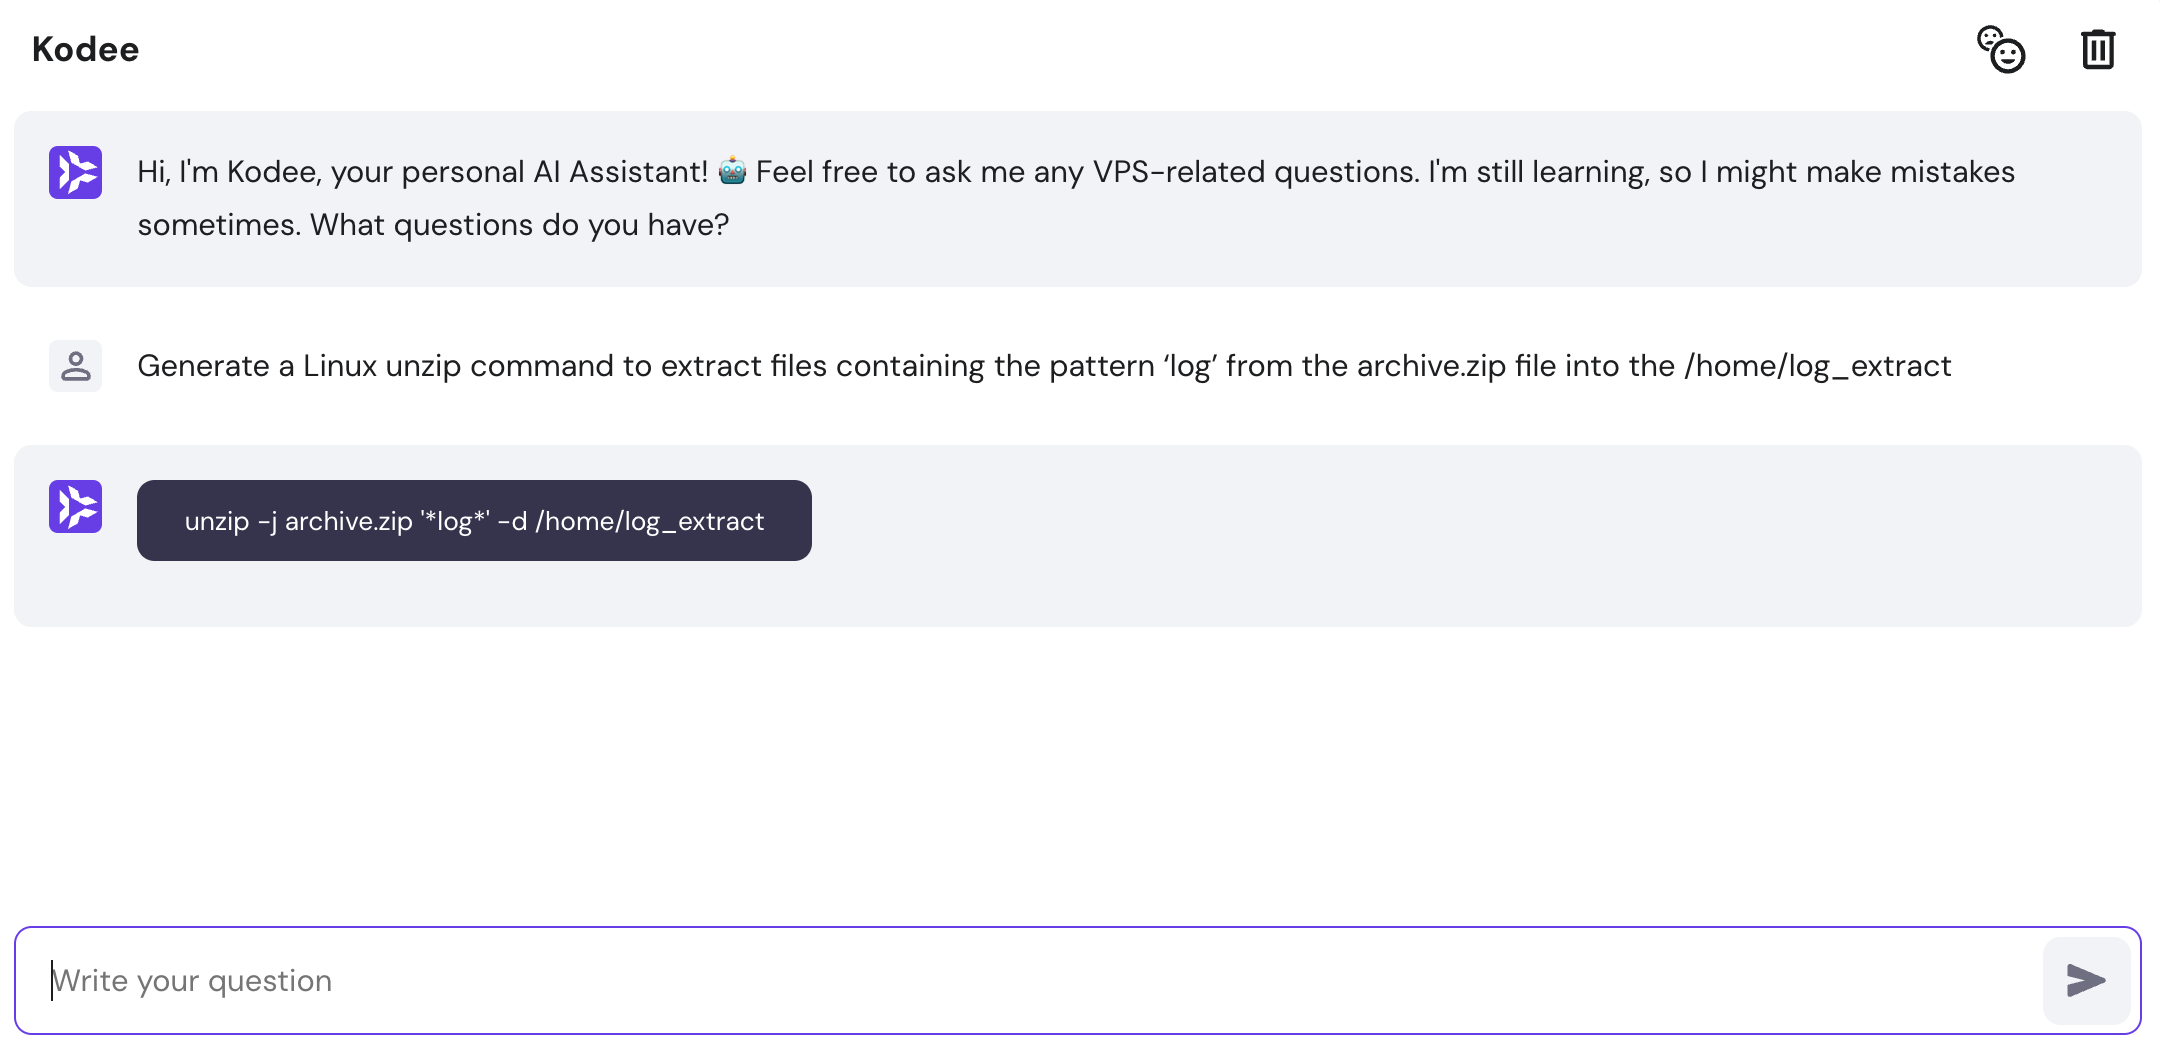
For example, enter “Generate a Linux unzip command to extract files containing the pattern ‘log’ from the archive.zip file into the /home/log_extract” or “Write a bash script that automatically unzips an archived log without overwriting existing files.”
To access the tool, click VPS from hPanel’s top menu and select Manage on your plan. Navigate to the sidebar → Kodee.

Conclusion
Like tar and gunzip, the unzip command lets you extract an archive file in Linux. However, you must install it manually via a package manager like APT for Debian or DNF for RHEL derivatives such as CentOS.
To unzip files, write their names after the command. By default, it will extract the content in your current folder, but you can specify a different directory using the -d option. Moreover, unpack specific items by listing their names after the archive.
You can use the unzip command for a specific task by integrating it into a bash script or combining it with other utilities. Before extracting, use the -n option to ensure you don’t overwrite existing files and check the contents of a ZIP archive using -l to minimize security risks.
With Hostinger, you can simply enter prompts, and Kodee, our AI assistant, will generate unzip commands or scripts for your specific tasks. Just enter the prompts and copy-paste the output into your Terminal.
Learn More Linux Commands for File Management
How to Remove Files and Directories
How to Create an Empty File
How to Locate a File
How to Compress a File with Tar Command
How to Change File Ownership with Chown Command
How to Change FIle Permissions with Chmod Command
How to Rename a File
How to Check File Type
How to Create a Symbolic Link (Symlink)

Aris is a Content Writer specializing in Linux and WordPress development. He has a passion for networking, front-end web development, and server administration. By combining his IT and writing experience, Aris creates content that helps people easily understand complex technical topics to start their online journey. Follow him on LinkedIn.