How to Change a WordPress Theme ‒ A Step-by-Step Guide + How It Can Help
As visitors judge a brand’s credibility based on its company’s website design, it’s important to create a visually appealing site from the get-go. Fortunately, changing the appearance of a WordPress site only requires installing a theme ‒ a collection of files responsible for a website’s look and feel.
There are plenty of free and premium WordPress themes available in the official theme directory and various marketplaces. Those with a tight budget can opt for a free WordPress theme, while performance-oriented users may want to look for a theme built with speed in mind.
This article will show you how to change theme in WordPress, along with the prerequisites for the process. We will also explore different issues that switching themes can solve.
Video Tutorial on Choosing a WordPress Theme
Not sure how to choose a premium WordPress theme for your website? We’ve got you covered – watch our video tutorial below!

Before Changing Your Theme
Before changing a theme in WordPress, make sure to save the following data from the old theme:
- Code snippets ‒ save all the code you’ve added to the theme files, such as the functions.php file. Alternatively, install a code snippet plugin to keep track of the existing code in a few clicks.
- Google Analytics tracking code ‒ this practice is particularly important if you’ve added analytics code to the current theme. Otherwise, you won’t be able to track your site’s performance after changing WordPress themes.
- Sidebar and widget content ‒ each theme has different sidebar and widget areas, so changing WordPress themes can mess up their visibility or positioning. This step includes making notes of any custom code previously added to these areas.
- Website backup file ‒ backing up your WordPress site is not necessary if you’re working in a staging environment.
Pro Tip
We recommend testing the new theme in a staging environment before installing it on a live site. Besides providing space for trial and error, a WordPress staging site lets you discover and solve critical errors without risking the live site’s functionality.
Additionally, check your website’s current load speed and performance to ensure the new theme performs better than the previous one.
How to Change a WordPress Theme
1. Enable the maintenance mode
2. Navigate to Appearance > Themes and install a theme you like
3. Preview the theme you installed and click on Activate
4. Customize the new theme, re-add code snippets, fix any errors
Once you’ve taken care of the prerequisites, follow this step-by-step guide to change your WordPress theme.
Step 1. Enable Maintenance Mode
Putting WordPress in maintenance mode tells site visitors that the website is unavailable due to ongoing maintenance. This status helps preserve your brand’s credibility during the transition, especially if the changes make a couple of the features non-functional.
The easiest way to do it is by using a plugin like WP Maintenance Mode. Alternatively, create a maintenance mode page with a landing page builder plugin or enable maintenance mode from your web host control panel. These methods do not require coding.
Pro Tip
If you choose to change themes using a staging site, feel free to skip this step.
Step 2. Install the New WordPress Theme
This tutorial applies to installing free themes available on the WordPress theme directory. To install a premium theme, you’ll need to upload the theme files manually.
- Navigate to Appearance → Themes from your WordPress dashboard. Click on the Add New button at the top of the page.

- Find your desired theme using the WordPress theme search option.

- Another way to narrow down your options is by using the Feature Filter function. Press Apply Filters after specifying the criteria.

- Hover over the chosen theme and select Install.

Step 3. Preview and Activate Your Theme
After the installation process is complete, you’ll see Live Preview and Activate buttons when you hover over the theme.
Clicking Live Preview will open the theme in the WordPress theme customizer or the Gutenberg editor if it’s a block theme, allowing you to preview how the website will look with it. To use the theme right away, select the Activate button.

Pro Tip
Switch between your installed themes by navigating to Appearance -> Themes from your WordPress admin panel.
Step 4. Fix Errors and Re-Add the Custom Code Snippets
Since the new theme will be free of modifications, you’ll need to restore all the data, custom code, and settings from the previous theme. The following checklist will ensure you do all the necessary setup before pushing the changes site live.
- Code ‒ add code snippets, theme-specific shortcodes, tracking code, and sidebar content. The layout of the sidebars might also change, so check and re-adjust the positioning of widgets accordingly.
- Pages ‒ check and re-adjust the layout and formatting of the widget areas across the WordPress site.
- Favicon ‒ make sure the favicon is working properly. Otherwise, re-add it via the WordPress customizer.
- Schema markup ‒ if you used a plugin to add and manage the data, the theme transition shouldn’t affect the schema markup. Otherwise, you’ll need to re-configure the new theme manually.
- Plugins ‒ since some themes come with pre-installed plugins and theme-specific features, you’ll want to ensure they don’t clash with your existing plugins.
- Website content ‒ changing WordPress themes shouldn’t affect the site’s existing content, but you should still make sure everything is in its place.
- Cache ‒ open your WordPress website in several browsers and clear the cache. Doing so will flush out any static files of the site before the theme change, ensuring a good user experience once it goes live.
Pro Tip
If you tested the new WordPress theme without going live, remember to copy the staging site to the main website and then push it live.
Change a WordPress Theme Manually via FTP
If you’re unable to access your WordPress admin area, you can switch themes via an FTP client.
An FTP client allows you to move files between your computer and your website’s server. Think of it like using a file manager to organize your files – just instead of your computer, you’re managing files on your website’s server.
FileZilla is a popular, free FTP client for transferring files. It is well-regarded for its ease of use and broad operating system support.
For this reason, we’ll use FileZilla to show you how to change your WordPress theme via FTP. However, the steps should be similar to any FTP client.
Step 1. Access Your WordPress Website via FTP
To upload your new WordPress theme via FTP, you need to establish a connection between the FTP client and your web hosting account.
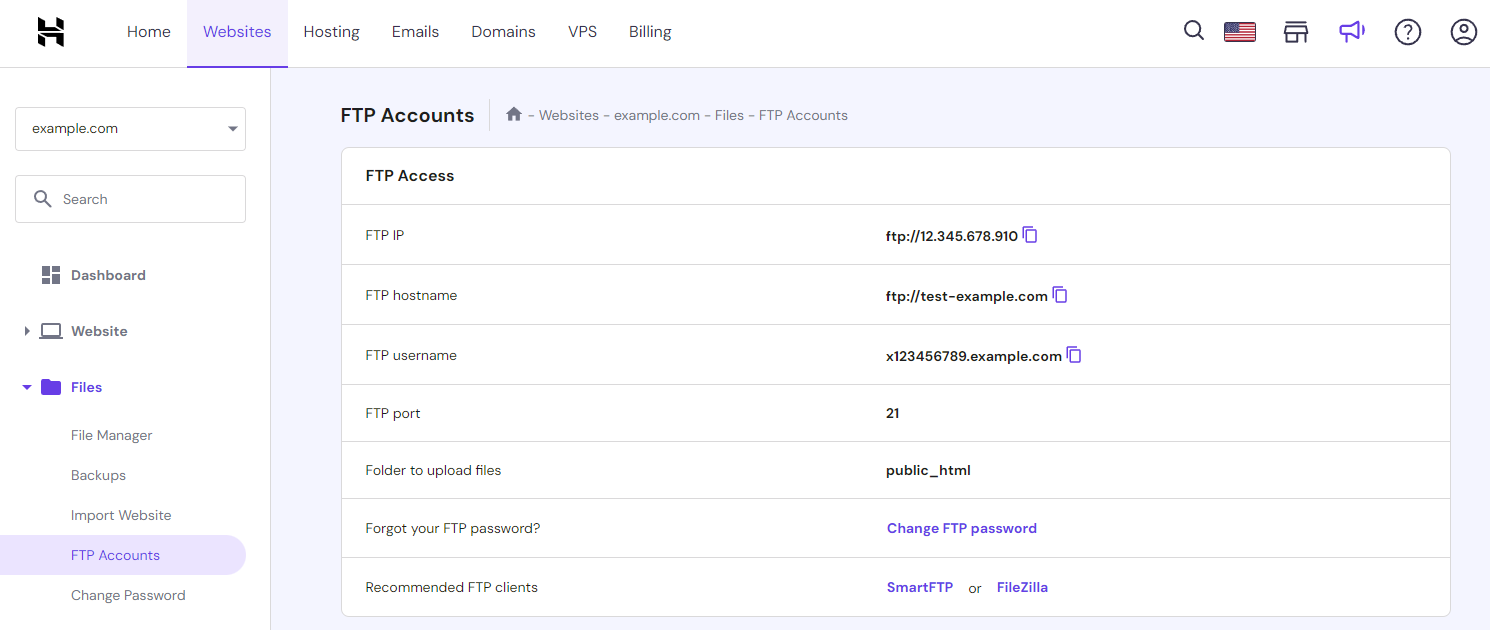
This process requires FTP credentials, which are vital for setting up the connection and ensuring FileZilla can access your website’s files. Generally, you’ll need the following details:
- FTP server – usually a URL like ftp.yourwebsite.com or it could be an IP address.
- FTP username – the username assigned by your hosting provider for FTP access.
- FTP password – the password associated with your FTP username.
On hPanel, access your FTP credentials by navigating to Websites → Dashboard → Files → FTP Accounts.
You can also obtain your FTP credentials by asking your hosting provider’s support team.
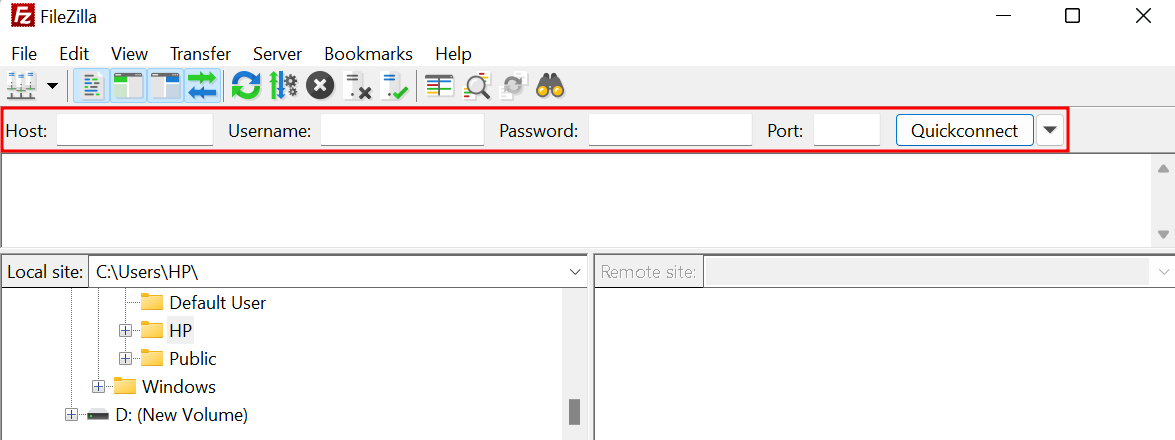
In the FTP client, look for a section to enter your connection details. Click the Quickconnect button to establish the connection.
Step 2. Navigate to the Themes Directory
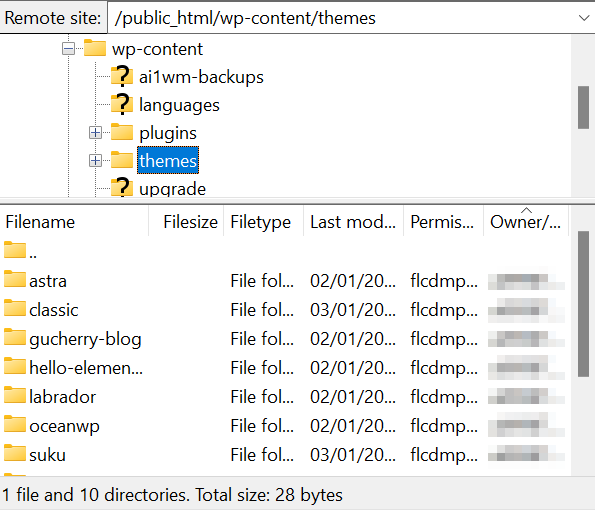
Once connected, you’ll see your local files on the left side of the window and your website’s files on the right. You can now start transferring files between your computer and your web hosting account by dragging and dropping files or using the context menu.
Now, let’s locate the directories for your WordPress site’s currently installed themes. Navigate to the Remote Site panel → /wp-content/themes/ directory.
Step 3. Download and Upload the New WordPress Theme
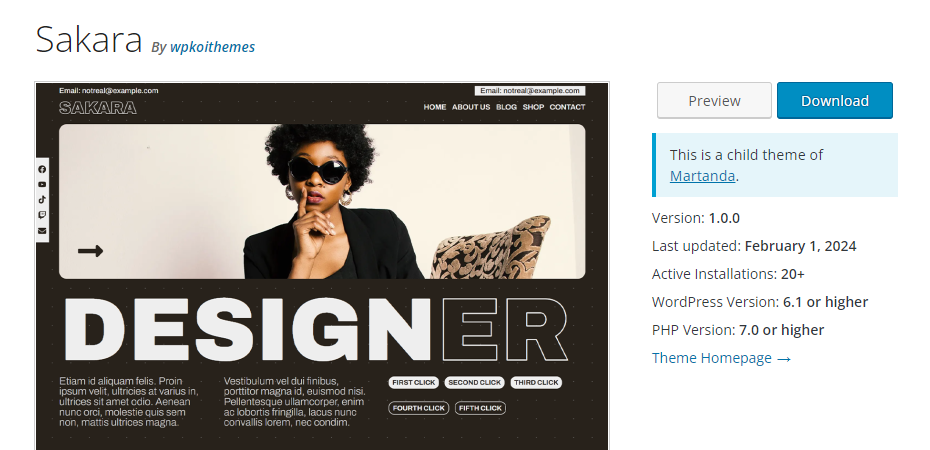
If you haven’t already, download the ZIP file of the new theme you want to use from its source. We’ll use Sakara, a child theme of Martanda, as an example.
Then, unzip this file on your computer.
It’s time to upload the unzipped theme folder to the /wp-content/themes/ directory. Here’s the step-by-step guide:
- Locate the unzipped theme folder on your hard drive in the left pane.
- Select the files you would like to upload.
- Right-click on your selection, and choose Upload.
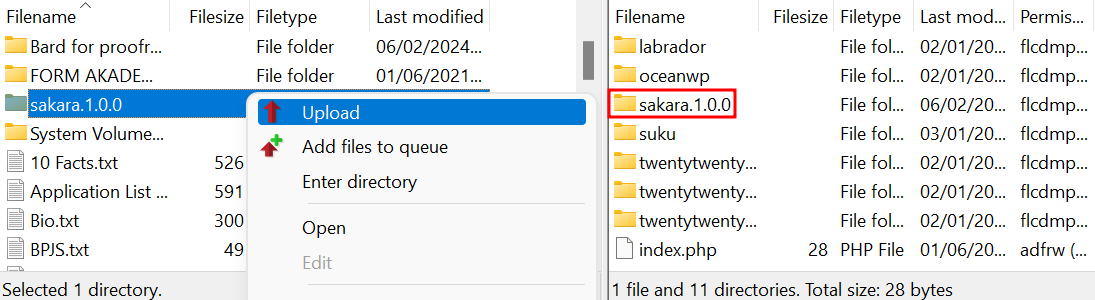
Ensure the upload completes fully to avoid any corrupted files.
Step 4. Activate the New Theme
Since you’re unable to access the WordPress admin area, you’ll need to make direct modifications to your WordPress site’s database. Be careful during this process since incorrect coding changes can lead to issues with your site.
Here’s how to activate your new theme via the phpMyAdmin database:
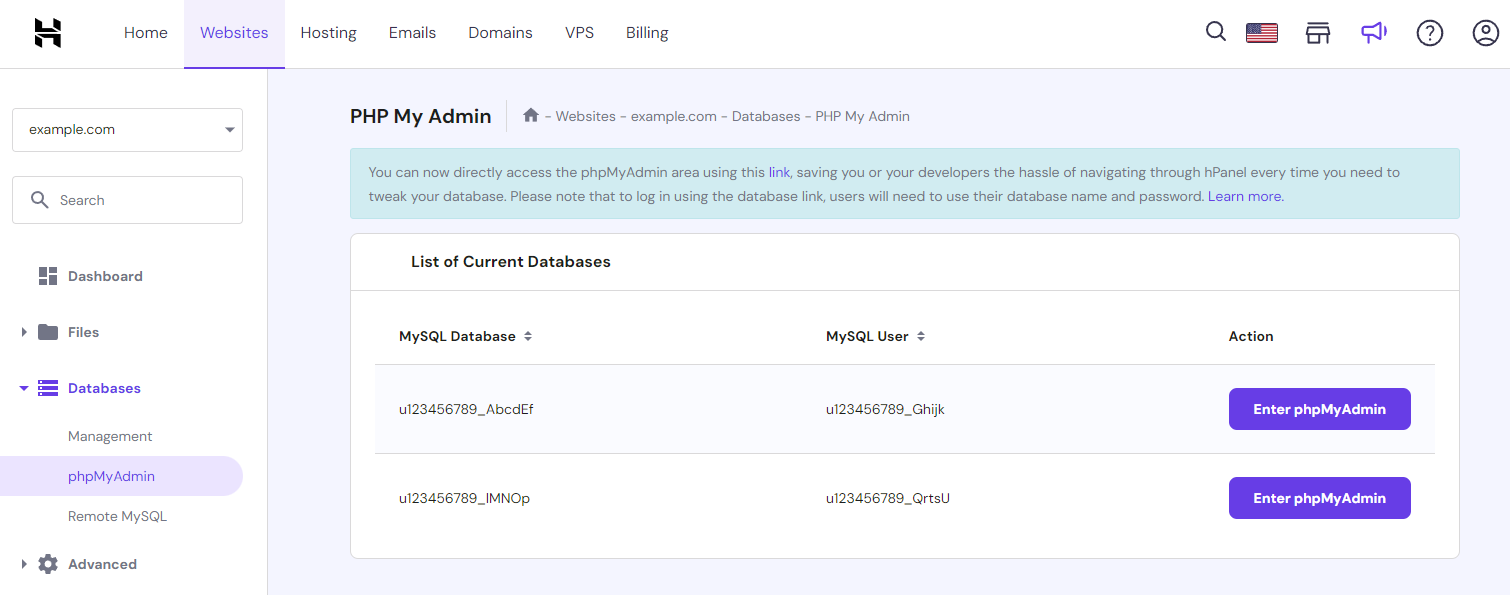
- Access your database via hPanel. Go to Websites → Dashboard → Databases → phpMyAdmin. On the panel, click Enter phpMyAdmin.
- Once you’re in, find the wp_options table.
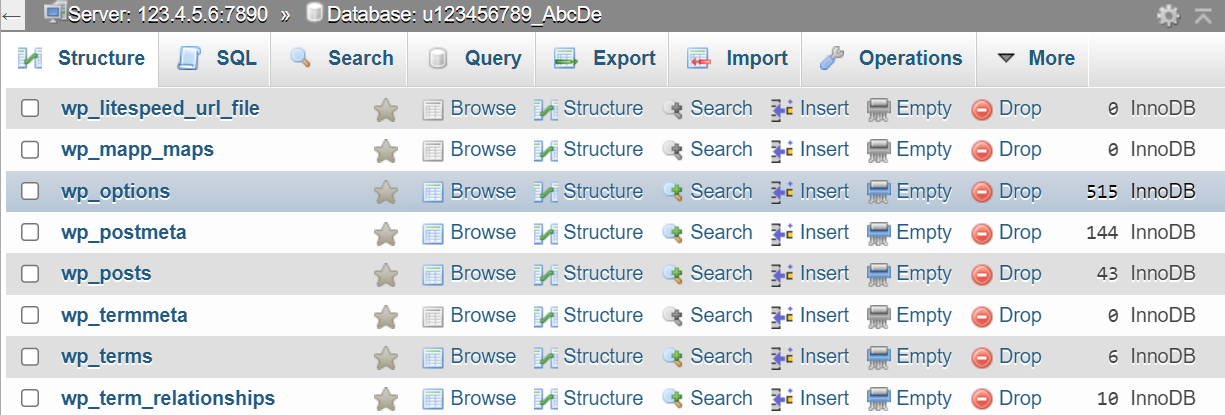
- Within wp_options, look for the template and stylesheet rows. These are responsible for defining the active theme.
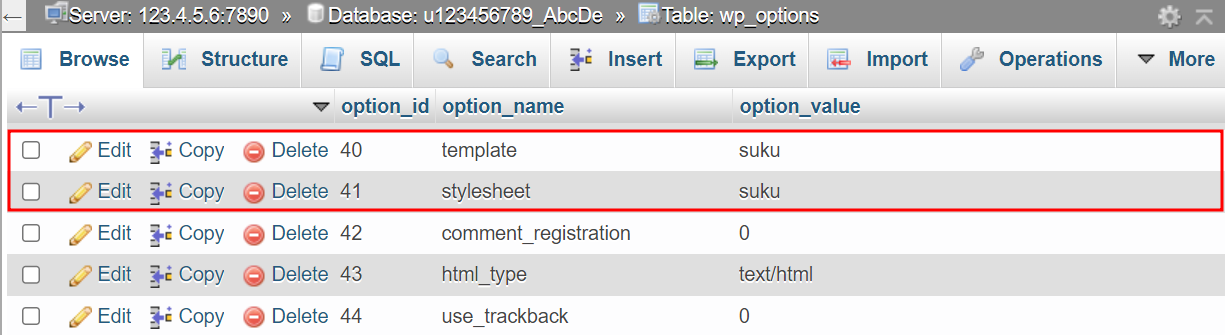
- Click Edit on the template and stylesheet rows to input the directory name of the new theme you uploaded to your FTP client.
- In the option_value field, replace the current theme name with the new theme’s directory name. The directory name should be entered exactly as it appears in /wp-content/themes/. Save your changes.

After changing the database values, clear your browser cache to ensure you’re not seeing your site’s cached version.
Check to see if the new theme is active. If the site looks as expected, the theme change was successful. Additionally, test your WordPress site thoroughly to ensure all functions are working as expected.

Why You Want to Change Your WordPress Theme
Installing new WordPress themes can give more than just a new look to your site. This method is also effective for solving the following problems:
- Outdated design ‒ more new themes with newer designs populate the marketplace today, allowing you to keep up with the latest UX trends and maintain a fresh look across the entire site.
- Theme limitations ‒ your currently installed theme may not have the functionality the site needs, calling for a new WordPress theme.
- Slow loading time ‒ installing an optimized WordPress theme can improve the site’s speed and performance.
- Security concerns ‒ switching from an outdated theme to a newer and maintained one is a great practice to secure your WordPress website. Also, avoid nulled themes as they often contain malicious code that creates vulnerabilities upon installation.
- Incompatibility with WordPress and PHP version ‒ if updating the active theme doesn’t solve compatibility issues, WordPress users are encouraged to switch to a theme that’s compatible with their current updated WordPress and PHP versions.
Conclusion
Sticking with the same WordPress theme for an extended period may be simple, but switching to a new theme will bring many benefits to your site. Besides giving your site a fresh look, a new theme can solve a number of problems and provide your site with new functionality.
For instance, changing theme in WordPress can optimize your site’s performance. Make sure to also optimize your site speed by using a high-quality WordPress hosting plan.
We hope this article has helped you understand how to change theme in WordPress properly. Good luck.

Jordana is a Senior Content Writer at Hostinger with a background in Information Systems. She has over five years of experience in WordPress and is casually dabbling with PHP and MySQL. Her passion for writing and technology drives her to create tutorials for anyone wanting to build their online presence. Follow her on LinkedIn.

Linda is a seasoned Content Writer specialized in website creation. With her passion for the written world and obsession with helping others, her goal is to deliver resourceful content pieces for all skill levels. When she’s not writing, Linda likes to cross stitch and watch films. Follow her on LinkedIn.