Moving from WordPress.com to WordPress.org: a comprehensive guide
As your site grows, moving from WordPress.com to WordPress.org will become inevitable, as the latter provides more control, customization options, and features.
If you’re looking to migrate your site to the self-hosted WordPress.org, this guide will cover all the essential steps you need to know. By the end of the article, you’ll be able to make a smooth transition without losing any content.

What do you need to get started
First things first, you need a domain name and hosting service to set up a self-hosted WordPress site.
Some web hosting providers offer both of these services in a single package. For example, if you buy one of Hostinger’s managed WordPress plans for a year or longer, you will get a free custom domain name, including the popular .com extension.
Each plan comes with everything you need to handle a larger audience, including unlimited bandwidth and a 99.9% uptime guarantee. Business and Cloud Startup users will also benefit from WordPress AI tools, which make it easy and fast to optimize your current site content and publish new blog posts.
There is no need to worry about site performance either, as Hostinger uses LiteSpeed Cache for WordPress for maximum speed. It works by storing a copy of your site content, so the server can load web pages much faster for future requests.

How to migrate a website from WordPress.com to WordPress.org using the export feature
This section will go over the migration process from WordPress.com to WordPress.org. Make sure you have access to your old WordPress.com site to initiate the move.
1. Export content from your WordPress.com site
Log in to your WordPress.com site and head to Dashboard → Tools → Export. Here, you will find two options for exporting your website files – either Export all or Select specific content to export.
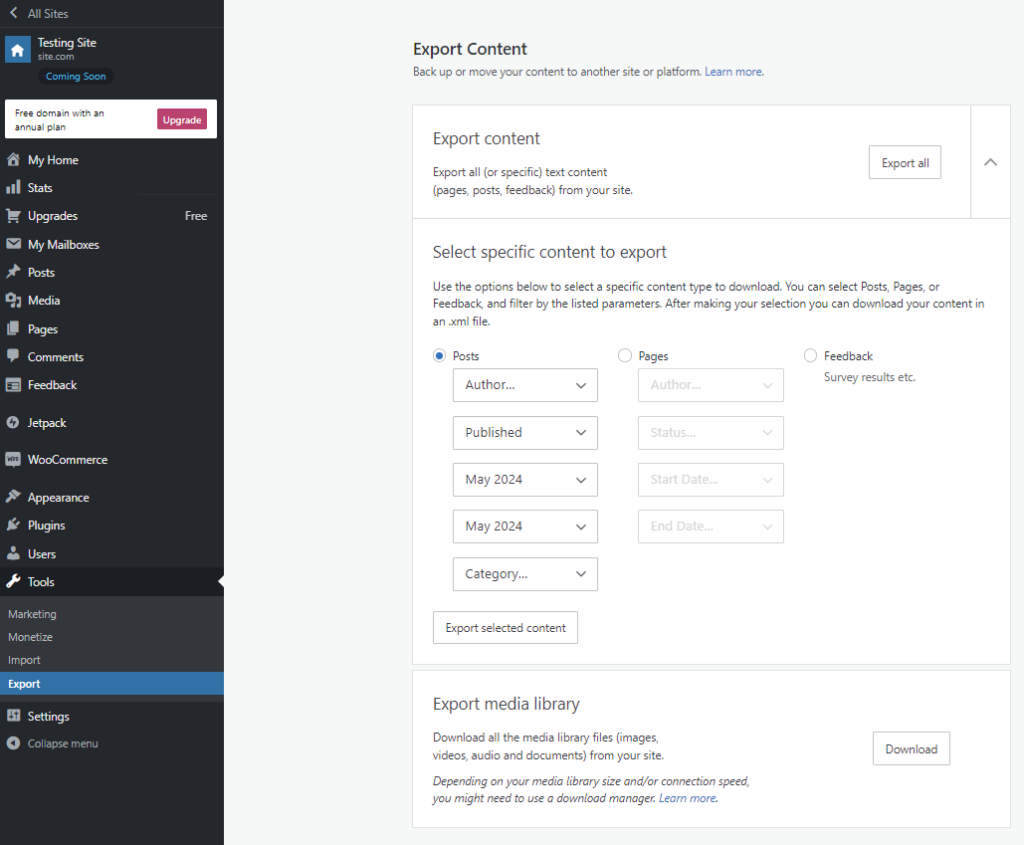
If you only need to migrate specific WordPress posts or pages, choose Export selected content. In this case, you will need to manually select the Author, Status, Category, Start Date, and End Date for posts and pages you wish to back up.
However, we suggest choosing the Export all option to avoid missing any content. Click Download to store the exported XML file on your computer – you will need it for WordPress.org installation later.
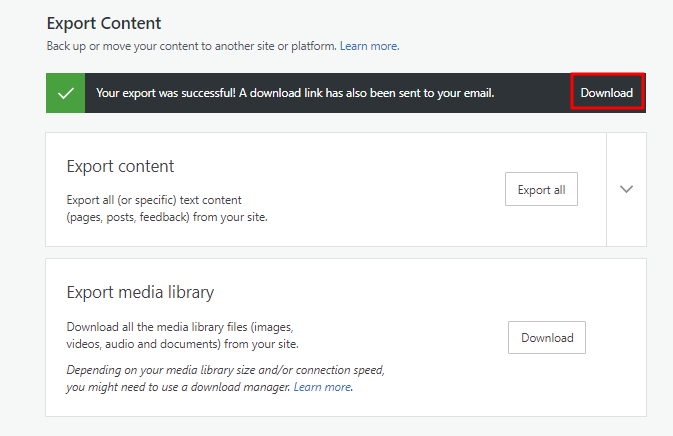
Note that the Export Content option is only for pages, posts, and feedback from the WordPress.com site.
If you want to save all of your site’s images, videos, audio, and documents, click the Download button inside the Export media library section.
2. Set up a new WordPress.org website
Once you’ve successfully exported your WordPress.com content, the next step is to create a new WordPress.org site.
WordPress installation process is different from one web hosting provider to another. If you decide to host your new site with Hostinger, follow these steps to register:
- Visit Hostinger’s Managed WordPress Hosting page and select your preferred plan.
- Choose a subscription period. We recommend the 48-month plan, as it offers the highest value for only ₹89.00/month.
- Create a new Hostinger account, pick a payment method, and fill in your contact information.
- Once done, click Submit Secure Payment to finalize your registration.
If the payment is successful, you’ll be redirected to the onboarding setup in hPanel.
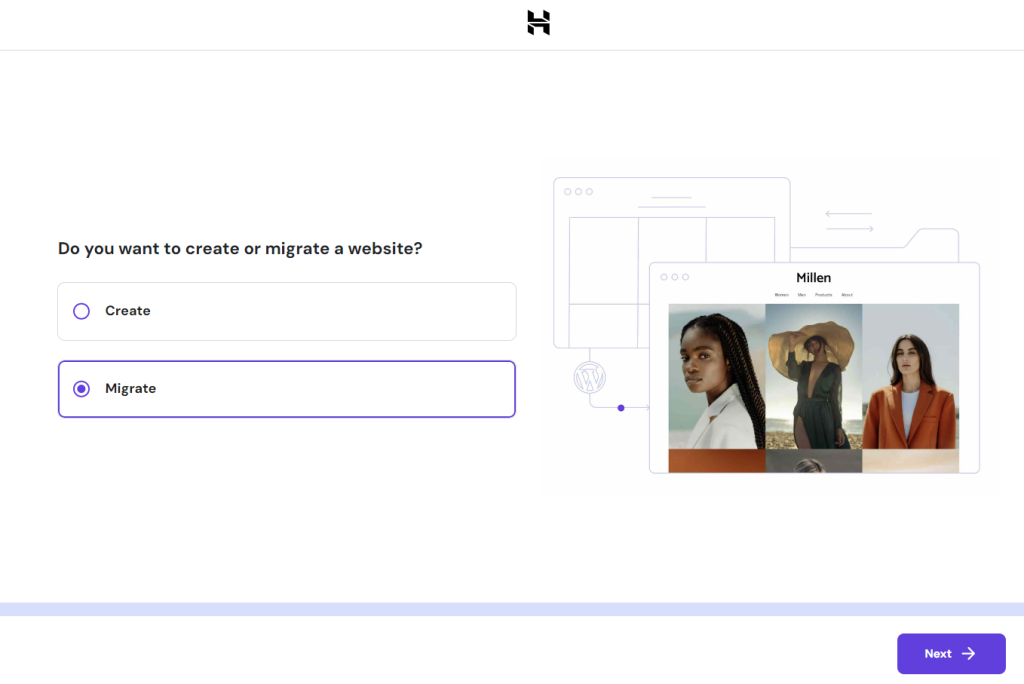
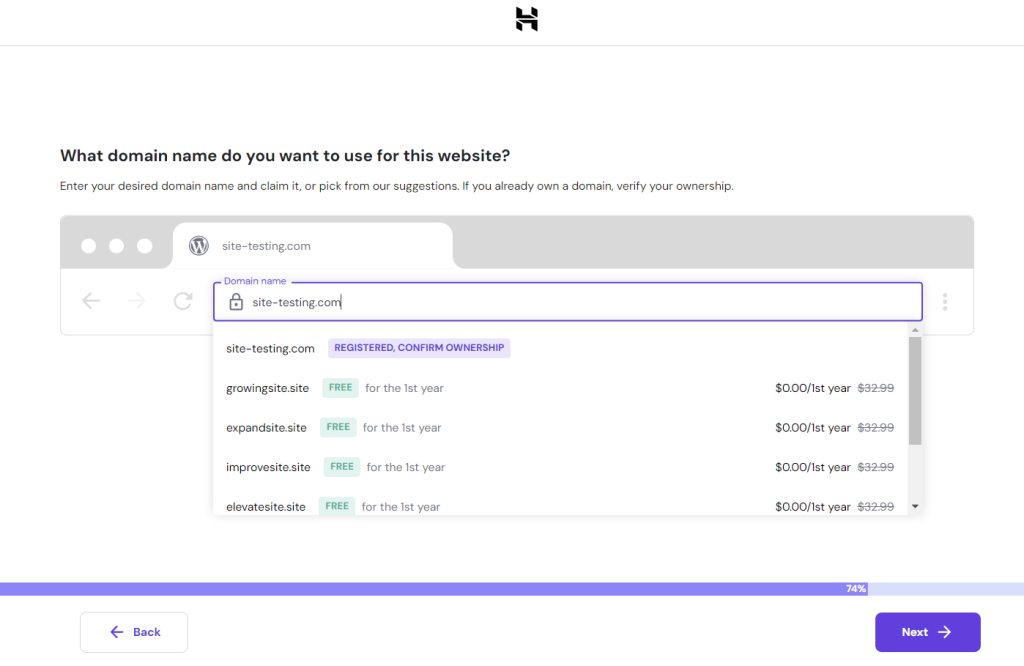
Choose Migrate to transfer your old website to Hostinger. On the subsequent page, enter a custom domain name you want to use for the new WordPress.org site.
If you have already bought a domain name from WordPress.com, simply fill in the existing address and confirm your ownership. You can point that domain to Hostinger by either changing the nameservers or the A record via hPanel later.
Next, select a server location closest to your target audience to ensure faster load times. We have data centers across different parts of the world, including North America, Europe, Asia, and South America.
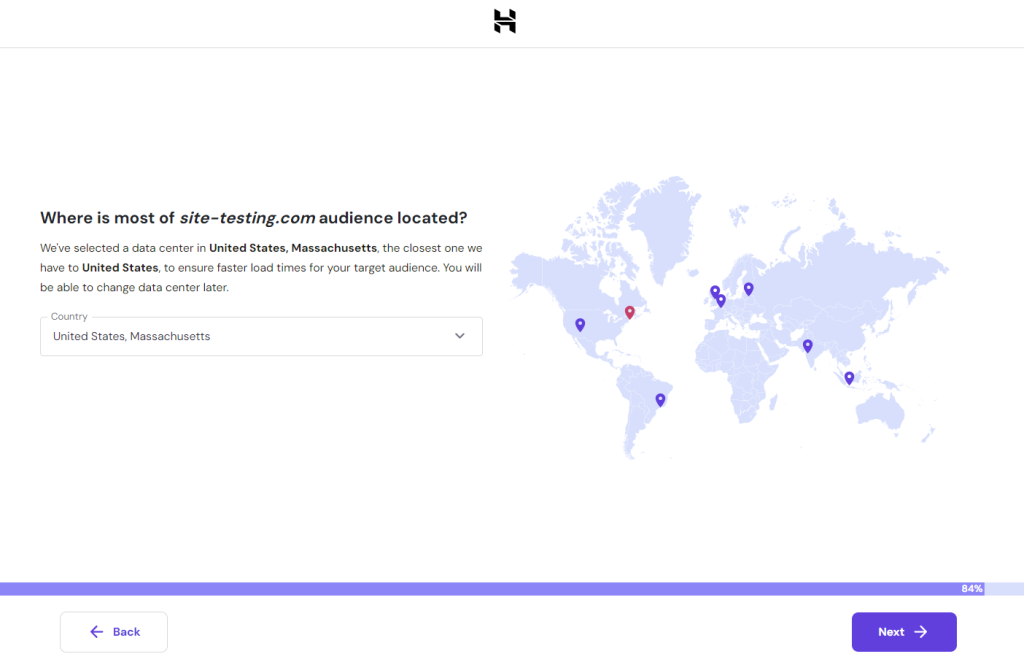
That’s it – you have successfully set up your hosting account. Now, it’s time to create your WordPress.org site either via hPanel or cPanel.
hPanel
Hostinger’s hPanel makes it easy to upload website files, connect domains, and manage your hosting account in one place.
Here’s how you can set up a new WordPress site:
- Access Websites from the top menu, and click the Dashboard button next to your domain name.
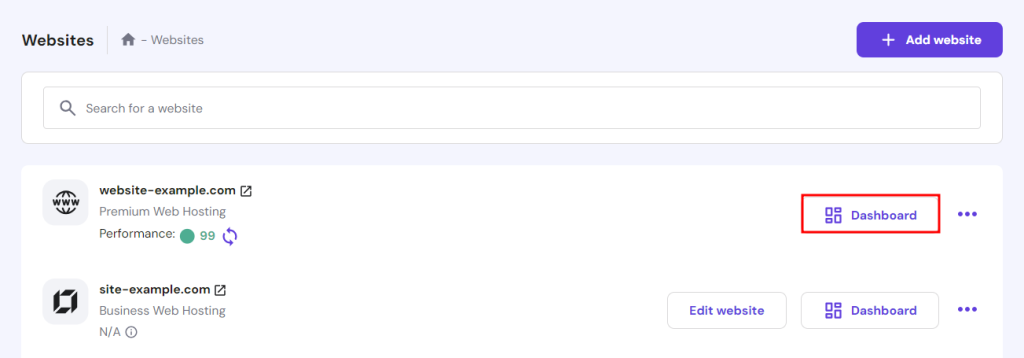
- On the left sidebar, scroll down to Website, choose WordPress, and select Install WordPress.

- Enter your Website Title, Administrator Username, Password, and Email. They don’t need to be the same as your web hosting login information.
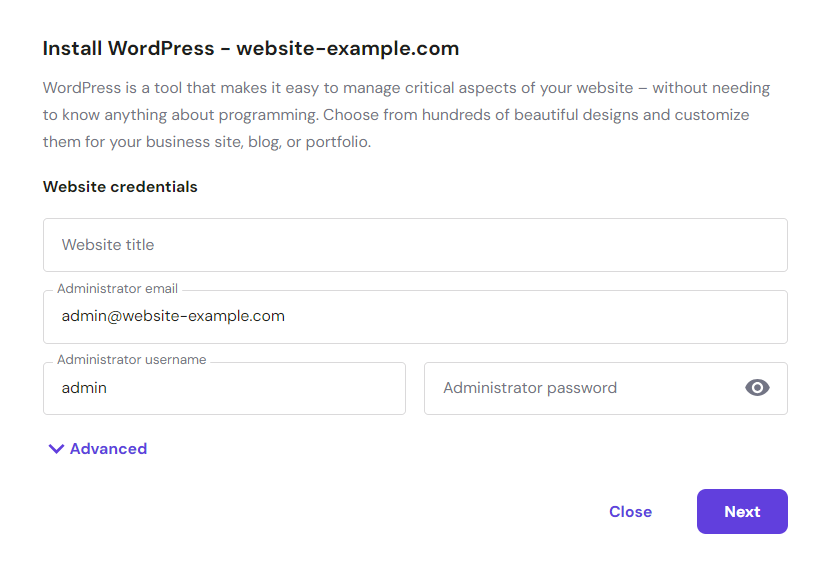
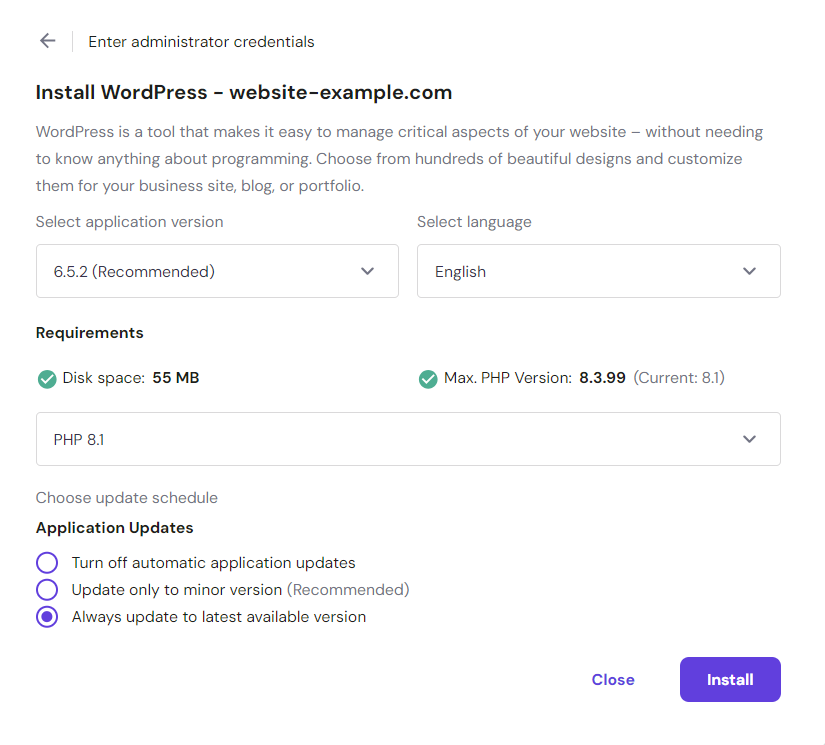
- After clicking Next, you’ll be asked to choose your preferred WordPress version, language, and PHP version.
- Make sure to select the Always update to latest available version option, so you won’t miss any WordPress core updates.
- Finally, hit Install.
Once WordPress is finished installing, the Overview menu will appear. Locate the Edit Website section and click Admin Panel to access your WordPress dashboard.
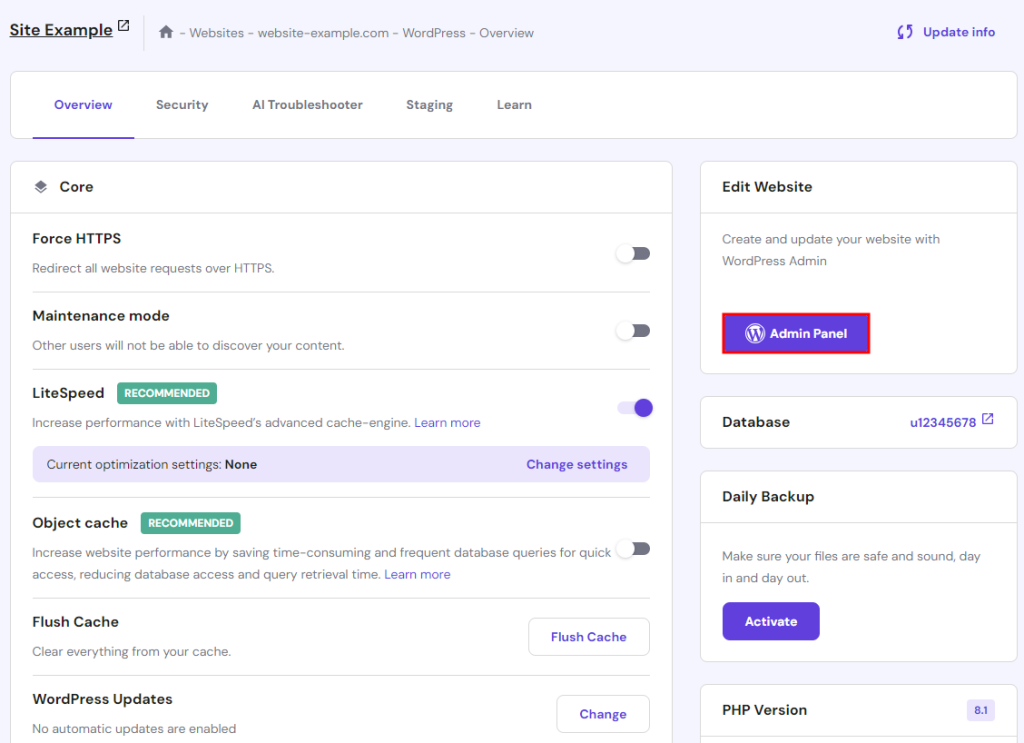
To keep the same layout as the old WordPress.com site, you need to change your WordPress theme before importing.
From your WordPress dashboard, head to Appearance → Themes, and choose the same theme as the WordPress.com site in the official directory, if available.
cPanel
As one of the most popular control panel options, cPanel offers both a graphical interface and server management interface via WHM (Web Host Manager).
To set up WordPress, simply log in to your web hosting account and access the cPanel dashboard:
- From the cPanel interface, scroll all the way down to Softaculous Apps Installer and click WordPress.
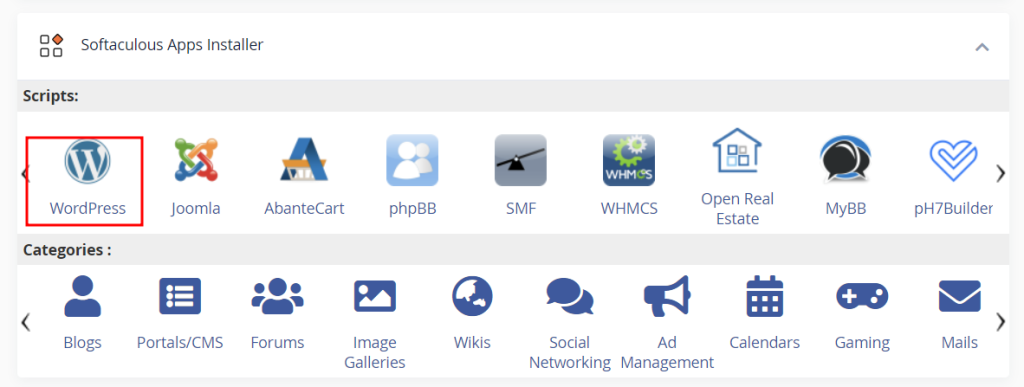
- Locate and click the Install Now button.
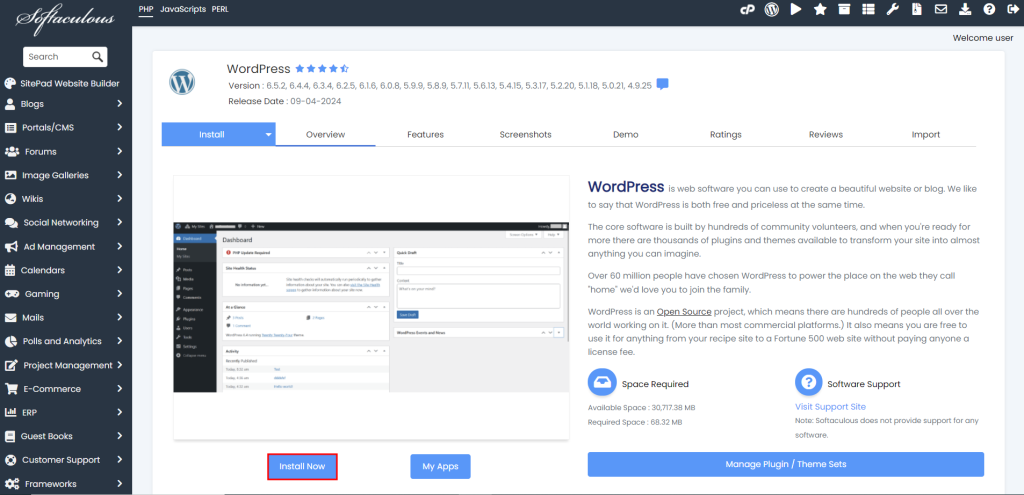
- Make sure to choose your installation URL and WordPress core version.
- Enter your Site Name, Site Description, Admin Username, Password, and Email. Finally, select your preferred Language.
- You can also pick the plugins you want to install under the Select Plugin(s) option.
- Scroll down to Select Theme and choose the initial theme you would like to use. Click Show All Themes to see all of the options.
- Lastly, fill in the Email installation details to field. Once you finish filling out the form, click Install.
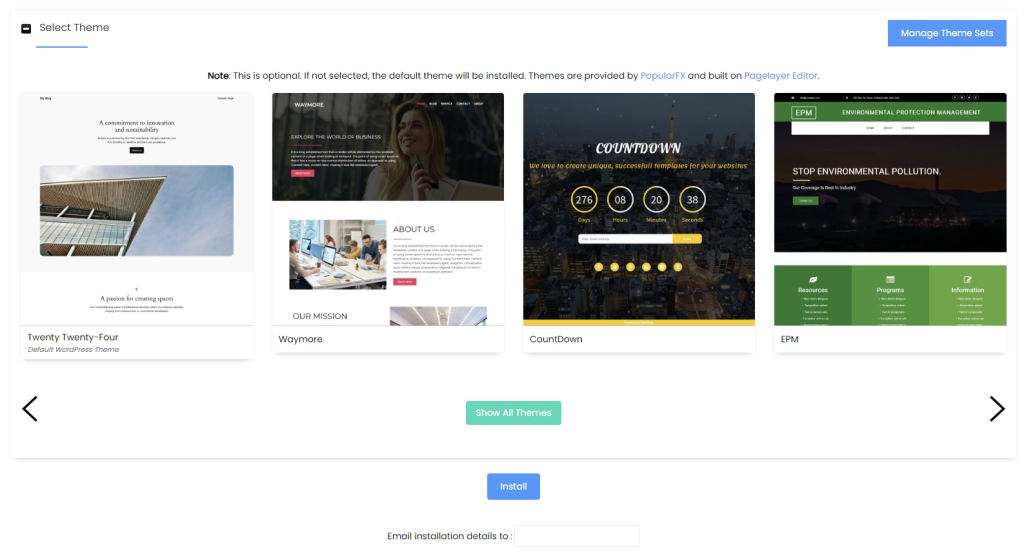
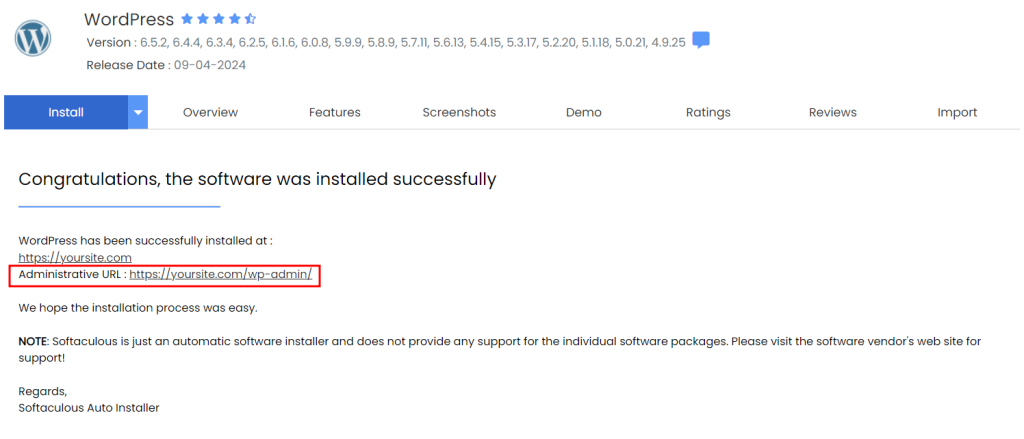
- Click the link next to Administrative URL, and you’ll be redirected to the self-hosted WordPress dashboard.
3. Import content to the new WordPress.org website
To import your content, prepare the exported XML file you’ve stored on your computer. Make sure you know exactly where it’s stored, so you can quickly upload the file later.
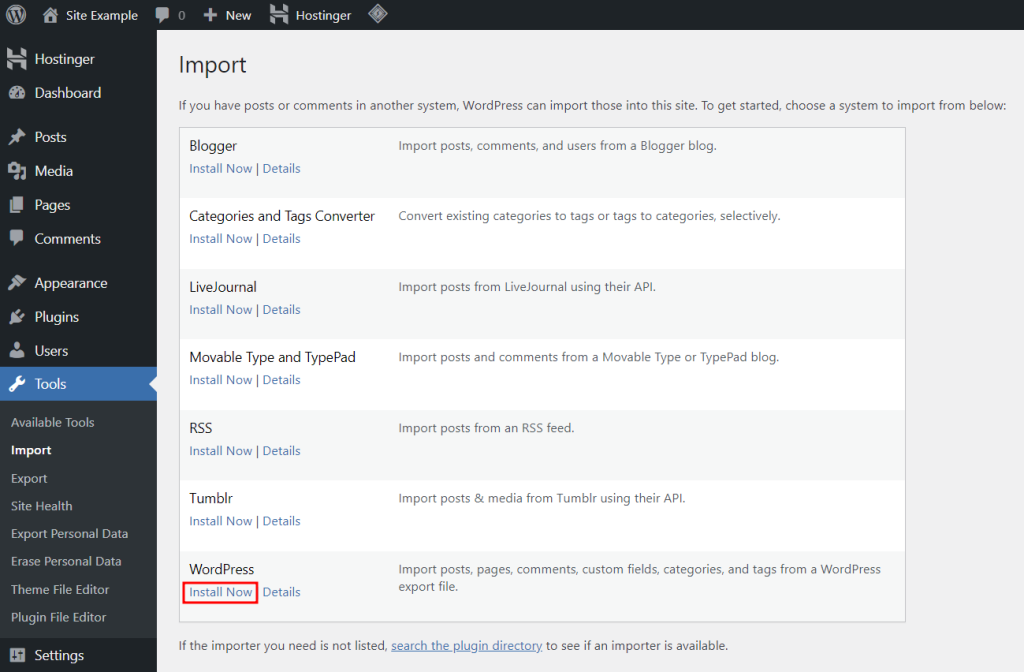
After that, open your WordPress admin panel and go to Tools → Import. Here, you will find different tools available, but the easiest method is to install the WordPress importer plugin.
To do so, simply click the Install Now button under the WordPress section.
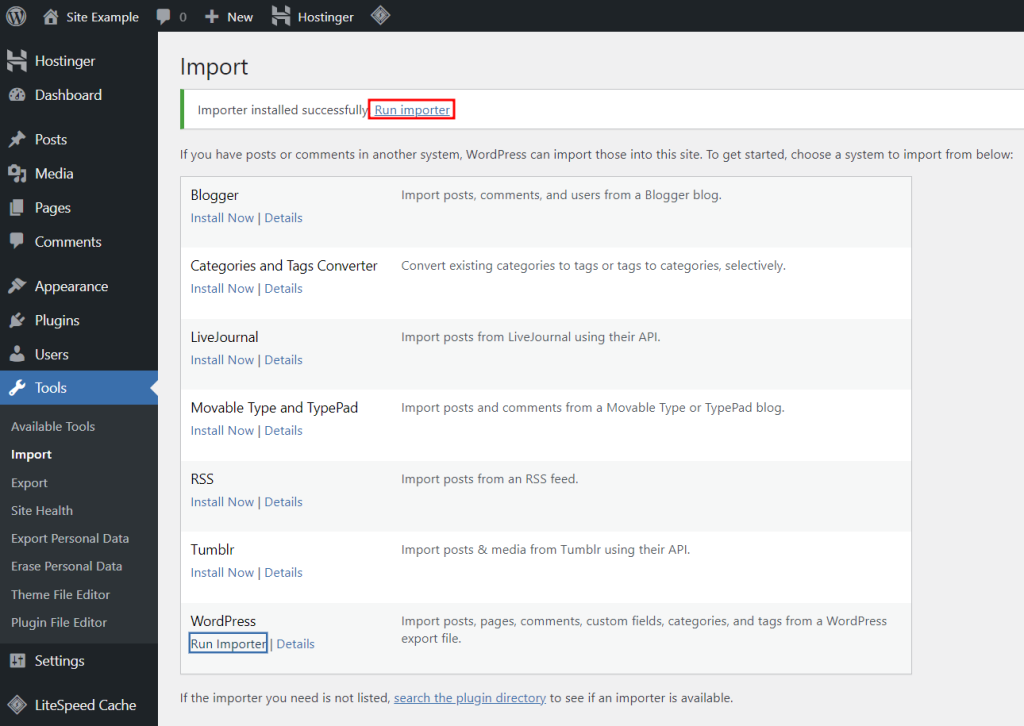
After WordPress has successfully installed the importer plugin, hit the Run importer button.
Click Choose File and select the exported XML file from your computer. Once successful, hit Upload file and import.

After you’ve uploaded and imported the file, you will see a couple of options:
- Assign Authors. You can import authors from WordPress.com, create a new user with a new login name, or assign an existing WordPress.org user.
- Import Attachments. Check the Download and import file attachments box to migrate all media files attached to your posts and pages.
Click Submit to finish the website importing process.

You should see a message saying that your WordPress.com content has been imported successfully.
4. Import image files
If you clicked the Download and import file attachments button, WordPress will automatically import images from your old posts and pages.
However, if your images or videos do not appear anywhere, simply re-upload them via Media → Add New Media File. Drop your files or click Select Files to upload all the images, videos, and media files you’ve downloaded from the old site.

5. Change URLs and fix permalinks
During the migration process, some of the URLs linked to posts or media files might still point to your old WordPress.com site. More often than not, it will result in broken links or duplicate content, which is bad for the user experience and SEO.
To fix link issues, install plugins like Better Search Replace. Once activated, head to Dashboard → Tools → Better Search Replace.
Under the Search/Replace section, add your WordPress.com URL in the Search for field and replace it with the new WordPress.org link.
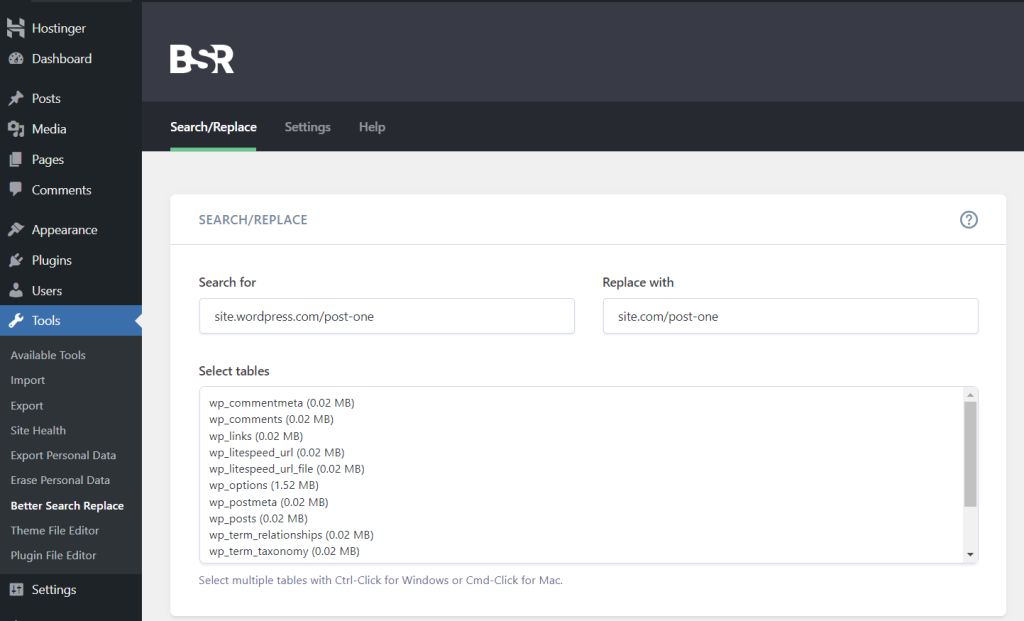
Under the Select tables section, choose what you want to search for. For example, to change the URLs in posts, choose wp_posts.
Check the Run as dry run? box and click Run Search/Replace to see the details of how many potential changes the plugin found.

If nothing needs to be updated, uncheck the box and hit Run Search/Replace once again.
By doing this, WordPress will update all the old URLs from the WordPress.com site to the new WordPress.org site.
The permalinks on your self-hosted WordPress website should also use the same permalink structure as your old WordPress.com blog. By default, WordPress.com posts are formatted as Day and name, like this:
yourdomain.wordpress.com/2024/05/06/how-to-create-a-website/
In WordPress.org, head to Dashboard → Settings → Permalinks, and choose Day and name under Common Settings. Don’t forget to save your changes.
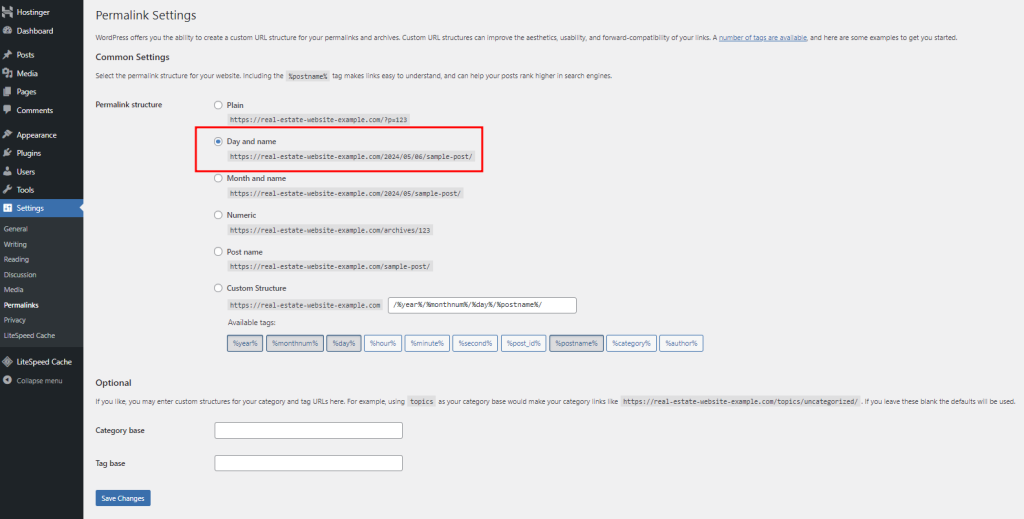
If you want to use other types of permalink structures, the only way is to copy your content and re-publish it via WordPress.org.
Then, set up a permanent 301 redirect, so you can move the old web page to a new URL without losing its ranking.
6. Redirect visitors and set your blog to private
By now, you already have a fully functioning WordPress.org site. However, your WordPress.com blog still exists, and people can find and visit it.
To avoid unnecessary confusion, it’s best to redirect all visitors from the old WordPress.com blog to your WordPress.org site.
To achieve this, access the dashboard of your WordPress.com site and go to Settings → General. Under Site address, click the Redirect this site option.

Simply add your new domain name in the relevant field and hit Go. However, keep in mind that this redirect tool costs $19.50/year.
If you don’t want to invest in this tool, you can set the WordPress.com site to private instead. Head to General Settings → Privacy and select Private. Once done, make sure to hit Save settings.
Now, your WordPress.com will only be visible to you and users with login credentials that you have approved.
How to migrate a website from WordPress.com to WordPress.org using a plugin
If you’re on a Business plan or higher, you can simplify the migration process with a WordPress plugin.
Here’s how to do it using All-In-One WP Migration.
- Install and activate the All-In-One WP Migration plugin.
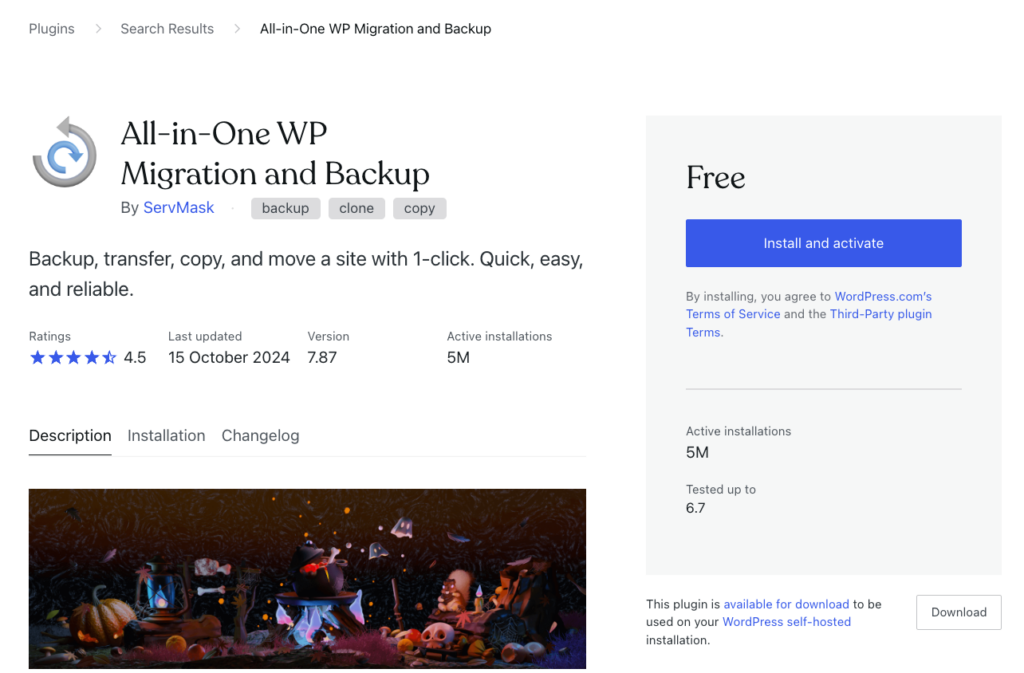
- Go to All-In-One WP Migration → Backups in your admin dashboard. Hit Create Backup.
- Once the plugin has finished compiling all the website files, download the backup file.
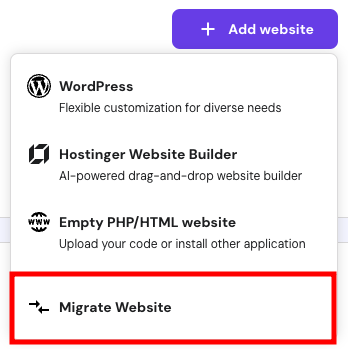
- Purchase one of Hostinger’s Managed WordPress hosting plans, then head to Websites in the hPanel dashboard. Click on the Add website button and pick Migrate Website.
- When asked about your preferred migration method, choose Upload WordPress website backup.
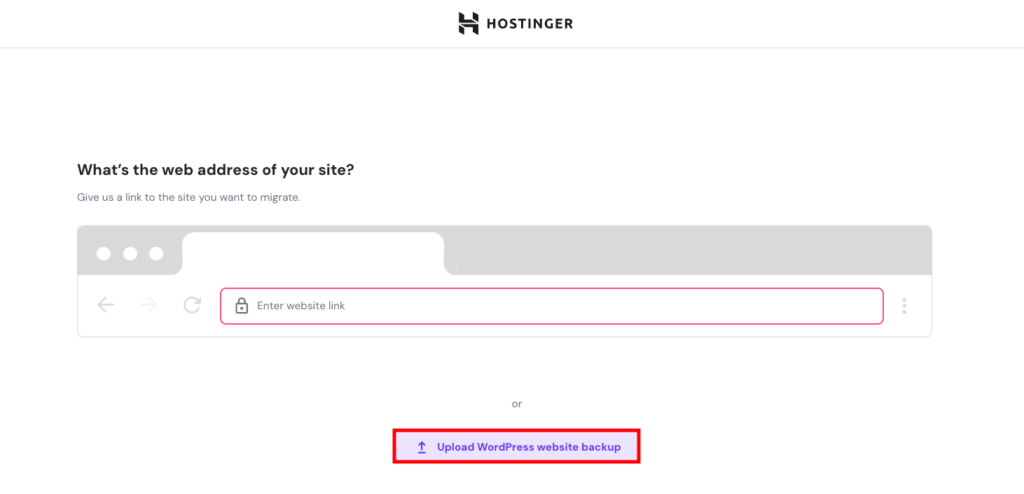
- Drag the WPRESS file from your local storage to the available field.
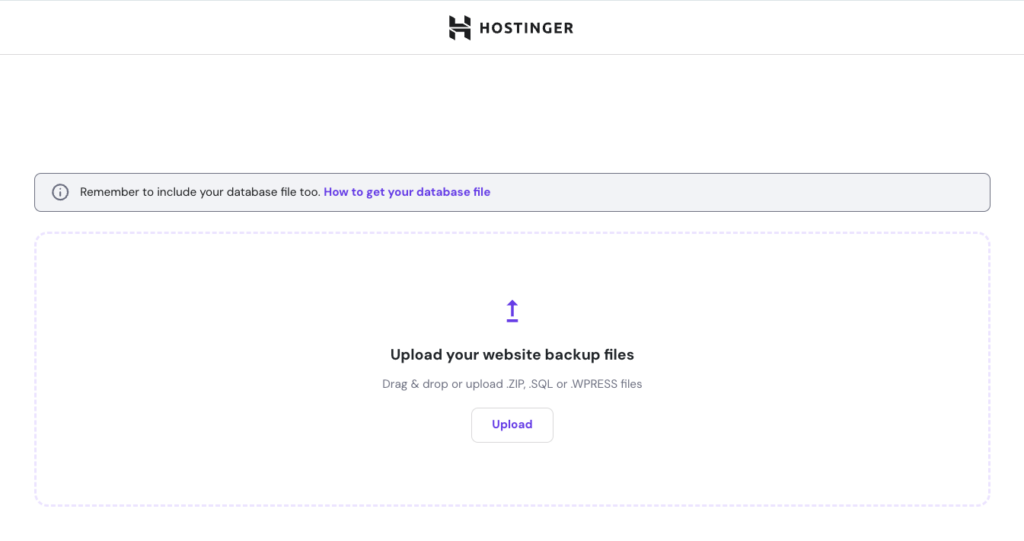
- Review the migration process and click Submit request.
That’s it! The migration process takes between 2-48 hours to complete. You can track the progress on the Migrations Requests page or in the Websites section of hPanel.
Remember to point your old domain to Hostinger nameservers so your website is accessible from the new hosting provider.For an even smoother experience, consider transferring your domain to Hostinger. This way, you can manage your website and domain from one platform.
Why move from WordPress.com to WordPress.org
If you want to grow your site even further, WordPress.org has several advantages that make it a more compelling option compared to WordPress.com:
- Advanced customization. WordPress.org offers thousands of themes and plugins, allowing you to add functionality, improve performance, and customize the design of your site with ease. It’s also possible to modify your site’s code for further customization.
- Data ownership. With full access to your site’s files and database, you can back up, export, and migrate your content whenever you need to without any restrictions. This is something that WordPress.com does not provide.
- Monetization opportunities. WordPress.org allows you to install free eCommerce plugins to sell products and run advertisements without sharing profits with anyone. In WordPress.com, you’ll have to buy a paid plan that supports monetization, which charges you transaction and processing fees.
- SEO and analytics tools. WordPress.org has a lot of SEO and analytics plugins you can install for free. In contrast, WordPress.com requires you to purchase the Creator plan for $35/month if you want to access its SEO and analytics tools.
- Community support. As an open-source platform, WordPress.org benefits from a vast community of developers and users who contribute to its growth and development. There are plenty of WordPress tutorials and forums to help you troubleshoot issues and stay updated on the latest WordPress trends and best practices.
If you want to learn more about the differences between these two platforms, read our in-depth comparison between WordPress.org and WordPress.com.
Conclusion
WordPress.com is an excellent blogging platform for beginners. However, as your site grows and attracts more traffic, you may find the offered features increasingly restrictive.
By moving from WordPress.com to WordPress.org, you have the opportunity to add more functionality, customize the design, and scale your site even further using a wide selection of WordPress plugins and themes.
To recap what you’ve learned in this tutorial, here’s a summary of how to migrate your website:
- Export all content and media files from WordPress.com.
- Purchase a hosting service and domain, and set up a new WordPress.org site.
- Import your posts, pages, and media files to the new site.
- Adjust the URLs and permalinks to avoid error pages and duplicate content.
- Redirect visitors from the old WordPress.com blog to the new WordPress.org site, or simply set WordPress.com to private.
We hope that this tutorial has helped make the process easier. If you have any questions regarding this topic, feel free to leave a comment down below.
Moving from WordPress.com to WordPress.org FAQ
Should I transfer my domain after moving to WordPress.org?
It depends on your preferences. If you prefer to have all website assets, including the domain, managed in one place for convenience, then you should transfer it. At Hostinger, you can easily point your existing domain to your new WordPress.org website via hPanel, so domain transfer won’t be necessary.
Can I move my website to WordPress.org without losing content?
Absolutely. You can export your content from WordPress.com and import it into your WordPress.org site. This process preserves your posts, pages, media, and other essential content elements.
Do I have to pay to move from WordPress.com to WordPress.org?
Moving from WordPress.com to WordPress.org doesn’t inherently incur costs, but there may be expenses associated with the transition. For example, you will need to purchase web hosting, acquire a custom domain if you choose to obtain a new one, and potentially pay for the WordPress.com redirect tool for the migration process.


Comments
October 09 2024
I am interested in migrating but I have some posts and pages still in draft. Can these be migrated or do they need to be published first?
October 11 2024
Hello Cindy! When migrating from WordPress.com to WordPress.org, you don’t need to publish your drafts first – both draft and published posts can be moved over. The migration process will include all your posts, pages, and drafts, so everything should come through just fine ;)