Linux List Users: How to Display All Users in the Terminal?
Listing users in Linux is an essential system administration task, especially if multiple developers work on the same virtual private server (VPS) environment. It helps simplify account auditing and permission management to ensure optimal security.
In Linux, list users by applying commands via Terminal, like cut, getent, and awk. However, these utilities have different outputs, making them suitable for particular management tasks and scenarios.
This article will explain how to show users in a Linux operating system using different commands. We will explore the prerequisites and best practices to ensure smooth system administration.

Prerequisites for Listing Linux Users
Before listing Linux users, ensure you have access to the system’s command-line interface. For remote machines like a VPS, connect using an SSH client like PuTTY, Terminal, or Hostinger’s Browser terminal.
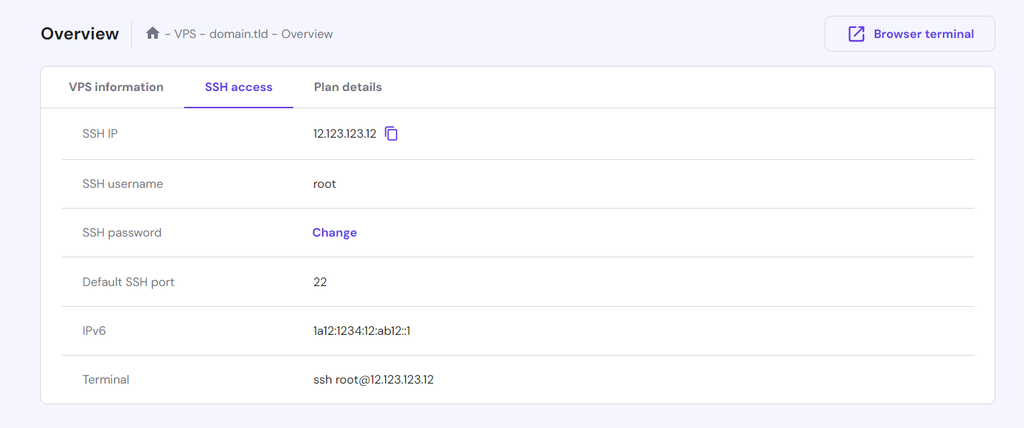
Also, you must log in as the root user since managing all the users requires an administrative privilege. Hostinger’s VPS hosting users can find the login information by going to hPanel → VPS → Manage → SSH Access tab.
Warning! Use root carefully as you might accidentally run destructive Linux commands. For security, log in as other users with administrative privileges and run the commands with sudo instead.
How to List Users in Linux
In Linux distributions, users are accounts that can interact with and manage the operating system. They are divided into two types – normal and system users.
System users are created automatically when you install the operating system or a package. Meanwhile, you set up a regular account manually using the useradd command.
Aside from the origin, they also have different IDs. A normal user typically has four-digit numbers, while the system account commonly uses 1-999.
Every Linux distribution stores all the users and their information within the /etc/passwd file, which comprises lines with the following syntax:
username:x:userID:groupID:userinfo:/homedir:/bin/bash
Each line represents a regular or system user account. Here’s what it means:
- username – the account’s name.
- x – the user’s encrypted password. The actual value is in /etc/shadow.
- userID – the user’s identification number.
- groupID – the group ID number the user belongs to.
- Userinfo – extra information about the user.
- /homedir – the user’s home directory.
- /bin/bash – the user’s default login shell.
How to List Users Using the cat Command
The cat or concatenate command reads and merges the content of multiple files. It also lets you list users in Linux by printing the /etc/passwd file entries like so:
cat /etc/passwd
By default, this Linux command will print all lines, showing multiple users and their details.
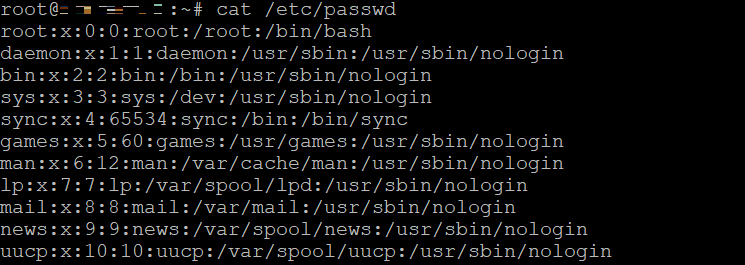
Querying the /etc/passwd file will show both regular and system accounts, regardless of their statuses. To list all the connected users, run the users command instead.
How to List Linux Users Using the getent Command
The getent command queries entries from system databases configured in /etc/nsswitch.conf, including passwd. To list all users, enter the following command:
getent passwd optional-user
If you specify the user, getent will show detailed information about that particular account. Otherwise, it displays all users similar to the cat command’s output.
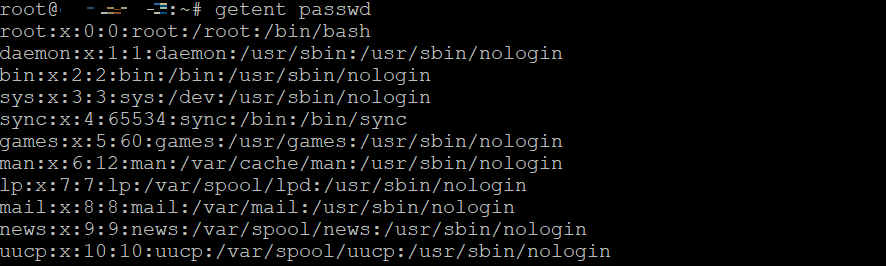
You can also use gentent to query other databases, like group that contains system groups. In addition, this utility is cross-compatible with other UNIX operating systems.
How to List Users With awk and cut Commands for Custom Output
If you want to output only usernames, use the awk command. This text-processing utility lets you set a character as a delimiter to divide each line in the /etc/passwd file into multiple fields.
We will set the colon (:) as the delimiter using the -F option and print the first column from each line, which contains only the usernames:
awk -F':' '{ print $1}' /etc/passwd

You can also do so using the cut command. It works similarly to awk but has a different syntax:
cut -d: -f1 /etc/passwd
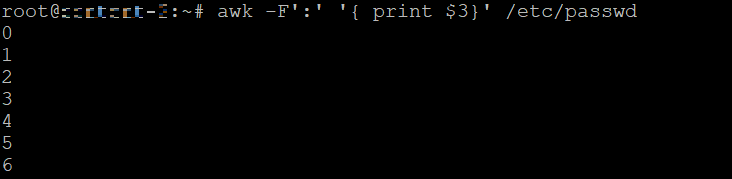
Aside from the usernames, you can use the awk or cut command to print custom outputs. For example, if you want to list all user IDs, run either of the following:
awk -F':' '{ print $3}' /etc/passwd
cut -d: -f3 /etc/passwd
Both commands use the colon as the delimiter and print the third field from each line, which contains the unique user ID.
Best Practices for Effective User Listing
To help improve your system administration efficiency, consider the following best practices when listing users in Linux.
Combine Commands With Pipes for Advanced User Listing
In a Linux system, a pipe (|) lets you pass output from a command to another utility. It is helpful for manipulating data and printing specific information.
Suppose you want to check a particular user ID number. You can do so by printing all the data using cat and passing the output into grep for filtering. Here’s how the command looks:
cat /etc/passwd | grep JohnDoe
The same command also lets you check whether a specific user exists.

You can also combine the awk command with the Linux find utility to retrieve all user accounts that own a file:
find / -type f -exec stat -c "%U %n" {} + | awk '{print $1}' | sort -u
Use a GUI for User Management
If you are unfamiliar with commands, use a graphical user interface (GUI) to list and manage users in a Linux-based system. While desktop distributions offer it by default, you need a third-party tool for a server.
The most common web-based utility for managing Linux system users is a control panel like Webmin, Virtualmin, and Plesk. While their features vary, they should be sufficient for listing and managing users.
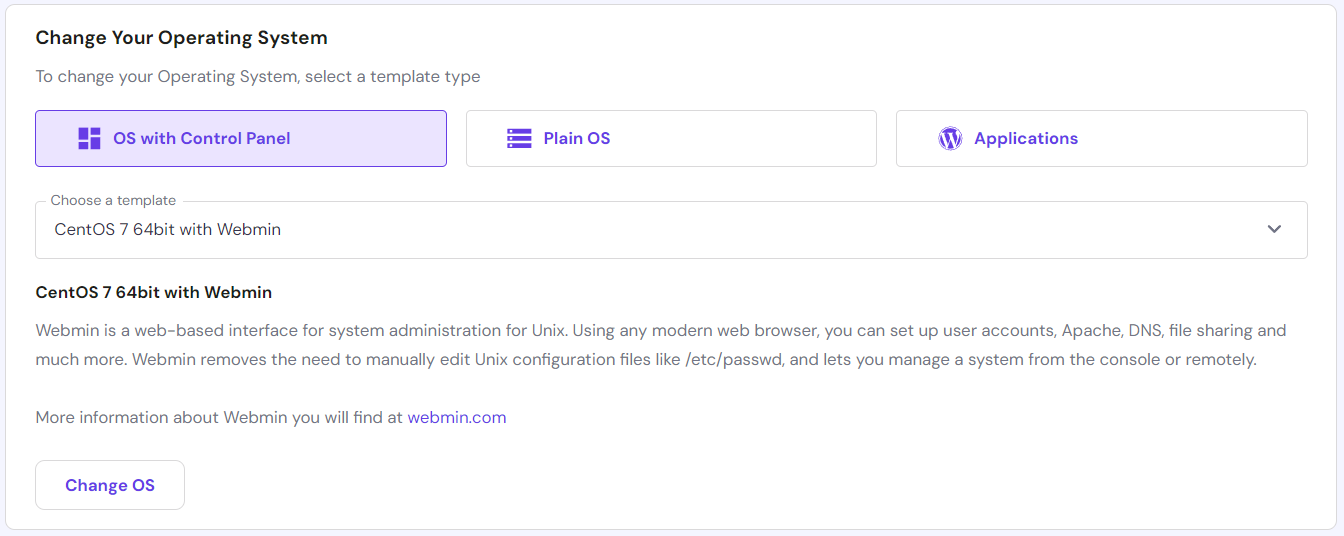
Depending on your web hosting provider, the steps to install them differ. At Hostinger, you can do so in a few clicks by going to hPanel → VPS → Settings → OS & Panels → Operating System. Click OS with Control Panel, select a template, and hit Change OS.
Warning! Changing the operating system and control panel will wipe all your VPS data. Before proceeding, back up your files via a File Transfer Protocol (FTP).
Manage User Information Securely
Proper user management is crucial for system safety and data integrity. Here are several tasks to consider:
- Assign minimal privileges. Only grant superuser privileges to a Linux system administrator to prevent unauthorized parties from viewing user information.
- Set proper permissions. Limit important files and directory permissions only to authorized users, especially those containing personal data.
- Enforce strong passwords. Ensure all system and normal users in the VPS use strong passwords with uppercase letters, numbers, and symbols.
- Regularly audit users. Periodically check all regular user accounts in your system to catch potentially malicious or compromised ones.
Write Simple Bash Scripts for Repetitive Tasks
Security audits require you to regularly display users to check for suspicious ones. Instead of doing so manually, Linux system administrators use a bash script to automate the process.
For example, you can create a script to list all user accounts in a TXT file using a single command execution. Then, use a cron job to run the task automatically at a specific interval or schedule.
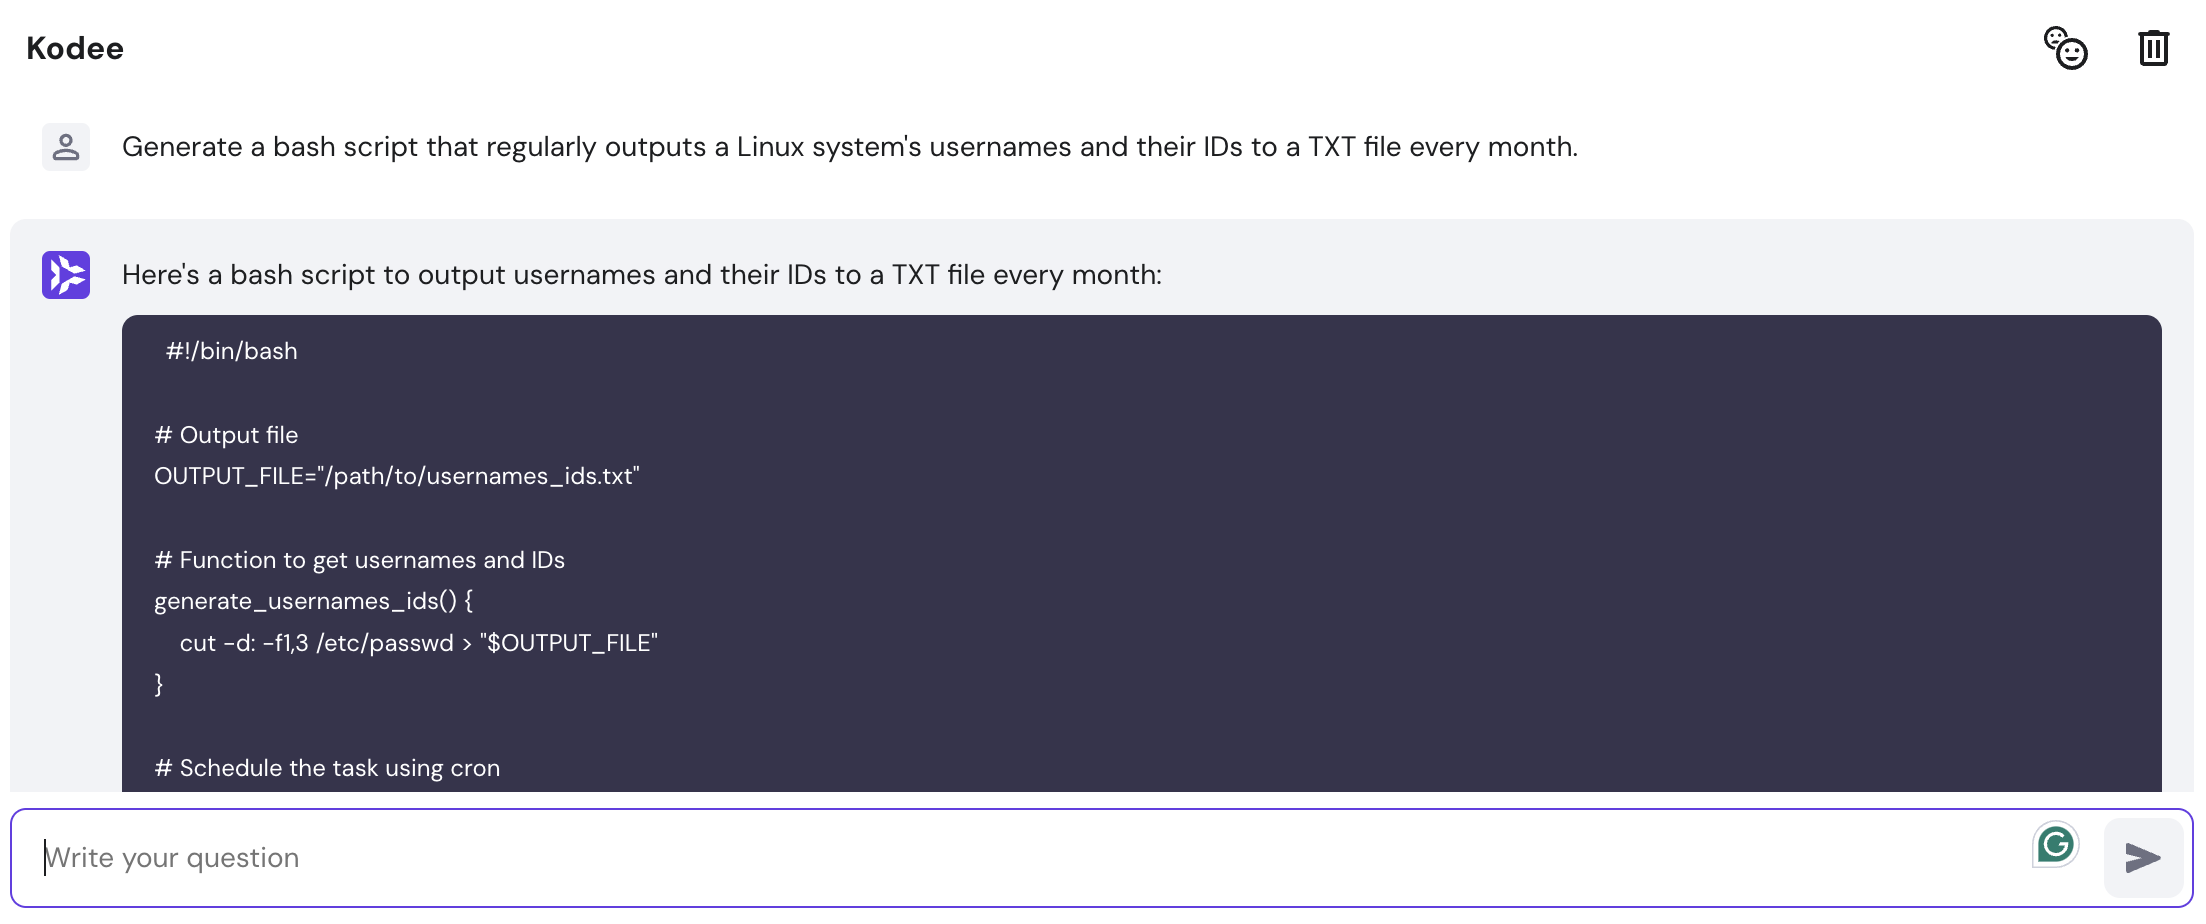
Since the script will vary depending on your task, use Kodee, our VPS AI assistant, to generate it automatically. Access this tool by clicking Kodee on the VPS overview page’s sidebar.

Conclusion
Listing users in a Linux system is crucial for server administrations. You can do so by outputting the /etc/passwd file’s content using the cat command. It will print all usernames with details like their ID, default home directory, and login shell path.
You can also get the same output by querying the passwd database using the getent command. Meanwhile, run awk -F or cut -d if you want to print only the names without additional user details.
Moreover, pipe the output into another command to print custom data. For example, add the grep command to filter specific entries or find to search file owners. You can also install a control panel like Webmin to easily manage users with GUI.
At Hostinger, you can install it easily using a control panel template via hPanel. We also offer a VPS AI assistant that helps generate bash scripts to automate repetitive user administration tasks.
Learn What Else Your Ubuntu Can Do
How to List Packages in Ubuntu
How to Install Git on Ubuntu
How to List Users in Ubuntu
How to Install Python Pip on Ubuntu
How to Install Redis on Ubuntu
How to Setup an FTP Server for Ubuntu
How to Install Laravel on Ubuntu
How to Install Node.js in Ubuntu
Linux List Users FAQ
To help you understand better, this section will answer several questions about listing users in Linux.
How Do I List Users in Linux?
You can list user accounts on Linux using the commands cat /etc/passwd or getent passwd. To see just the usernames, use awk -F: ‘{ print $1 }’ /etc/passwd or cut -d: -f1 /etc/passwd. To find currently logged-in users, use the users command.
Can I View All Users and Their Details With One Command?
Yes, you can display all system and regular users by running cat /etc/passwd. Alternatively, use the getent command to retrieve the information directly from the passwd database. The output will be identical with both commands.
Which Option Shows Only the Username When Listing Users?
The options differ depending on the command. Use -F with awk to print only the username. It separates each line in /etc/passwd into multiple fields and prints the first column. You can do the same using -d with the cut utility.
Is There a Way to Sort the User List Alphabetically?
Yes, you can sort the user list alphabetically by piping output from awk, cut, getent, or cat commands into the sort utility. It will use descending order by default, but you can reverse it using the -r option.

Aris is a Content Writer specializing in Linux and WordPress development. He has a passion for networking, front-end web development, and server administration. By combining his IT and writing experience, Aris creates content that helps people easily understand complex technical topics to start their online journey. Follow him on LinkedIn.

Comments
September 09 2020
Can u help me? which command i must type for..... LOOK ALL USERS using ubuntu 12.04? Example: Zidane, Nick Help me... Urgent to teach student
November 18 2020
Hey Madam Ida! :) You can try the following command: less /etc/passwd or cut -d : -f 1 /etc/passwd Additionally, you can check our other linux guide here.
June 11 2024
Can u help? What command Display all users in the system, categorize system user and Normal users.
June 14 2024
Hello! To display all users in the system and categorize them as system users or normal users, you can use the following command:
awk -F: '{ if ($3 >= 1000) print "Normal User: " $1; else print "System user: " $1 }' /etc/passwd | sort. This command filters users based on their user ID, labeling those with an ID number greater than or equal to 1000 as normal users and those with an ID number lower than 1000 as system users ;)