How to Install MongoDB on Ubuntu in 2024
MongoDB is one of the most popular open-source NoSQL database managers. It stores data in a formatted document instead of a tabular format. Since it doesn’t have a rigid schema, MongoDB offers a higher scalability and flexibility than SQL.
This database management system (DBMS) is popular among developers due to its performance and compatibility with various programming languages. However, to install MongoDB, Ubuntu users need various commands, making the process challenging.
With this in mind, we’ll explain how to install MongoDB on Ubuntu virtual private server (VPS) hosting. We’ll also cover the steps to create a new database, set up a user, and enable remote authentication.

What Is MongoDB?
MongoDB is one of the most popular open-source NoSQL database management systems. It is widely used for large-scale applications or websites.
Unlike SQL, MongoDB stores data in a BSON document with a flexible schema, resulting in higher scalability. It also supports various operating systems, programming languages, and frameworks.
Prerequisites for the MongoDB Installation on Ubuntu
Before installing the official MongoDB package, check your hardware and software compatibility. Your VPS hosting plan must support Ubuntu, offer an SSH connection, and provide full root access.
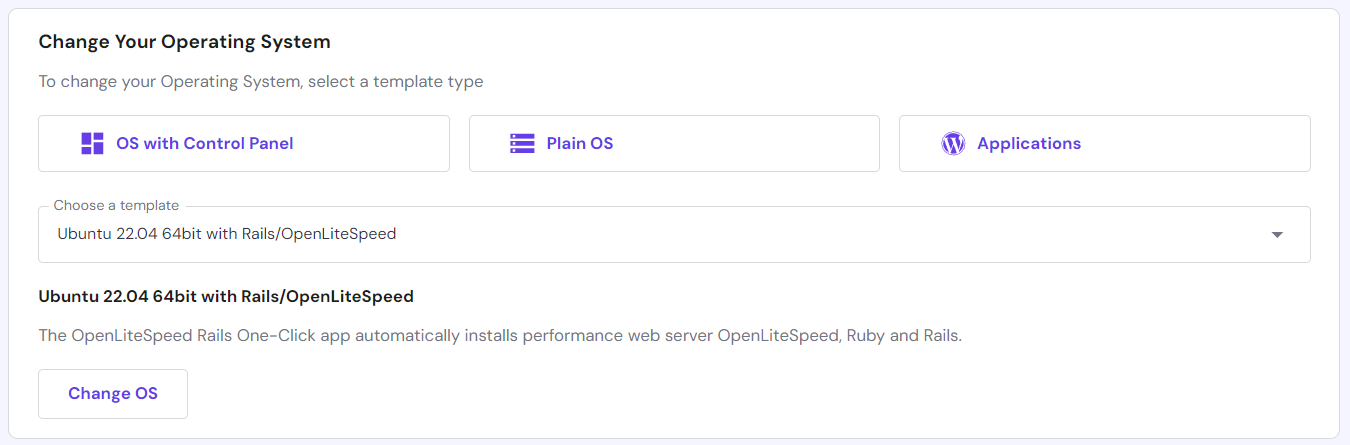
Hostinger’s VPS hosting offers various Linux distributions, including Ubuntu. You can install it easily by going to the VPS Dashboard → OS & Panel → Operating System.
We recommend using the newest operating system to ensure compatibility and security. However, the steps to install MongoDB on Ubuntu 20.04 or other versions are similar.
Our VPS hosting plans also enable you to connect remotely via SSH. In addition to using an application like PuTTY and Terminal, you can run Linux commands directly from your web browser using our Browser terminal.
Hostinger’s VPS also provides full root access, allowing users to run MongoDB installation commands without permission issues.

How to Install MongoDB on Ubuntu
In this section, we will explain how to install MongoDB on Ubuntu 20.04 or other versions. Before proceeding, ensure you have connected to your VPS via SSH using a root or superuser account
1. Install MongoDB
Before installing the MongoDB package, download the GnuPG and cURL utility by running this command in your command-line interface:
sudo apt-get install -y gnupg curl
Use cURL and GnuPG to Import the MongoDB public GPG key to retrieve the installation package:
curl -fsSL https://pgp.mongodb.com/server-7.0.asc | sudo gpg -o /usr/share/keyrings/mongodb-server-7.0.gpg --dearmor
Note that the URL varies depending on the MongoDB packages. In this tutorial, we will install MongoDB Community Edition 7.0, the latest stable version at the time of writing.
After importing the official MongoDB packages, create a list file for installation. The command differs depending on your Ubuntu version. For Ubuntu 22.04 or later, run:
echo "deb [ arch=amd64,arm64 signed-by=/usr/share/keyrings/mongodb-server-7.0.gpg ] https://repo.mongodb.org/apt/ubuntu jammy/mongodb-org/7.0 multiverse" | sudo tee /etc/apt/sources.list.d/mongodb-org-7.0.list
Meanwhile, run the following to configure the list file on Ubuntu 20.04:
echo "deb [ arch=amd64,arm64 signed-by=/usr/share/keyrings/mongodb-server-7.0.gpg ] https://repo.mongodb.org/apt/ubuntu focal/mongodb-org/7.0 multiverse" | sudo tee /etc/apt/sources.list.d/mongodb-org-7.0.list
Refresh the APT repository to synchronize the local package database:
sudo apt-get update
Run the following command to install the latest stable version of MongoDB using the APT package management system:
sudo apt-get install -y mongodb-org
Optionally, choose a specific version of the official mongodb-org package. For example, run the following command to install MongoDB version 7.0.2:
sudo apt-get install -y mongodb-org=7.0.2 mongodb-org-database=7.0.2 mongodb-org-server=7.0.2 mongodb-mongosh=7.0.2 mongodb-org-mongos=7.0.2 mongodb-org-tools=7.0.2
If you specify only the MongoDB version and not the other components, APT will install the newest package.
Since APT automatically updates the component package, pin the installation to keep the current version. Here are the command examples:
echo "mongodb-org hold" | sudo dpkg --set-selections
echo "mongodb-org-server hold" | sudo dpkg --set-selections
echo "mongodb-mongosh hold" | sudo dpkg --set-selections
Pro Tip
If you don’t import the public GPG key to your local package database, APT will install the unofficial MongoDB package. This might lead to compatibility, security, and legal issues, as well as a lack of support.
2. Start Your MongoDB Service
After the installation, run MongoDB Community Edition by entering the following:
sudo systemctl start mongod
The systemctl command is essential for MongoDB service management. For example, if you encounter an error, run the following to reboot running services and try starting the DBMS again:
sudo systemctl daemon-reload
To find out whether MongoDB database server loaded properly, check its status with this command:
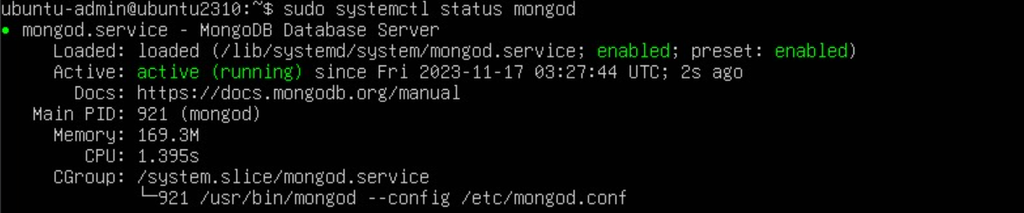
sudo systemctl status mongod
You should see active (running) if the MongoDB service is working, similar to the following output.
By default, the service doesn’t start at boot. To automatically load it at startup, enable MongoDB using the following command. :
sudo systemctl enable mongod
Check the service status using systemctl. If it shows Enabled instead of Loaded, MongoDB is ready to use.
MongoDB’s primary daemon process is called mongod. It handles data requests, manages access, and runs background management operations.
3. Configure MongoDB
Change the MongoDB database setting by modifying the main configuration file. It is created automatically during the installation process and accessible through /etc/mongod.conf.
Use a text editor like nano to open and modify the file. Here’s the command:
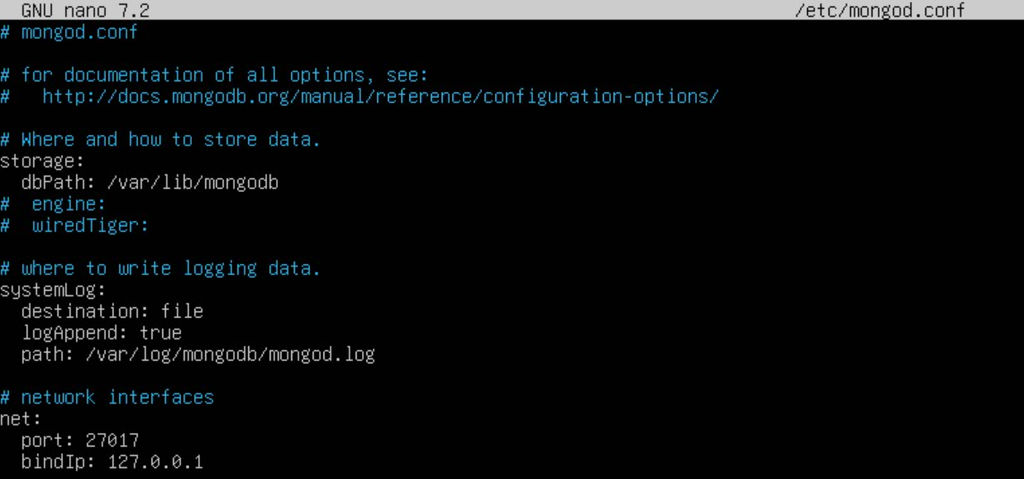
sudo nano /etc/mongod.conf
There are several configuration options that determine the MongoDB server behavior. For example, systemLog defines your database logging settings, while net lets you modify network-related settings.
Warning! Be careful when editing the mongod configuration file as you may break the service or expose your server to security risk.
All options have several parameters. For instance, the systemLog option has the path parameter determining the default log storage location, namely /var/log/mongodb/mongod.log.
Instead of deleting the parameters and options, add a hash symbol (#) to disable them. It is a good practice since you can easily reactivate them by removing the character.
After editing the configuration file, restart MongoDB using this command to apply the changes:
sudo systemctl restart mongod
4. Create a New Database
The MongoDB installation process automatically creates the admin database. Since it is usually used for administrative purposes like storing authentication data, we recommended creating a new one.
To do so, enter the Mongo shell by running the following command:
mongosh

MongoDB has the same command for creating and accessing databases. If one with the specified name exists, the shell will switch to it.
For example, the following will switch you to the default database since the name exists:
use admin
Meanwhile, run this command in the MongoDB shell to create the customers database:
use customers
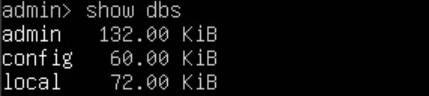
To check all the MongoDB databases in your system, run the following:
show dbs
5. Create a New User
Since MongoDB has no default account, you must create a new user for each database and set their privileges. You can do so using the db.createUser() function.
For example, we will create a new root MongoDB user account with full permissions. After switching to the database admin mode using the use command, enter:
db.createUser(
  {
    user: "root",
    pwd: "$tr0ngPa$$w0rD",
    roles: [ { role: "root", db: "admin" } ]
  }
)
You can write the function in one or multiple lines. Remember to pay attention to the capitalization since it is case-sensitive.
MongoDB has various roles, like dbAdmin, dbOwner, and readWrite. We recommend granting a user account minimal permissions to help avoid unauthorized modifications and data access.
Important! MongoDB user management relies on databases, meaning you must run the use command before entering a function.
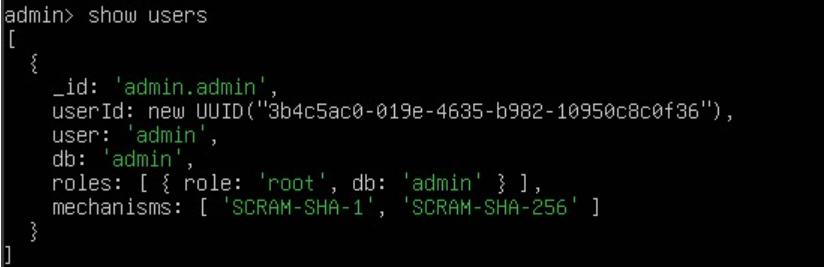
To show all users within your current database, use this command:
show users
To test the database connection, quit the MongoDB console by entering the exit command on Terminal and run the following:
mongosh --port [port] -u [username] -p '[password]' '[database]'
For example, we will connect to the root user using the default port of 27017:
mongosh --port 27017 -u root -p '$tr0ngPa$$w0rD' 'admin'
6. Enable Remote Authentication
By default, MongoDB authorizes all logins from the host machine. While this is sufficient for local deployment, you may encounter problems when pushing an application from another device.
To access MongoDB from another system, modify the mongod.conf file’s bindIP parameter. Its default value is the local IP address, meaning it denies access from other machines than the host server.
Warning! Be careful when changing IP addresses in your MongoDB configuration file as it can make your database public, exposing your service to serious security risks.
Use nano to open the mongod.conf file and add your VPS public IP address to the bindIP parameter, like so:
bindIP: 127.0.0.1,123.123.12.1
We don’t recommend changing the value to 0.0.0.0 since allowing all systems’ IP addresses to connect will expose your server to cyber attacks.
To ensure only permissive users can access your database, enable authentication by adding the following line under the security section:
authorization: enabled
Ensure you have removed the hash symbol at the beginning of the security option. Press Ctrl + X, Y, and Enter to save the changes. Restart MongoDB using the following command:
sudo systemctl restart mongod
After installing the Mongo utility in your local system, you should be able to connect to the database server by running this command syntax:
mongo "mongodb://user:password@ip:port/?authSource=database_name"
For example, we will connect to MongoDB using the root user, with the admin database as the authenticator. Here’s the command:
mongo "mongodb://root:$tr0ngPa$$w0rD@123.123.1.1:27017/?authSource=admin"
To improve remote access security, limit the MongoDB listening port only to your local system’s IP address. In Ubuntu, you can do so using the Uncomplicated Firewall (UFW) command:
sudo ufw allow from your_local_machine_ip_address to any port 27017
It means the firewall will only accept connections from the specified IP address and block others.
Learn More About VPS and Databases
How to Show Users in MySQL Using Linux Commands
How to Install PostgreSQL on Ubuntu
How to Install phpMyAdmin on Ubuntu.
Conclusion
MongoDB is a free, open-source NoSQL database management system (DBMS) popular for large-scale websites or applications. Since it doesn’t use a fixed schematic structure to store data, it is more flexible and scalable than SQL.
In this article, we have provided the MongoDB installation guide for Ubuntu. Here’s the recap:
- Install MongoDB. Import the official MongoDB repository key using GnuPG and cURL. Create the list file and install it using the APT package manager.
- Start MongoDB. Run the MongoDB instance using the systemctl command. Enable the daemon to ensure it starts automatically during the system startup.
- Set up MongoDB. Open the mongod.conf configuration file using a text editor. Modify your database settings and restart Mongod to apply the changes.
- Create a new database. Enter the Mongo shell using the mongosh command. Run the use command to create a new MongoDB database or access an existing one if the specified name exists.
- Create a new user. Access the MongoDB shell and enter the db.createUser() function to create a new user in your current database. Set its password and permissions.
- Enable remote authentication. Change the mongod.conf file’s bindIP settings to enable remote access to your database. To improve security, enable the MongoDB authentication setting and limit the permitted IP address using UFW.
When deploying MongoDB, use a VPS with full root access and vast software compatibility like Hostinger’s to ensure a smooth configuration process. We also provide a one-click OS installer and the Browser terminal to streamline the task.
How to Install MongoDB on Ubuntu FAQ
In this section, we will answer several common questions about installing MongoDB on Ubuntu.
How to Check if MongoDB Is Installed Correctly?
To verify whether your Ubuntu system has MongoDB installed, check its version number using the mongod –version command.
If you see the MongoDB version, it means the database is configured properly. Alternatively, enter the mongosh command and check whether Terminal returns an error.
How to Uninstall MongoDB?
To uninstall MongoDB Community Edition, stop the instance by running sudo service mongod stop. Then, remove the package using the apt purge “mongodb-org*” command.
Delete databases and log files in /var/log/mongodb and var/lib/mongodb directories using the rm command.
What’s the Difference Between MongoDB and MongoDB Community Edition?
MongoDB Community Edition is the free and open-source version of the database management solution. MongoDB may refer to the Enterprise Advanced edition or the cloud-based Atlas.

Ignas takes great satisfaction in helping people tackle even the most complex technical issues. His current goal is to write easy-to-follow articles so that these issues will not happen at all. During his free time, Ignas likes to play video games and fix up things around his house.

Aris is a Content Writer specializing in Linux and WordPress development. He has a passion for networking, front-end web development, and server administration. By combining his IT and writing experience, Aris creates content that helps people easily understand complex technical topics to start their online journey. Follow him on LinkedIn.
Comments
July 31 2020
Thank you, but I don't know how can I connect to Mongodb on VPS via Robo3T on local machine. Please help....
November 06 2020
Hey Vi! That would depend on your local machine's settings. I'd strongly recommend checking some official mongodb and robo3t resources for this.
September 11 2021
My Question is how to deploy any website on hostinger with mongodb database?
September 20 2021
Hi there, first things first - make sure you have a VPS (not a shared or cloud plan, as they do not support MongoDB), then you can proceed to setting up your server and installing MongoDB. Lastly, follow the instructions of your framework to deploy it. Good luck!
July 12 2023
I have one shared account on Hostinger, where we are using PHP based application. Now i need to test my Nodejs along with mongodb code, so can you help me to setup this on hostinger shared hosting. Please provide me detail information
July 14 2023
Hello there! Node.js and MongoDB is only supported on our VPS plans since they require root access. We even offer a template that comes preinstalled with Node.js, all you would need is to install MongoDB. VPS plans come with 30 day money back guarantee, so you can test it out and if you don't like it - get your money back.
May 29 2024
this doesnt help for ubuntu 24
June 06 2024
Hey there, Sorry about that! We found extra characters in the curl and gpg command, which caused the error. It's fixed now, so everything should be okay. Thanks for letting us know!