How to Configure Your Ubuntu Firewall with UFW and Set Firewall Rules
When configured improperly, your Linux virtual private server (VPS) is vulnerable to cyber attacks. Even if your hosting provider installs robust security features, you must apply additional measures to ensure its safety.
An effective way to secure your Linux VPS is by enabling Uncomplicated Firewall in Ubuntu. This feature helps filter malicious incoming and outgoing traffic on your server.
In this article, we will explain how to use UFW for Ubuntu firewall configuration and create custom rules. This UFW setup guide will also explore its importance and best practices.

Understanding the Importance of the Ubuntu Firewall
A firewall is a security system monitoring your server’s outgoing and incoming connections. It uses a set of predetermined rules to allow or block these connections.
This tool is essential since a computer connected to the internet can receive and process requests from any source, including cyber attackers. Here are the benefits of having firewall protection:
- Cyber threat protection. A firewall blocks malicious connections that cyber criminals use to launch a hacking attack or inject malware.
- Traffic filtering. VPS users can set a custom rule to only allow specific connections to reach the server and block the others.
- Access control. A system administrator can use a firewall to block outgoing traffic to prevent users on the server from accessing potentially malicious websites.
- Data collection. A firewall tracks system events, which you can analyze to set more suitable rules.
UFW is an application for Linux firewall configuration. It is pre-installed on Ubuntu 22.04 LTS and Debian 10 or later but disabled by default.
Uncomplicated Firewall (UFW) utilizes a command-line interface (CLI) and uses iptables for configuration. Iptables is Linux’s built-in firewall containing tables – storage for rules determining how to filter traffic.
It also has a graphical user interface called GUFW, which users can install on their desktop environment. Meanwhile, UFW command line usage is for a remote server like VPS.
How to Set Up Ubuntu Firewall on Different Ubuntu Versions
Before configuring firewall rules in Ubuntu, we must enable UFW. Although we will use Ubuntu 22.04 for this tutorial, the Linux commands should also work for the older versions.
UFW configuration on a remote server requires SSH connection using Terminal. Here’s how to do so on a Ubuntu system via Hostinger:
- Open hPanel → VPS.
- Select the relevant VPS.
- In the SSH access tab, copy the Terminal command similar to the following:
ssh username@server-ip
- Open Terminal and paste the command. Press Enter.
- Enter your SSH root password.
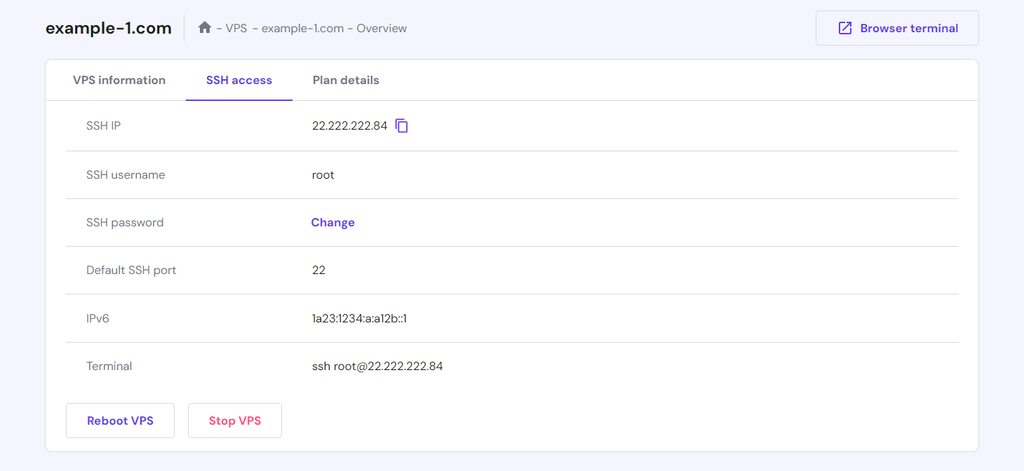
If you connect using SSH applications like PuTTY, paste the server IP address into the designated field and use port 22 to connect. On the CLI, enter the root username and password. For security reasons, note that the password won’t show when you type it.
Pro Tip
Hostinger’s users can use the Browser Terminal feature to run shell commands directly from their web browser without Terminal or SSH applications.
Once connected, follow these steps to configure UFW on Ubuntu 22.04:
- Activate UFW with the following command:
sudo ufw enable
- If you receive a UFW command not found error, it means the firewall isn’t installed on your system. To install it, use the command below:
sudo apt-get install ufw
- To confirm that the installation is successful, use this command to check the firewall status:
sudo ufw status

The default UFW policies block all incoming connections and allow outgoing connections, which are sufficient for most users. However, you must establish custom rules if you host network services or applications.

How to Set Firewall Rules on Ubuntu With UFW
A firewall rule is an instruction to determine how your system treats connections – accepted or denied. In this section, we will explain how to create custom UFW rules based on ports, IP addresses, and services.
Opening and Closing Ports with UFW
Ports are connection interfaces an application uses to establish a connection with a server.
Opening unused ports creates security vulnerabilities, as cyber criminals may use them to access your server. It makes closing and opening a port in Linux VPS essential to improve its security.
To minimize risks, users can open and close ports with UFW to control which applications are allowed to connect to their computer. Here are the command syntaxes:
sudo ufw allow port/protocol

sudo ufw deny port/protocol
Replace port with the port number and protocol with TCP or UDP. To find out the values for your application, refer to IANA’s list of port number registries.
Use allow to change the default incoming policy. For instance, run the following command to enable the port for SSH connections:
sudo ufw allow 22/tcp
To change the default policy for outgoing traffic, use the deny option. For example, enter the command below to block the connection from your server to a MySQL database:
sudo ufw deny 56/tcp
You can also open or close port ranges with a single command. Here’s how the basic syntax looks:
sudo ufw allow/deny starting_port:ending_port/protocol
For instance, here’s the command to deny access from port 300 to 310 UDP:
sudo ufw deny 300:310/UDP
Working With Services on Ubuntu Firewall
UFW lets administrators manage network services on Ubuntu systems by opening and closing ports. Instead of specifying the port, they can enter the service name.
For example, HTTP transmissions use port 80, while HTTPS connections require port 443. If you want to enable HTTP connections, run the following command:
sudo ufw allow http
The command will automatically open the HTTP port, namely 80. Similarly, enabling HTTPS connections means opening port 443.
Denying or Allowing IP Address Connections
UFW also lets users deny access to a specific IP address. To do so, execute the following command:
sudo ufw deny from ipaddress
Replace deny with allow if you want to enable access from the specified IP address, like the following:
sudo ufw allow from 192.168.1.3
You can also create a rule that applies to a specific network interface. For instance, this rule syntax allows an IP address to connect to a specific port only:
sudo ufw allow from ipaddress to any port portnumber
Here’s an example command that allows an IP address to connect to your server only when using port 44:
sudo ufw allow from 192.168.1.3 to any port 44
Alternatively, use this command to prevent the IP address from connecting to your server when using the specified port:
sudo ufw deny from 192.168.1.3 to any port 44
Deleting Rules on Ubuntu Firewall
To delete firewall rules in Ubuntu, use the delete command. Here’s the syntax:
sudo ufw delete rule_number
Since deleting rules requires their number label, list them using this command:
sudo ufw status numbered

Now, replace the placeholder with the appropriate rule number. For example, here’s a command that will delete rule number four.
sudo ufw delete 4
Alternatively, you can reset the firewall configuration to the default rules. To do so, set incoming and outgoing to default using these commands:
sudo ufw default deny incoming

sudo ufw default allow outgoing
To delete UFW rules entirely and start over, use the reset command:
sudo ufw reset
If you want to learn more commands, browse the UFW manual by running the following:
sudo ufw -help
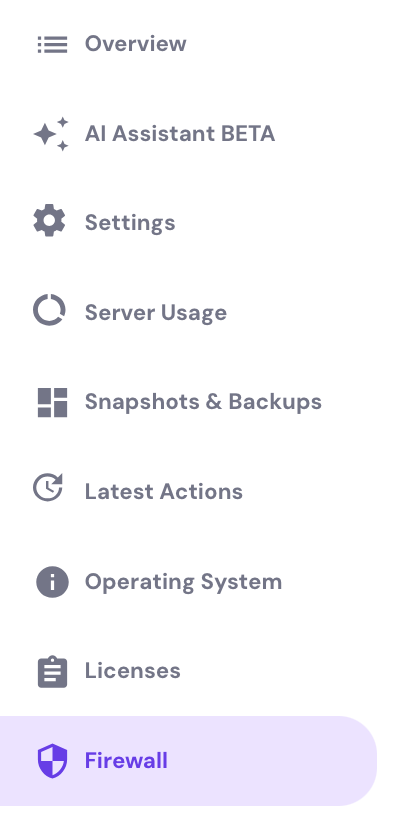
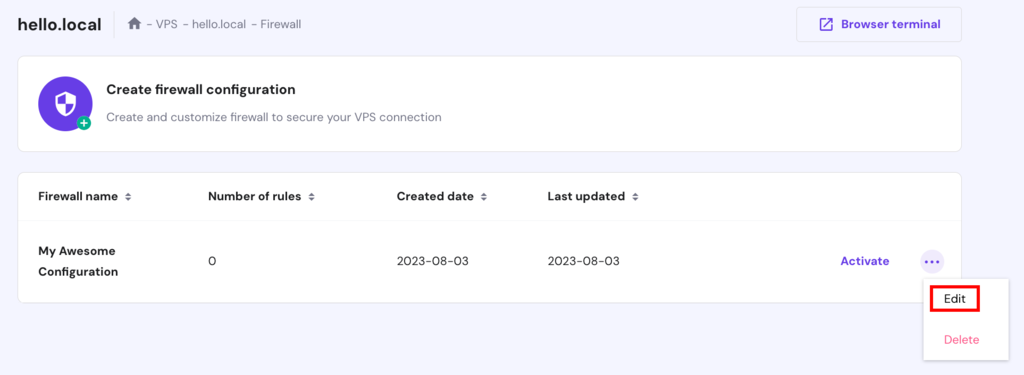
Hostinger’s VPS solutions have a built-in firewall management feature accessible via hPanel. It provides a graphical user interface to help users easily configure their firewall rules. Select your VPS and navigate to the Firewall section:
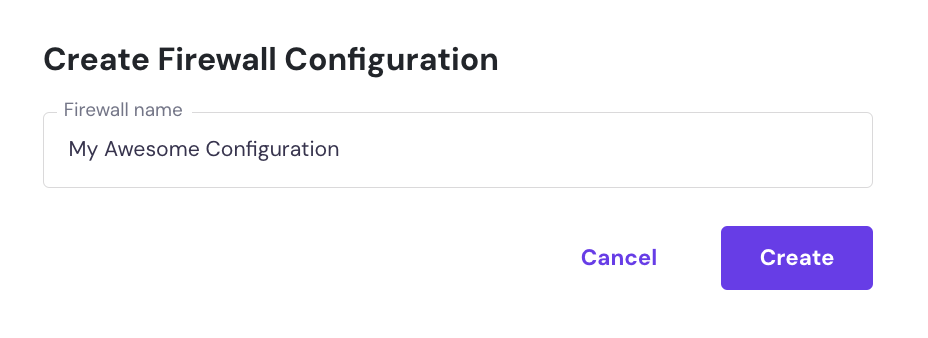
Then, select the Create firewall configuration button and give your configuration a name:
Lastly, hit Edit and add any preferred firewall rules:
UFW Best Practices
In this section, we will explain Ubuntu firewall best practices to help you utilize the program effectively to improve your VPS security.
Enable UFW Logging
UFW logging allows system administrators to review all incoming or outgoing packets stored in iptables. It provides detailed information about the packets, including their source, destination, and transmission protocol.
This feature helps users troubleshoot connection issues and identify potential security threats. However, it is disabled by default. To check its status, use the following command:
sudo ufw status verbose
To enable it, run this command:
sudo ufw logging on
Use the same command with an off value to disable UFW logging. You can run different commands to view UFW logs, but the easiest way is to use less. Here’s the command:
sudo less /var/log/ufw*
The command above assumes the default directory for UFW logs. If you store the firewall logs in another folder, change the file path accordingly.
Pro Tip
In addition to checking the logging feature, use sudo ufw status verbose to list your rules.
Use UFW With IPv6
As IPv4 IP addresses run out, IPv6 becomes more important in modern networking. UFW lets you filter IPv6 to improve your VPS security, but this feature is disabled by default.
To enable it, change the UFW configuration file using a text editor like Nano with this command:
sudo nano /etc/default/ufw
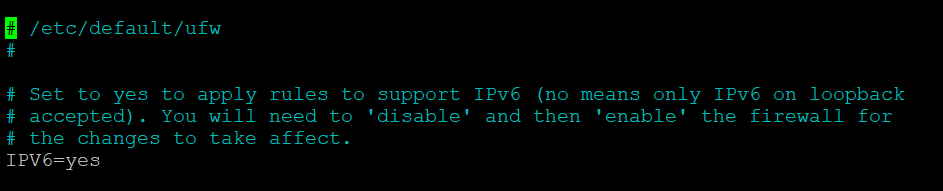
Find IPv6 and change the value from no to yes. Press Ctrl + X to quit Nano and press Y to confirm the changes. To disable it, change the value back to no.
Check UFW Compatibility With Docker
Docker may cause conflicts with UFW as it can modify the firewall rules in iptables. UFW won’t prevent an application in the Docker container from connecting to a blocked port, regardless of the rules.
Since UFW doesn’t show that the port is open, this incompatibility exposes your server to security risks. There are different ways to match UFW and Docker’s rules, but using the ufw-docker utility is the easiest.
Open Terminal or your SSH client and follow these steps to install and use the tool:
- Enter these commands to download the script from the repository:
sudo wget -O /usr/local/bin/ufw-docker \ https://github.com/chaifeng/ufw-docker/raw/master/ufw-docker
sudo chmod +x /usr/local/bin/ufw-docker
- Install the utility using this command:
sudo install ufw-docker
- Restart UFW with the command below:
sudo systemctl restart ufw
- Run the ufw-docker command to open a port for a Docker container, like the following:
sudo ufw-docker allow httpd 80
Set Up UFW Application Profiles
Several applications require multiple network interfaces, which can be tedious to allow individually. UFW lets you easily set a rule based on the application’s ports with one command:
sudo ufw allow app_name
Replace app_name with your application profile. For example, here’s the command to allow incoming SSH connections:
sudo ufw allow ssh
You can also allow ports from a source IP address to a specific destination using this command:
sudo ufw allow from source_IP to destination_IP app app_name
UFW has pre-configured application profiles by default, which you can obtain using this command:
sudo ufw app list
You may also create custom application profiles. To do so, connect to your server via Terminal or an SSH client and follow these steps:
- Run the touch command to create an empty file in the UFW application folder:
sudo touch /etc/ufw/applications.d/file_name
- Open the file using Nano with this command:
sudo nano /etc/ufw/applications.d/file_name
- Enter the following snippet to set your application profile. Replace the placeholders with the appropriate values:
[app_name]
title=application_title
description=application_description
ports=ports/protocol|ports/protocol|ports/protocol
- Press Ctrl + X to close Nano and Y to confirm the changes.
- Update the application definitions in UFW using these commands:
sudo ufw app update appname
sudo ufw app info appname
You can specify multiple ports with the same protocol using commas in the configuration code. For port ranges, use a colon instead of a dash. See the following example:
ports=80,443,8140/tcp|800:1500/udp
Follow Other Security Practices Beyond Firewall
Enabling UFW is one of many important Ubuntu security measures. Since there are a variety of cyber threats, system administrators must fortify firewalls with other security practices.
Here are several additional security practices you should implement in your VPS hosting environment:
- Update regularly. Older software packages have vulnerabilities that expose your VPS to cyber threats. To minimize the risk, regularly update your VPS software and enable cron jobs to automate the process.
- Change SSH ports. SSH connections use port 22 by default, which hackers often exploit to access your server. Changing the SSH port helps improve your VPS security.
- Use SSH keys. SSH keys are additional security credentials for connecting to your VPS. They are longer and more complex than passwords, making them more secure.
- Disable root login. A root user can modify any aspect of your system, making them a common target for hacking. To secure your VPS, disable root login and create alternative user roles with superuser privileges.
- Install IDS/IPS tool. Intrusion detection and prevention systems let you quickly determine the origin of malicious network traffic, which you can block using UFW. To learn more about how to install the tool, check out our tutorial on setting up Suricata on Ubuntu.
Conclusion
A VPS system is vulnerable to cyber threats when configured improperly. An efficient way to improve your Ubuntu server security is to install Uncomplicated Firewall (UFW) that filters outgoing and incoming connections.
UFW is installed by default, but users must manually enable it via Terminal or an SSH client like PuTTY. Once enabled, edit the default policies to filter connections based on ports, IP addresses, or services.
In addition, follow the firewall’s best practices to improve your Ubuntu network security. For example, enable logging to track traffic in detail, check UFW compatibility with Docker, set up an applications profile, and fortify the firewall with other security practices like using SSH keys.
Discover More About How to Protect Your Linux
How to Configure OpenVPN on VPS
How to Configure Fail2Ban on CentOS
How to Install ClamAV on CentOS
Ubuntu Firewall FAQ
In this section, we will answer several commonly asked questions about setting up UFW in Ubuntu.
Is UFW Pre-installed in Ubuntu 22.04 and Newer Versions?
Yes, UFW was introduced in Ubuntu 8.04 LTS, and it comes pre-installed in later versions, including 22.04. However, it is disabled on the default settings.
To enable it, enter the sudo ufw enable command. Other UFW features are also disabled by default, such as IPv6 support and logging.
What Are the Basic UFW Commands to Know When Setting up a Firewall on Ubuntu?
UFW has various commands for different purposes. For example, the sudo ufw status command checks whether the firewall is active.
Other important commands include sudo ufw deny and sudo ufw allow, which alter the default settings for incoming and outgoing connections. Enter sudo ufw -help to list all commands.
Are the UFW Commands the Same Across Ubuntu Versions?
UFW commands are mostly the same regardless of the Ubuntu version. However, if you use versions older than 8.04 TLS, you can’t run them.
What Is the Difference Between UFW and GUFW?
UFW is a command-line version of Ubuntu’s firewall, while GUFW has a graphical user interface. Both work similarly to configure your system’s firewall.
GUFW is easier to use for beginners as it has a visual interface. However, UFW is more convenient for a remote server as it uses SSH.

Aris is a Content Writer specializing in Linux and WordPress development. He has a passion for networking, front-end web development, and server administration. By combining his IT and writing experience, Aris creates content that helps people easily understand complex technical topics to start their online journey. Follow him on LinkedIn.