How to use the Linux dig command
The dig command, short for domain information groper, is a powerful network tool for querying domain name system (DNS) servers. It helps diagnose and resolve DNS-related problems, essential for maintaining network stability and performance.
This article provides a complete guide on using the dig command in Linux, from its installation and basic syntax to practical applications. By the end of this guide, you’ll know how to use dig effectively to perform DNS lookups, troubleshoot network issues, and monitor propagations.

Installing and setting up dig
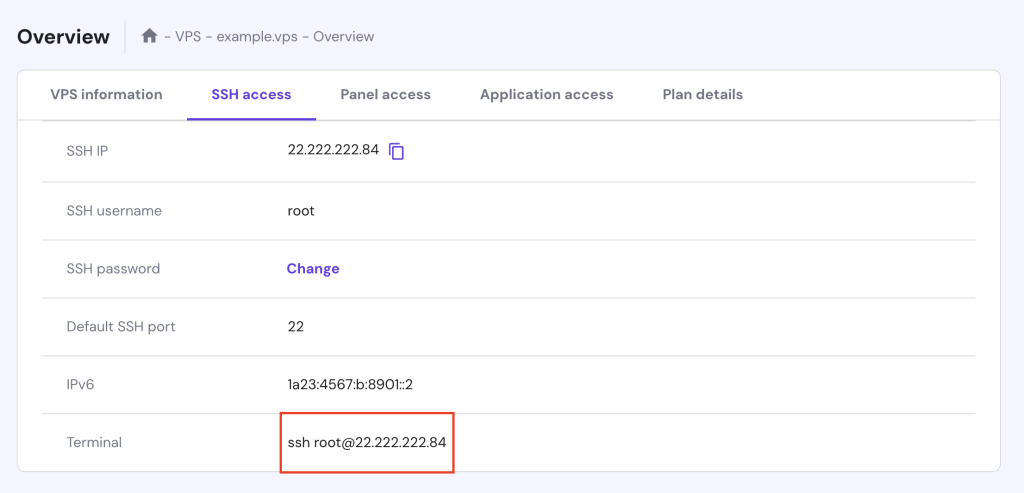
Before using the dig command, ensure it’s installed on your Linux system. For Hostinger VPS customers, access your server via SSH to install this tool. You can find your login credentials by navigating to the VPS dashboard → SSH access.
Here are the commands to install dig on different Linux distributions, all of which are available on Hostinger VPS plans.
Debian and Ubuntu
sudo apt-get update
sudo apt-get install dnsutils
CentOS
sudo yum install bind-utils
Fedora
sudo dnf install bind-utils
Arch Linux
sudo pacman -S bind
After that, verify that dig is installed correctly by checking its version:
dig -v
The output should look something like this:
DiG 9.16.1-Ubuntu

dig command syntax
The basic syntax of the dig command is as follows:
dig [server] [name] [type]
Here’s an explanation of each argument:
- [server] (optional). The IP address or hostname of the DNS server to query. dig will use the DNS servers listed in /etc/resolv.conf if omitted.
- [name]. The domain name to query. This is the DNS resource record about which you want information.
- [type] (optional). The DNS record type to query, including A, MX, and NS. dig will query an A record if no type is specified by default.
For instance, to query an A record for example.com, you can run:
dig example.com
Here’s the expected output:
; <<>> DiG 9.16.1-Ubuntu <<>> example.com

;; global options: +cmd

;; Got answer:

;; ->>HEADER<<- opcode: QUERY, status: NOERROR, id: 12345

;; flags: qr rd ra; QUERY: 1, ANSWER: 1, AUTHORITY: 2, ADDITIONAL: 1

;; QUESTION SECTION:

;example.com.   IN  A

;; ANSWER SECTION:

example.com.  3600  IN  A 93.184.216.34

;; AUTHORITY SECTION:

example.com.  3600  IN  NS ns1.example.com.

example.com.  3600  IN  NS ns2.example.com.

;; ADDITIONAL SECTION:

ns1.example.com.  3600  IN  A 192.0.2.1

;; Query time: 10 msec

;; SERVER: 192.0.2.53#53(192.0.2.53)

;; WHEN: Thu Jul 25 14:00:00 UTC 2024

;; MSG SIZE  rcvd: 123
dig command options
The dig command offers several options to customize the DNS queries and outputs. Here are some of the most commonly used ones:
- +short. Displays only the most relevant information, such as the IP address for an A record.
- +noall. Suppresses all sections of the output except those explicitly requested.
- +answer. Shows only the answer section of the output. Typically used with +noall.
- +trace. Performs a complete trace of the DNS resolution process from the root servers down to the authoritative servers.
- @server. Specifies a different DNS server to query instead of the default one.
- -x. Performs a reverse DNS lookup, translating an IP address to a domain name.
- +multi. Formats the output to be more human-readable, which is useful when dealing with multiple DNS records.
- +nocmd. Omits the initial command line from the output, showing only the results.
- +stats. Shows the statistics section, which includes query time and server details.
You can also use multiple options in one command to customize the output further. Below is an example of combining @server, +short, and +trace options:
dig @8.8.8.8 example.com +short +trace
When executed, it displays the following:
; <<>> DiG 9.16.1-Ubuntu <<>> @8.8.8.8 example.com +short +trace

;; global options: +cmd

.           518400  IN  NS  a.root-servers.net.

.           518400  IN  NS  b.root-servers.net.

...

example.com.  3600  IN  A 93.184.216.34
How to use the dig command
This section demonstrates how to use the dig command for various network administration scenarios.
Querying a specific DNS record type
Querying a specific DNS record type lets you obtain particular information about a domain, such as its IP address, mail servers, or name servers. Here are different dig commands to query specific DNS record types:
SOA record
The start of authority (SOA) record contains administrative information about the domain, including the primary name server and the domain administrator’s registered email.
dig example.com SOA
Here’s the output you should see:
...

;; QUESTION SECTION:

;example.com.  IN  SOA

;; ANSWER SECTION:

example.com.  3600  IN  SOA ns1.example.com. hostmaster.example.com. 2021071601 3600 1800 1209600 300

...
MX record
The mail exchange (MX) record specifies the mail servers responsible for receiving emails for the domain, which is vital for setting up and troubleshooting email services.
dig example.com MX
Running the above command will show the following:
...

;; QUESTION SECTION:

;example.com.  IN  MX

;; ANSWER SECTION:

example.com.  3600  IN  MX 10 mail.example.com.

;; ADDITIONAL SECTION:

mail.example.com.  3600  IN  A 192.0.2.2

...
NS record
The name server (NS) record lists the name servers responsible for the domain. It helps you understand the domain’s DNS infrastructure.
dig example.com NS
This command will show an output similar to:
...

;; QUESTION SECTION:

;example.com.  IN  NS

;; ANSWER SECTION:

example.com.  3600  IN  NS ns1.example.com.

example.com.  3600  3600  IN  NS ns2.example.com.

;; ADDITIONAL SECTION:

ns1.example.com.  3600  IN  A 192.0.2.1

...
Querying a specific DNS server
You can use dig to ask a particular DNS server for information instead of relying on the default ones configured in your system. It’s useful for testing and comparing responses from different DNS servers.
Querying Google’s public DNS server
Google’s public DNS server (8.8.8.8) is often used for testing and troubleshooting.
dig @8.8.8.8 example.com
Here’s the output:
...

;; QUESTION SECTION:

;example.com.  IN  A

;; ANSWER SECTION:

example.com.  3600  IN  A 93.184.216.34

;; AUTHORITY SECTION:

example.com.  3600  IN  NS ns1.example.com.

example.com.  3600  IN  NS ns2.example.com.

;; ADDITIONAL SECTION:

ns1.example.com.  3600  IN  A 192.0.2.1

...
Querying an authoritative name server
Authoritative name servers provide the definitive answer for DNS queries about domains, ensuring you get the most accurate response.
dig @ns1.example.com example.com
If your configurations are correct, you’ll see an output similar to the previous one.
Tracing the DNS path
Tracing the DNS path involves following a DNS query from your computer to the authoritative name server. This process lets you see the route queries take to the final DNS server.
To trace the DNS path, append the +trace option to your command like this:
dig example.com +trace
The dig output shows the DNS servers involved at each step:
.                       518400  IN      NS      a.root-servers.net.

.                       518400  IN      NS      b.root-servers.net.

;; Received 512 bytes from 192.0.2.1#53(192.0.2.1) in 5 ms

example.com.            3600    IN      NS      ns1.example.com.

example.com.            3600    IN      NS      ns2.example.com.

;; Received 200 bytes from 192.0.2.1#53(192.0.2.1) in 10 ms

example.com.            3600    IN      A       93.184.216.34

;; Received 100 bytes from 192.0.2.2#53(192.0.2.2) in 15 ms
Displaying only the answer section
Using the dig command, you can filter the output to show cleaner and more readable information while eliminating unnecessary details, making it quicker to analyze results.
Use the +noall and +answer options together in your dig command, for example:
dig example.com +noall +answer
This provides a clean and concise result showing just the queried domain’s IP address:
example.com. 3600 IN A 93.184.216.34
Formatting output
Similar to displaying only the answer section, formatting output lets you customize how the results are displayed to make them more readable and easier to analyze. Here are some command examples for use:
Using +short
This option summarizes the query results. For instance:
dig example.com +short
You should see the following output:
93.184.216.34
Using +multi
As the name suggests, +multi displays multiple records in a more readable format:
dig example.com +multi
Here’s the output:
example.com.  3600  IN  A   93.184.216.34

example.com.  3600  IN  NS  ns1.example.com.

3600  IN  NS  ns2.example.com.
Using +nocmd
Use +nocmd in your command to show only the main results:
dig example.com +nocmd
When executed, it displays:
;; QUESTION SECTION:

;example.com.  IN  A

;; ANSWER SECTION:

example.com.  3600  IN  A 93.184.216.34
Using +comments
With +comments, you can show or hide comment lines in the output. For example, to hide comments, run:
dig example.com +nocmd +noall +answer +nocomments
The above command will show:
example.com. 3600 IN A 93.184.216.34
Performing reverse DNS lookup
A reverse lookup converts an IP address into a domain name, the opposite of the more common forward DNS lookup. This helps verify that the IP address is correctly mapped to a specific domain name.
Here’s an example of performing a reverse DNS lookup:
dig -x 93.184.216.34
You’ll see an output similar to:
...

;; QUESTION SECTION:

;34.216.184.93.in-addr.arpa. IN  PTR

;; ANSWER SECTION:

34.216.184.93.in-addr.arpa. 3600  IN  PTR example.com.

...
Please note if a PTR record is not defined for an IP address, then it’s not possible to do a reverse DNS lookup since the PTR record points to the domain or hostname.
Executing batch queries
You can also use dig to execute multiple DNS lookups in a single command. It helps query information about several domain names or IP addresses, saving time and simplifying the process.
To run batch queries, follow these steps:
- Create a file named domains.txt or any name you prefer using the nano text editor:
nano domains.txt
- Add the IP addresses or domains you want to query, one per line:
example1.com

example2.com

example3.com
- Save your edits and exit nano by pressing Ctrl + X → Y → Enter.
- Run dig with the -f option followed by your file’s name:
dig -f domains.txt
When executed, the command shows:
...

;; QUESTION SECTION:

;example1.com.  IN  A

;; ANSWER SECTION:

example1.com.  3600  IN  A 93.184.216.34

;; AUTHORITY SECTION:

example1.com.  3600  IN  NS ns1.example1.com.

example1.com.  3600  IN  NS ns2.example1.com.

;; ADDITIONAL SECTION:

ns1.example1.com.  3600  IN  A 192.0.2.1

...

;; QUESTION SECTION:

;example2.com.  IN  A

;; ANSWER SECTION:

example2.com.  3600  IN  A 93.184.216.35

;; AUTHORITY SECTION:

example2.com.  3600  IN  NS ns1.example2.com.

example2.com.  3600  IN  NS ns2.example2.com.

;; ADDITIONAL SECTION:

ns1.example2.com.  3600  IN  A 192.0.2.2

...

;; QUESTION SECTION:

;example3.com.  IN  A

;; ANSWER SECTION:

example3.com.  3600  IN  A 93.184.216.36

;; AUTHORITY SECTION:

example3.com.  3600  IN  NS ns1.example3.com.

example3.com.  3600  IN  NS ns2.example3.com.

;; ADDITIONAL SECTION:

ns1.example3.com.  3600  IN  A 192.0.2.3
Verifying DNSSEC
DNS security extensions, or DNSSEC, are a set of protocols that secure the DNS lookup process. It ensures that the responses are authentic and haven’t been tampered with. Verifying DNSSEC helps protect against DNS spoofing attacks.
To verify DNSSEC with the dig command, add the +dnssec option:
dig example.com +dnssec
The output includes RRSIG records in the ANSWER and AUTHORITY sections:
...

;; QUESTION SECTION:

;example.com.  IN  A

;; ANSWER SECTION:

example.com.  3600  IN  A 93.184.216.34

example.com.  3600  IN  RRSIG  A 13 2 3600 (

20240301000000 20240215000000 12345 example.com.

hT+pV8JZfCh3UOjP4xB1C2YJmtD5efcd )

;; AUTHORITY SECTION:

example.com.  3600  IN  NS  ns1.example.com.

example.com.  3600  IN  NS  ns2.example.com.

example.com.  3600  IN  RRSIG  NS 13 2 3600 (

20240301000000 20240215000000 12345 example.com.

kd9K8vNlF8cD/B8ejq8G8C9Zp7L )

;; ADDITIONAL SECTION:

ns1.example.com.  3600  IN  A 192.0.2.1

ns1.example.com.  3600  IN  RRSIG  A 13 2 3600 (

20240301000000 20240215000000 12345 example.com.

y6R/B9elK5dQ/L5gRk9F4O0aP8g )

...
Practical dig applications
Once you’ve learned the basics, it’s time to explore some practical dig command applications.
Troubleshooting DNS issues
Using the dig command to diagnose DNS problems helps you effectively identify and resolve network issues. Here are general steps for troubleshooting DNS issues with this command:
- Check the DNS resolution by verifying if a domain name resolves correctly:
dig example.com
- Ensure the domain’s name servers are correctly configured:
dig example.com NS
- Identify where DNS resolution might be failing by tracing the entire DNS lookup path:
dig example.com +trace
- Verify the DNSSEC settings to see if the RRSIG records are present:
dig example.com +dnssec
- Make sure that an IP address resolves to the correct domain name:
dig -x 93.184.216.34
- To fix specific services like email, check the relevant DNS records. For example:
dig example.com MX
Pay attention to each output and make sure the ANSWER sections are correct.
Monitoring DNS propagation
Monitoring DNS propagation involves checking the DNS change status across different servers. It ensures that DNS record updates have been successfully propagated throughout the web.
Follow these instructions to verify DNS propagation:
- Use the @server option to query a specific DNS server, such as Google’s public DNS server:
dig @8.8.8.8 example.com
- Query different DNS servers to compare their responses. For Cloudflare’s server, run:
dig @1.1.1.1 example.com
If the ANSWER sections from different servers match, the DNS changes have propagated successfully. Otherwise, some servers may still need to update their records. You can check the propagation status periodically.
Performance testing
Measuring DNS response times is essential for assessing your DNS servers’ performance. This lets you identify slowdowns or issues affecting your network’s speed and reliability.
Here’s how to measure DNS response times:
- Run the basic dig command. Focus on the output’s Query time field, which indicates the time taken to get a DNS server response:
dig example.com
- Query different DNS servers to compare their response times. This helps identify which servers are performing better:
dig @8.8.8.8 example.com

dig @1.1.1.1 example.com
- Use the +stats option for additional statistics about query times and server details:
dig example.com +stats
Conclusion
In this article, we covered the essential uses of the Linux dig command, from fundamental DNS lookups to more advanced queries and troubleshooting methods. In addition, mastering dig can enhance your network management skills.
Practice the command examples in this guide to get the most out of dig. Experimenting with different options allows you to comprehend DNS’s inner workings better and optimize network performance.
If you have any questions or want to share your experience with dig commands, leave a comment below.
dig command FAQ
What is the dig command used for?
The dig command is used to query DNS name servers. It retrieves DNS information about numerous records, such as A, MX, and NS, helping diagnose and resolve network-related problems.
How does the dig command work?
The dig command works by sending a DNS query to the specified server. It then displays the response, which includes information about the queried domain’s DNS records, allowing network administrators to fix issues.
What are some common uses of the dig command?
The dig command is commonly used to perform DNS lookups, query specific record types, trace DNS resolution paths, verify DNSSEC, and troubleshoot propagation and resolution issues.

Ariffud is a Technical Content Writer with an educational background in Informatics. He has extensive expertise in Linux and VPS, authoring over 200 articles on server management and web development. Follow him on LinkedIn.