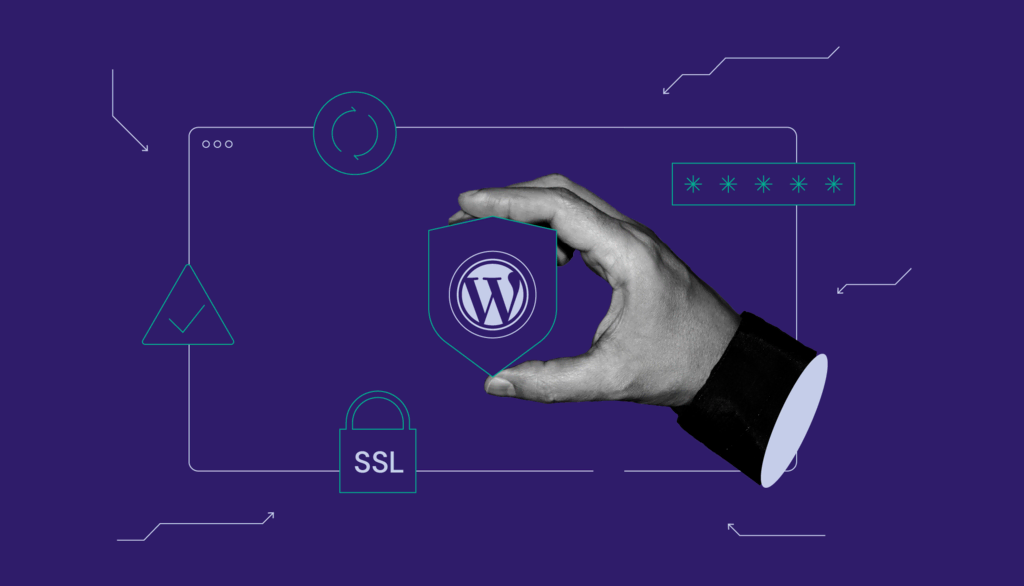
How to Improve WordPress Security: 22 Methods to Protect Your Website
WordPress is the most popular content management system (CMS), with 43.2% of all websites running on its software. Unfortunately, its popularity attracts all sorts of cybercriminals who exploit the platform’s security vulnerabilities.
This doesn’t mean that WordPress has a terrible security system – security breaches can also happen due to the users’ lack of security awareness. Therefore, it’s best to apply precautionary security measures before your website becomes a hacker target.
We will discuss 22 methods to improve WordPress security and protect your site from various cyberattacks. The article will include best practices and tips – with or without WordPress plugins. Some methods are also applicable to other platforms than WordPress.
Download WordPress Security Checklist
How to Secure WordPress Website – Video Tutorial
No time to read? Find out more about WordPress security measures in our tutorial instead.

WordPress Security Checklist and Additional Tips
Implementing one or two WordPress security measures won’t be enough to make your WordPress website completely safe.
Download our WordPress Security Checklist to help track your progress in applying important security measures to your website. We also share some WordPress security tips to help you protect your site further.
How to Secure Your WordPress Website?
1. Keep your site up to date.
2. Use secure wp-admin login credentials.
3. Setup safelist and blocklist for the admin page.
4. Use a trusted WordPress theme.
5. Install an SSL certificate for a secure data transfer.
6. Remove unused WordPress themes and plugins.
7. Enable two-factor authentication.
8. Create backups regularly.
9. Limit the number of failed login attempts.
10. Change your WordPress login page URL.
11. Automatically log out idle users.
12. Monitor user activity.
13. Regularly scan your site for malware.
14. Disable the PHP error reporting feature.
15. Migrate to a more secure web host.
16. Disable file editing.
17. Use .htaccess to disable PHP file execution and protect the wp-config.php file.
18. Change the default WordPress database prefix.
19. Disable the XML-RPC feature.
20. Hide your WordPress version.
21. Block hotlinking from other websites.
22. Manage file and folder permissions.
General Best Practices to Improve Website Security
In this section, we will go over six general WordPress security tips that don’t require advanced technical knowledge and high-risk investments. Even a beginner will be able to do these simple tasks, like updating WordPress software and removing unused themes.
1. Update WordPress Version Regularly
WordPress releases regular software updates to improve performance and security. These updates also protect your site from cyber threats.
Updating your WordPress version is one of the simplest ways to improve WordPress security. However, nearly 50% of WordPress sites are running on an older WordPress version, making them more vulnerable.
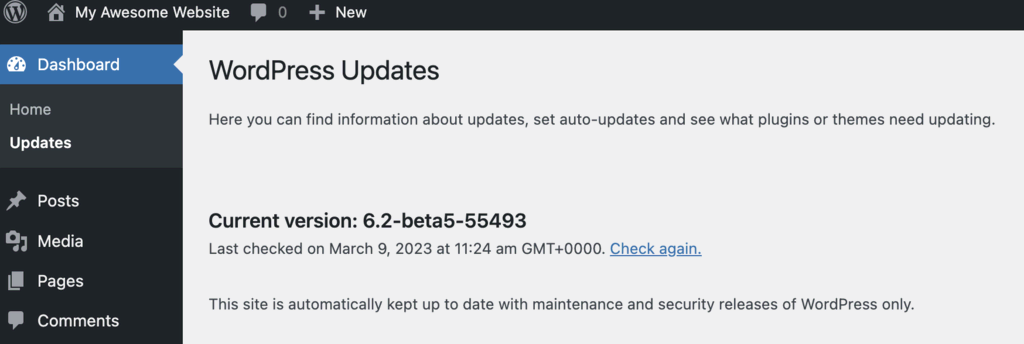
To check whether you have the latest WordPress version, log in to your WordPress admin area and navigate to Dashboard → Updates on the left menu panel. If it shows that your version is not up to date, we recommend updating it as soon as possible.
Keep an eye on the future update release dates to ensure your site won’t run an outdated WordPress version.
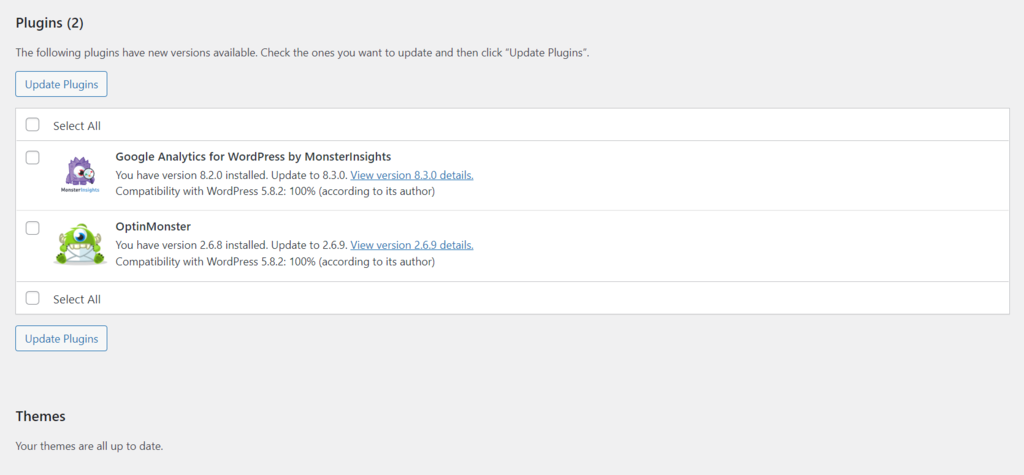
We also advise updating the themes and plugins installed on your WordPress site. Outdated themes and plugins may conflict with the newly updated WordPress core software, causing errors and being prone to security threats.
Follow these steps to get rid of outdated themes and plugins:
- Navigate to your WordPress admin panel, and go to Dashboard → Updates.
- Scroll down to the Plugins and Themes sections, and check the list of themes and plugins ready for updates. Note that they can be updated all at once or separately.
- Click Update Plugins.
Expert Tip
Enabling automatic updates eases up your workload, but it can crash your website due to incompatibility with older plugins or themes. If you enable this option, make sure that your website is backed up regularly so that you can revert to the previous version in case of an error.

2. Use Secure WP-Admin Login Credentials
One of the most common mistakes users make is using easy-to-guess usernames, such as “admin”, “administrator”, or “test”. This puts your site at a higher risk of brute force attacks. Moreover, attackers also use this type of attack to target WordPress sites that don’t have strong passwords.
Therefore, we recommend making your username and password unique and more complex.
Alternatively, follow these steps to create a new WordPress administrator account with a new username:
- From your WordPress Dashboard, navigate to Users → Add New.

- Create a new user and assign it the Administrator role. Add a password and hit the Add New User button once you’re done.
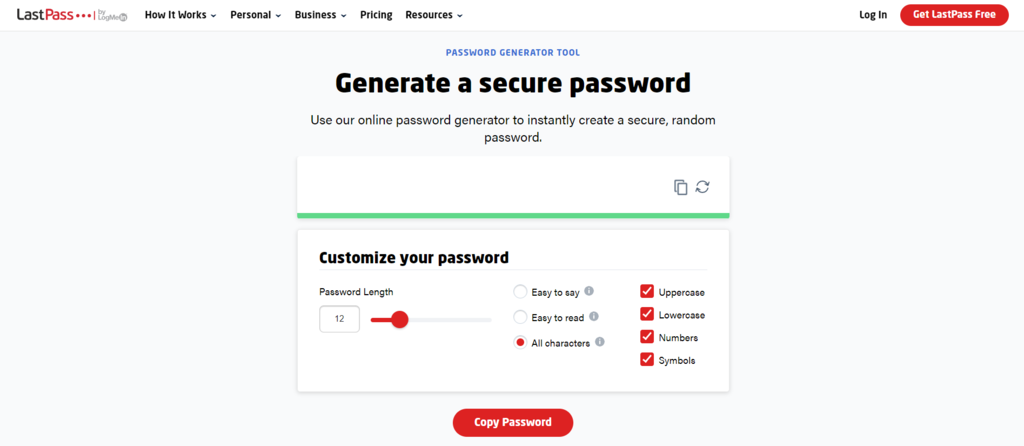
Incorporate numbers, symbols, and uppercase and lowercase letters into your password. We also recommend using more than 12 characters as longer passwords are way harder to crack.
Expert Tip
The longer password – the safer. However, strong passwords don’t have to be long and complex – use special symbols and numbers instead of well-known letters. For example, 41@bAm@! instead of Alabama! is easy to recall and harder to crack. Alternatively, use a pattern on the keyboard instead of actual words, like qpzmwoxn. Additionally, mix these two to create a stronger password.

If you need help generating a strong password, use online tools like LastPass and 1Password. You can also use their password management services to store strong passwords safely. That way, you don’t have to memorize them.
After creating a new WordPress admin username, you’ll need to delete your old admin username. Here are the steps to do so:
- Log in with your newly created WordPress user credentials.
- Navigate to Users → All Users.
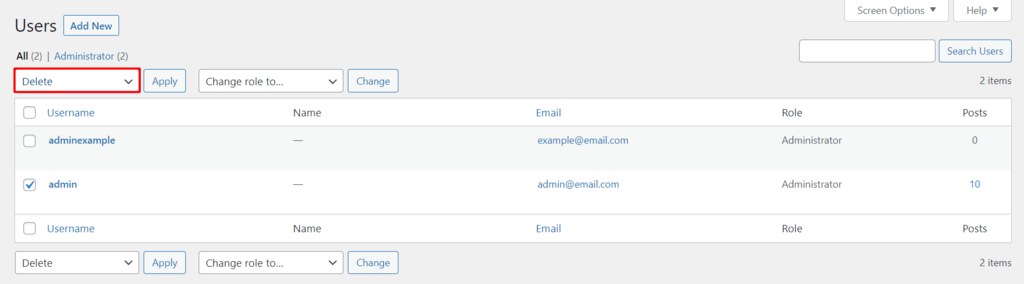
- Select the old admin account that you want to delete. Change the Bulk Actions dropdown menu to Delete, and click Apply.
To keep your site safe, it’s also important to check the network before logging in. If you’re unknowingly connected to a Hotspot Honeypot, a network operated by hackers, you risk leaking login credentials to the operators.
Even public networks such as a school library’s WiFi may not be as secure as it appears. Hackers can intercept your connection and steal unencrypted data, including login credentials.
For that reason, we recommend using a VPN when you connect to a public network. It provides a layer of encryption to the connection, making it harder to intercept data and protecting your online activities.
3. Set Up Safelist and Blocklist for the Admin Page
Enabling URL lockdown protects your login page from unauthorized IP addresses and brute force attacks. To do that, you need a web application firewall (WAF) service for WordPress, such as Cloudflare or Sucuri.
Using Cloudflare, it’s possible to configure a zone lockdown rule. It specifies the URLs you want to lockdown and the IP range allowed to access these URLs. Anyone outside the specified IP range won’t be able to access them.
Suggested reading
Looking for how to set up other rules on your CDN? Check out our guide to configuring Cloudflare page rules.
Sucuri has a similar feature called URL path blacklist. First, you add the login page URL to the blocklist so that no one can access it. Then, you safelist authorized IP addresses to access the login page.
Alternatively, restrict access to your login page by configuring your site’s .htaccess file. Navigate to your root directory to access the file.
Important! Before making any changes, we strongly advise you to back up the old .htaccess file. If anything goes wrong, you’ll be able to restore your site easily.
Adding this rule to your .htaccess will limit access to your wp-login.php to only one IP. Thus, attackers won’t be able to get in your login page from other locations.
# Block IPs for login Apache 2.2
<files /wp-login.php>
order deny,allow
allow from MYIP
allow from MYIP2
deny from all
</files>
# Block IPS for login Apache 2.4
<Files "wp-login.php">
Require all denied
</Files>
This rule should be placed after the # BEGIN WordPress and # END WordPress statements, as shown below.
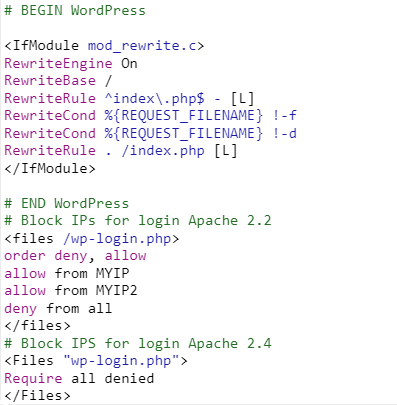
This rule applies even if you don’t have a static IP, since you can restrict logins to your ISP common range.
You can also use this rule to restrict other authenticated URLs, such as /wp-admin.
Expert Tip
Note that blocklisting is effective only against known threats. Hackers can design malware specifically to evade detection by tools that use a blocklist system. While safelisting offers more robust security, it can also be more complex to implement, especially if you want a third party to do it – they will need information on all the applications you use.
4. Use Trusted WordPress Themes
Nulled WordPress themes are unauthorized versions of the original premium themes. In most cases, these themes are sold at a lower price to attract users. However, they usually have many security issues.
Often, nulled theme providers are hackers who hacked the original premium theme and inserted malicious code, including malware and spam links. Moreover, these themes can be backdoors to other exploits that can endanger your WordPress site.
Since nulled themes are distributed illegally, their users don’t receive any support from the developers. This means that if your site has any issues, you’ll have to figure out how to fix them and secure your WordPress site yourself.
To avoid becoming a hacker target, we recommend picking a WordPress theme from its official repository or trusted developers. Alternatively, check third-party themes in official theme marketplaces such as ThemeForest, where thousands of premium themes are available.
5. Install SSL Certificate
Secure Sockets Layer (SSL) is a data transfer protocol that encrypts the data exchanged between the website and its visitors, making it more difficult for attackers to steal important information.
In addition, SSL certificates also boost the WordPress site’s search engine optimization (SEO), helping it gain more visitors.
Websites with an SSL certificate installed will use HTTPS instead of HTTP, so it’s easy to identify them.
Most hosting companies include SSL with their plans. For example, Hostinger provides a free Let’s Encrypt SSL certificate on all its hosting plans.
Once you have installed an SSL certificate on your hosting account, activate it on your WordPress website.
Plugins like Really Simple SSL or SSL Insecure Content Fixer can handle the technical aspects and SSL activation in a few clicks. The premium version of Really Simple SSL can enable HTTP Strict Transport Security headers that enforce HTTPS use when accessing the site.
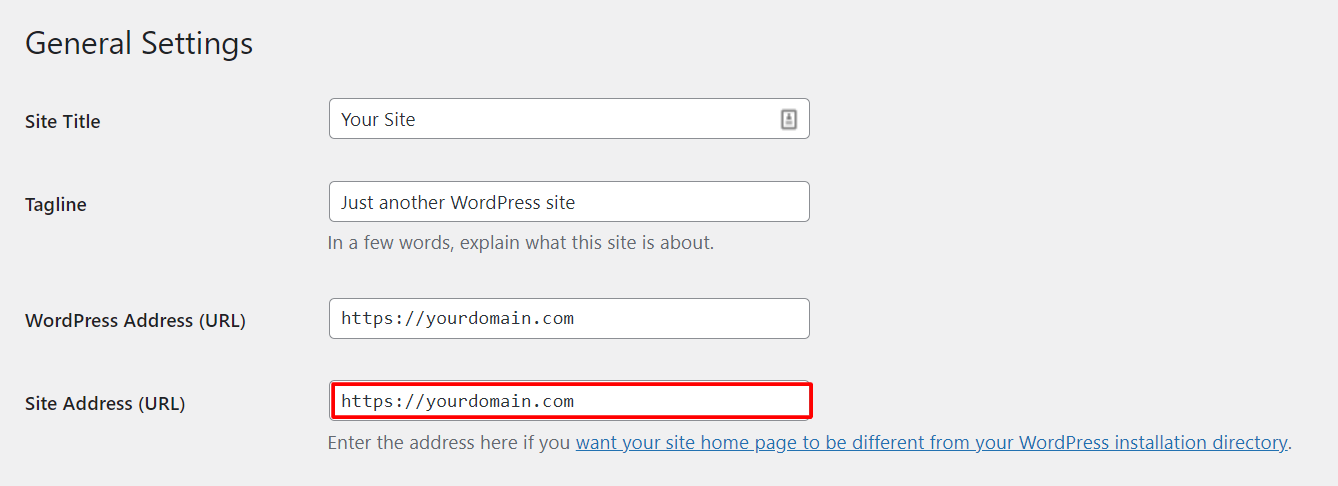
Once done, change your site’s URL from HTTP to HTTPS. To do so, navigate to Settings → General and find the Site Address (URL) field to change its URL.
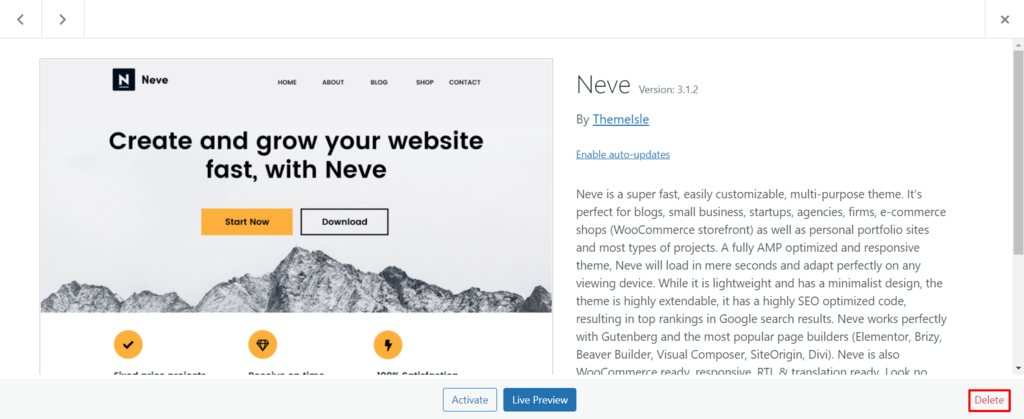
6. Remove Unused WordPress Plugins and Themes
Keeping unused plugins and themes on the site can be harmful, especially if the plugins and themes haven’t been updated. Outdated plugins and themes increase the risk of cyberattacks as hackers can use them to gain access to your site.
Follow these steps to delete an unused WordPress plugin:
- Navigate to Plugins → Installed Plugins.
- You’ll see the list of all installed plugins. Click Delete under the plugin’s name.

Note that the delete button will only be available after deactivating the plugin.
Meanwhile, here are the steps to delete an unused theme:
- From your WordPress admin dashboard, go to Appearance → Themes.
- Click on the theme you want to delete.
- A pop-up window will appear, showing the theme details. Click the Delete button on the bottom-right corner.
Expert Tip
When deleting a popular WordPress plugin or theme from your WordPress dashboard, you might not have the option to use a custom uninstaller, where you can choose to completely remove all of the data regarding that plugin or theme. In this case, you’ll need to do it via an FTP client by accessing your database and removing the plugin or theme entries manually.
How to Utilize WordPress Security Plugins
The next method to improve WordPress security is by using WordPress plugins.
It’s a convenient way to protect your website, but remember not to install all of these plugins at once without further consideration since too many plugins can slow down your site.
First, identify your needs to choose the most effective plugins for your website.
1. Enable Two-Factor Authentication for WP-Admin
Activate two-factor authentication (2FA) to reinforce the login process on your WordPress website. This authentication method adds a second layer of WordPress security to the login page, as it requires you to input a unique code to complete the login process.
The code is available only to you via a text message or a third-party authentication app.
To apply 2FA on your WordPress site, install a login security plugin like Wordfence Login Security. Additionally, you’ll need to install a third-party authentication app such as Google Authenticator on your mobile phone.
Expert Tip
If you’re not sure which two-factor authentication plugin to use, choose the most frequently updated and reviewed one.
Once you have installed the plugin and the authentication app, follow these steps to enable two-factor authentication:
- Go to the plugin page on your WordPress admin. If you’re using Wordfence Login Security, navigate to the Login Security menu on the left menu panel.
- Open the Two-Factor Authentication tab.
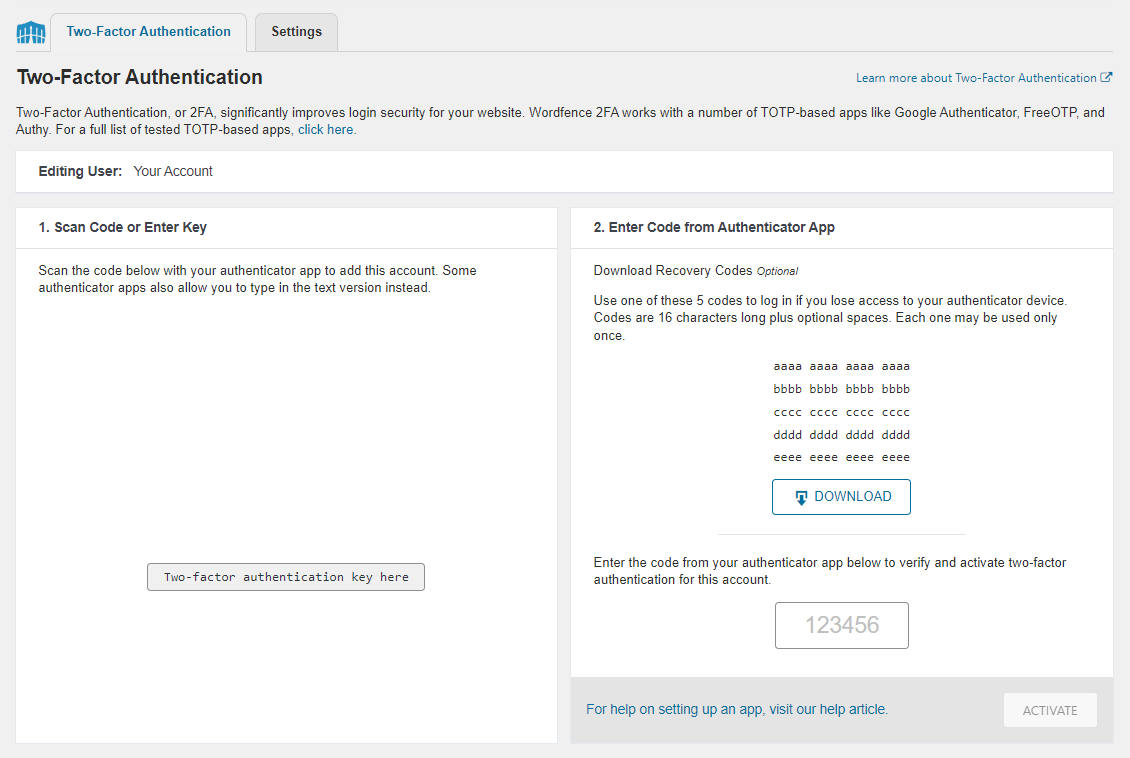
- Use the app on your mobile phone to scan the QR code or enter the activation key.
- Enter the code generated on your mobile phone app to the available field under the recovery codes section.
- Click the ACTIVATE button to complete the setup.
Also, download the provided recovery codes in case you lose access to the device that contains the authentication app.
2. Back Up WordPress Regularly
Regularly creating a WordPress site backup is an important mitigation task because it will help you recover your site after incidents, such as cyberattacks or physical damage to the data center. The backup file should include your entire WordPress installation files, like your database and the WordPress core files.
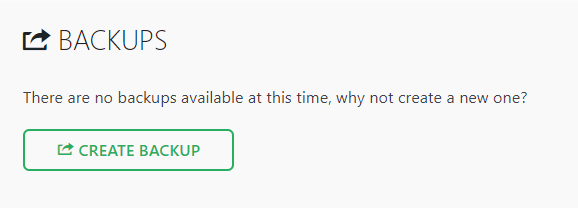
With WordPress, backing up a site can be done using a plugin like All-in-One WP Migration. Follow these steps to create a backup file with this plugin:
- Install and activate the plugin.
- Navigate to the All-in-One WP Migration menu at the left menu panel.
- Select Backups.
- Click Create Backup.
- Once the backup is created, it will appear in a list on the Backups page.

- Download and save the backup to the storage. To do so, go to All-in-One WP Migration → Export.
- Click the EXPORT TO drop-down menu, select File. This will generate a backup for your site.

- Once the process is complete, click the download link and save your site backup to designated safe storage, preferably not a location on the same server as your website. This is because backups stored on your web server are publicly accessible, making it vulnerable to cyberattacks.
In case of an incident, you can restore your WordPress site using All-in-One WP Migration’s importing tool.
Hostinger users can also create backups without a WordPress plugin by using the hPanel’s backup feature.
Expert Tip
I wouldn’t recommend storing website backups on a personal computer. Instead, use storage applications like Google Drive. But if you decide to do so, the best way would be to store it in at least three locations, such as your computer, a USB flash drive, and an external storage like Dropbox.
3. Limit Login Attempts
WordPress allows its users to make an unlimited number of login attempts on the site. Unfortunately, hackers can brute force their way to your WordPress admin area by using various password combinations until they find the right one.
Thus, you should limit login attempts to prevent such attacks on the website. Limiting failed attempts also helps monitor any suspicious activities on your site.
Most users only need a single try or a few failed attempts, so you should be suspicious of any questionable IP addresses that reach the attempt limit.
One way to limit the login attempts in order to increase WordPress security is by using a plugin. There are many great options available, such as:
- Limit Login Attempts Reloaded – configures the number of failed attempts for specific IP addresses, adds users to the safelist or blocks them entirely, and informs website users about the remaining lockout time.
- Loginizer – offers login security features such as 2FA, reCAPTCHA, and login challenge questions.
- Limit Attempts by BestWebSoft – automatically blocks IP addresses that reach the login attempt limit and adds them to a deny list.
One of the risks of implementing this WordPress security measure is getting a legitimate user locked out of WordPress admin. However, you shouldn’t be worried about that, as there are many ways to recover locked-out WordPress accounts.
4. Change the WordPress Login Page URL
To take a step further to protect your website from brute force attacks, consider changing the login page’s URL.
All WordPress websites have the same default login URL – yourdomain.com/wp-admin. Using the default login URL makes it easy for hackers to target your login page.
Plugins like WPS Hide Login and Change wp-admin Login enable custom login URL settings.
If you use the WPS Hide Login plugin, here are the steps to change your WordPress login page URL:
- On your dashboard, go to Settings → WPS Hide Login.
- Fill in the Login URL field with your custom login URL.
- Click the Save Changes button to finish the process.
5. Log Idle Users Out Automatically
Many users forget to log out of the website and leave their sessions running. Hence, letting someone else who will use the same device access their user accounts and potentially exploit confidential data. This especially applies to users who use public computers in internet cafes or public libraries.
Therefore, it’s crucial to configure your WordPress website to log inactive users out automatically. Most banking sites use this technique to prevent unauthorized visitors from accessing their sites, ensuring that their client’s data is safe.
Using a WordPress security plugin like Inactive Logout is one of the easiest ways to log out idle user accounts automatically. Aside from terminating idle users, this plugin can also send a custom message to alert idle users that their website session will end soon.
6. Monitor User Activity
Identify any unwanted or malicious actions that put your website in danger by tracking activities in your admin area.
We recommend this method for those who have multiple users or authors accessing their WordPress website. That’s because users may change settings that they should not, like altering themes or configuring plugins.
By monitoring their activities, you will know who is responsible for those unwanted changes and if an unauthorized person has breached your WordPress website.
The easiest way to track user activity is by using a WordPress plugin, such as:
- WP Activity Log – monitors changes on multiple website areas, including posts, pages, themes, and plugins. It also logs newly added files, deleted files, and modifications to any file.
- Activity Log – monitors various activities on your WordPress admin panel and lets you set rules for email notifications.
- Simple History – in addition to recording activity log on WordPress admin, it supports multiple third-party plugins like Jetpack, WP Crontrol, and Beaver Builder, recording all activity related to them.
7. Check for Malware
The AV-TEST Institute registers over 450,000 new malware and potentially unwanted applications (PUA) every day. Some malware even have a polymorphic nature, meaning they can modify themselves to avoid security detection.
Thus, it’s crucial to regularly scan your WordPress site for malware since attackers always develop new types of threats.
Fortunately, many great WordPress malware scanner plugins can check for malicious software and improve WordPress security.
Our experts recommend these security plugins to install on your site:
- Wordfence – a popular WordPress security plugin with real-time malware signature updates and alert notifications that inform if another site has blocklisted yours for suspicious activity.
- BulletProof Security – helps secure your WordPress website with an idle session logout feature, hidden plugin folders that aren’t visible in the WordPress plugins section, and database backup and restoration tools.
- Sucuri Security – one of the best security plugins on the market, offering various SSL certificates, remote malware scanning, and post-hack security action features.
Expert Tip
If your WordPress website is infected with malware, follow these key points:
1. Be sure to always have your wp-admin area accessible, perform a scan, and get rid of the malware.
2. Make sure that your plugins, themes, and WordPress core software are up to date.
3. Check for vulnerabilities in your database to see if your plugins or themes are listed there as a risk.
How to Secure WordPress Without Using Plugins
It’s also possible to enhance your website security without using plugins. Most of these tasks will involve tweaking your site’s code, but no need to worry – we’ll show you how to do it step by step.
1. Disable PHP Error Reporting
The PHP error reporting displays the full information about your website’s paths and file structure, making it a great feature for monitoring your site’s PHP scripts.
However, showing your website’s vulnerabilities on the backend is a serious WordPress security flaw.
For example, if it displays a specific plugin on which the error message has appeared, cybercriminals could use that plugin’s vulnerabilities.
There are two ways to disable PHP error reporting – via the PHP file or your hosting account’s control panel.
Modifying the PHP File
Follow these steps to modify your PHP file:
- Open your site’s wp-config.php file using an FTP client such as FileZilla or your hosting provider’s File Manager.
- Add the following code snippet to the file. Make sure to add it before any other PHP directive.
error_reporting(0);
@ini_set(‘display_errors’, 0);
- Click Save to apply the change.
Changing PHP Settings Using the Control Panel
If you don’t want to code, disable the PHP error reporting via your hosting provider’s control panel. Here’s how to do so via hPanel:
- From your hPanel dashboard, navigate to the Advanced section. Then, click PHP Configuration.
- Go to the PHP Options tab, uncheck the displayErrors option.
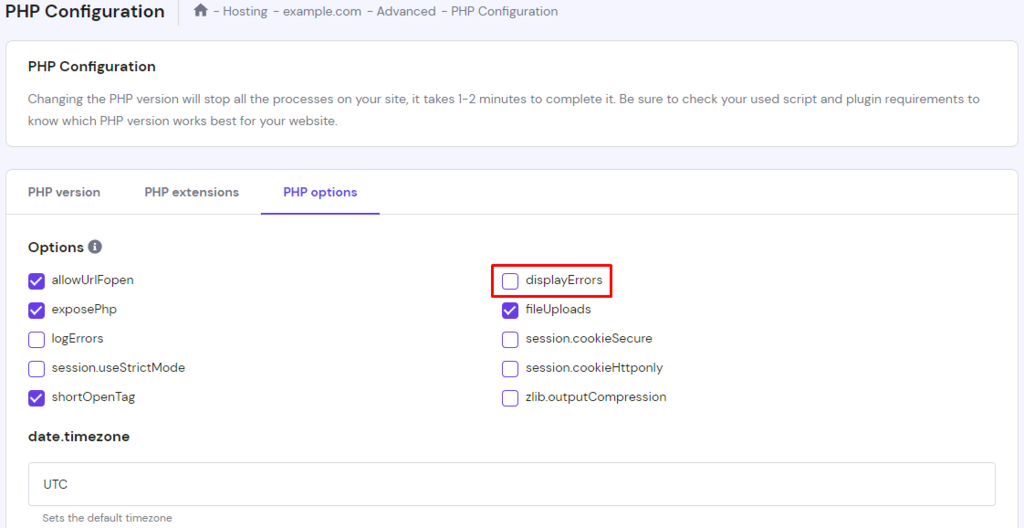
- Click Save.
2. Migrate to a More Secure Web Host
Multiple WordPress security measures won’t matter much if the hosting environment is prone to cyberattacks. Your hosting provider should guarantee a safe space for all your website data and files on their server, so it’s critical to choose the one that has an excellent security level.
If you think your current web hosting company is not secure enough, it’s time to migrate your WordPress website to a new hosting platform. Here’s what you need to consider when searching for a secure web host:
- Type of web hosting – shared and WordPress hosting types tend to be more vulnerable to cyberattacks than other types of hosting due to resource sharing. Select a web host that also offers VPS services or dedicated hosting to isolate your resources.
- Security – a good hosting provider monitors its network for suspicious activity and periodically updates its server software and hardware. They also need to have server security and protection against all types of cyberattacks.
- Features – regardless of the hosting type, having automatic backups and security tools for preventing malware is a must-have feature to safeguard your WordPress site. In the worst-case scenario, you will be able to use it to restore a compromised website.
- Support – choosing a hosting company with a 24/7 support team with excellent technical knowledge is essential. They will help you protect your data and tackle any technical and safety problems that may occur.
Hostinger’s WordPress hosting offers the essential resources and features needed to protect your WordPress website, such as a web application firewall and a malware scanner like Monarx. We also provide virtual private servers and cloud hosting service if you prefer to keep resources isolated.
3. Turn File Editing Off
WordPress has a built-in file editor that makes editing WordPress PHP files easy. However, this feature can become a problem if hackers gain control of it.
For this reason, some WordPress users prefer to deactivate this feature. Add the following line of code to the wp-config.php file to disable file editing:
define( 'DISALLOW_FILE_EDIT', true );
If you want to re-enable this feature on your WordPress site, simply remove the previous code from wp-config.php using an FTP client or your hosting provider’s File Manager.
4. Restrict Access Using the .htaccess File
The .htaccess file ensures that WordPress links work properly. Without this file declaring the correct rules, you will get many 404 Not Found errors on your site.
Furthermore, .htaccess can block access from specific IPs, restrict access to only one IP, and disable PHP execution on particular folders. Below we’ll show you how to use .htaccess to harden your WordPress security.
Important! Always back up your existing .htaccess file before making any changes to it. This can help you to restore your site easily if anything goes wrong.
Disabling PHP Execution in Specific Folders
Hackers often upload backdoor scripts to the Uploads folder. By default, this folder only hosts uploaded media files, so it shouldn’t contain any PHP files.
To secure your WordPress site, disable the PHP execution in the folder by creating a new .htaccess file in /wp-content/uploads/ with these rules:
<Files *.php>
deny from all
</Files>
Protecting the wp-config.php File
The wp-config.php file in the root directory contains WordPress core settings and MySQL database details. Thus, the file is usually a hacker’s primary target.
Protect this file and keep WordPress secure by implementing these .htaccess rules:
<files wp-config.php>
order allow,deny
deny from all
</files>
5. Change the Default WordPress Database Prefix
WordPress database holds and stores all crucial information required for your site to function. Therefore, hackers often target the database with SQL injection attacks. This technique injects harmful code into the database and can bypass WordPress security measures and retrieve the database content.
Over 50% of cyberattacks consist of SQL injection, making it one of the biggest threats. Hackers execute this attack because many users forget to change the default database prefix wp_.
Let’s take a look at two methods that you can implement to protect your WordPress database from SQL injection attacks.
Important! Before proceeding, make sure to back up your MySQL database.
Changing Table Prefix
- From your hPanel dashboard, navigate to the File Manager and open the wp-config.php file. Alternatively, use an FTP client to access the file.
- Look for the $table_prefix value within the code.
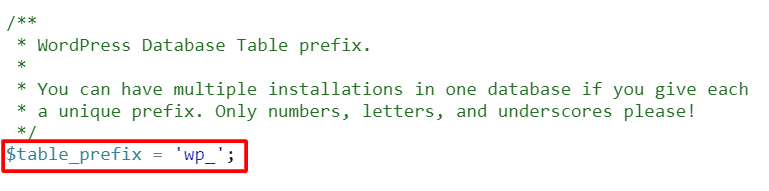
- Replace the default WordPress database prefix wp_ with a new one. Use a combination of letters and numbers to create a unique prefix for the website.
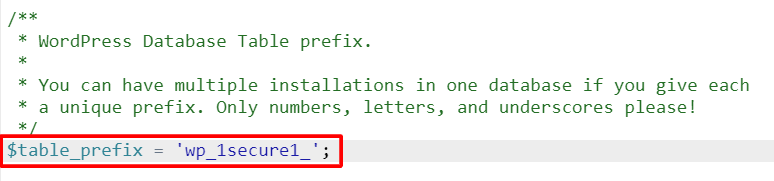
- Click Save & Close.
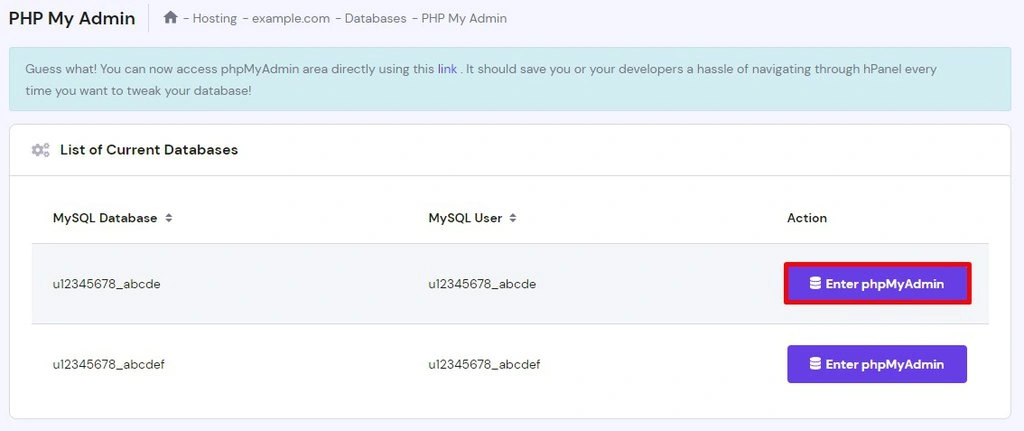
- Moving back to the hPanel dashboard, go to the Databases section and click phpMyAdmin. Then, open the site’s database by clicking Enter phpMyAdmin.
- If you have multiple databases, find the database’s name in the wp-config.php file. Look for the following block of code:
// ** MySQL settings - You can get this info from your web host ** //
/** The name of the database for WordPress */
define( 'DB_NAME', 'MySQL Database' );
- Scroll down to the bottom and click on the Check all button.
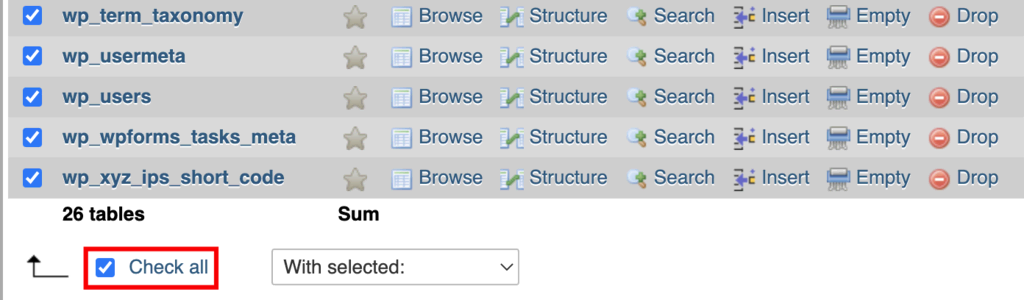
- Click on the With selected: drop-down menu and select the Replace table prefix option.
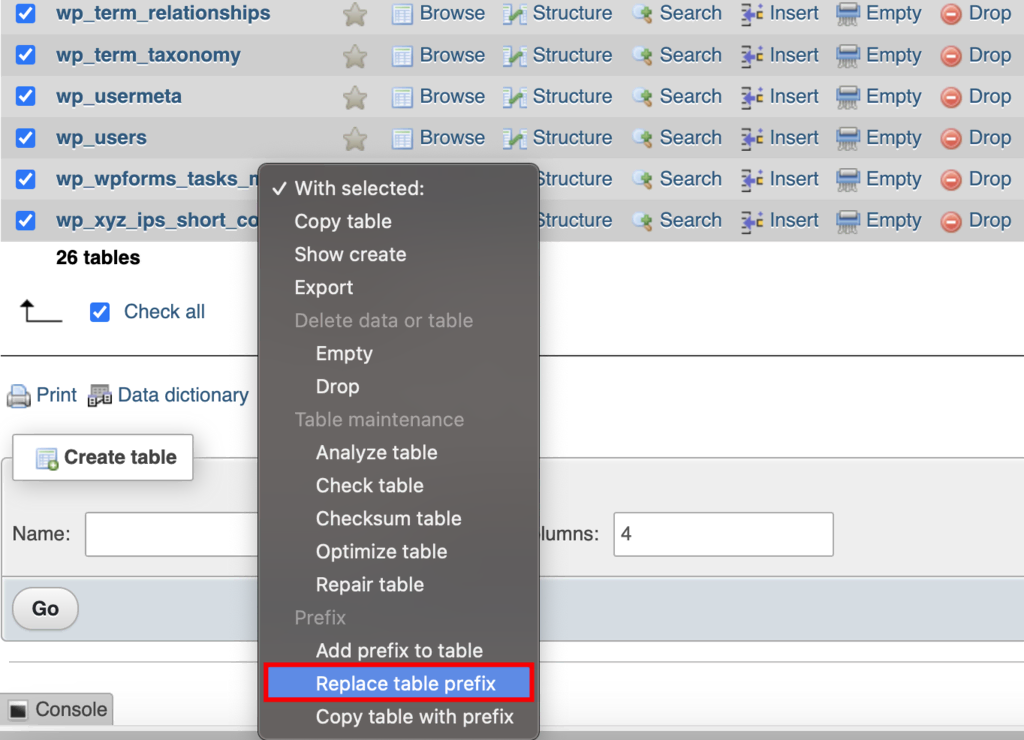
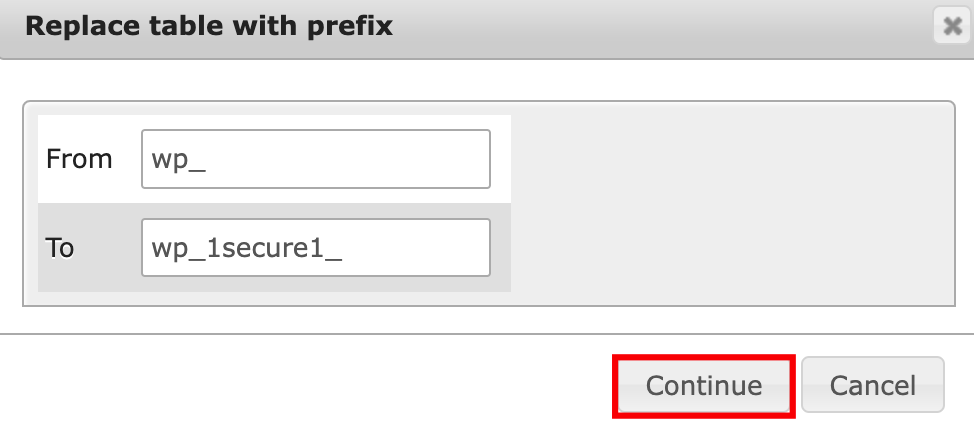
- Enter the current prefix along with a new one, and select Continue.
Updating Prefix Values in the Tables
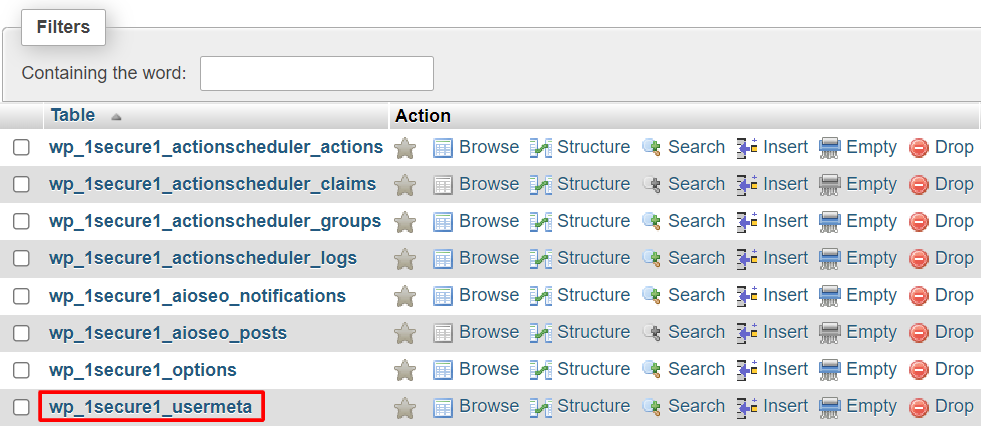
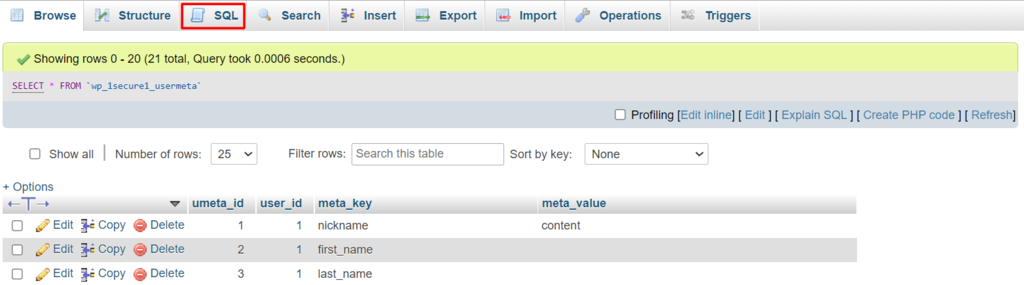
Depending on the number of WordPress plugins installed on your site, you may need to update some values in the database manually. Do this by running separate SQL queries on tables that are likely to have values with the wp_ prefix – these include the options and usermeta tables.
Use the code below to filter all values that contain the following prefix:
SELECT * FROM `wp_1secure1_tablename` WHERE `field_name` LIKE '%wp_%'
wp_1secure1_tablename contains the table name in which you want to perform the query. Meanwhile, field_name represents the name of the field/column where values with wp_ prefix most likely appear.
Here’s how to manually change the prefix value:
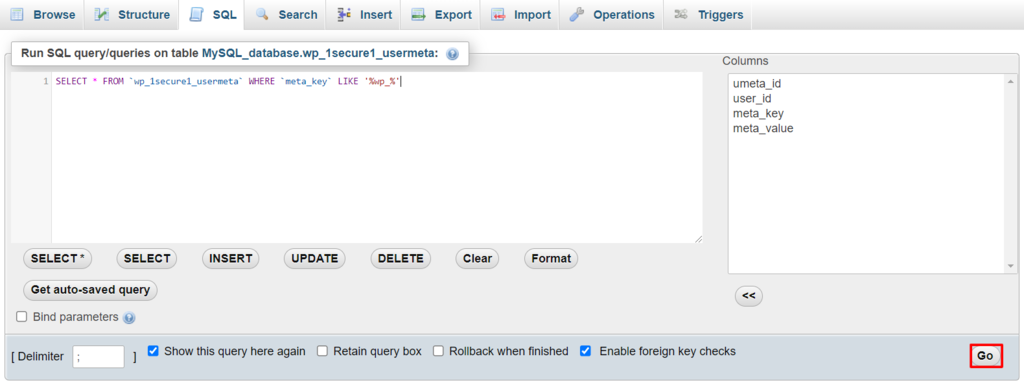
- From the phpMyAdmin dashboard, navigate to a table with the prefix value that you want to update. For example, open wp_1secure1_usermeta.
- Navigate to the SQL tab at the top menu bar.
- Enter the code above in the SQL query editor to filter the values containing wp_, and click Go. Be sure to modify the information according to your actual table and field names.
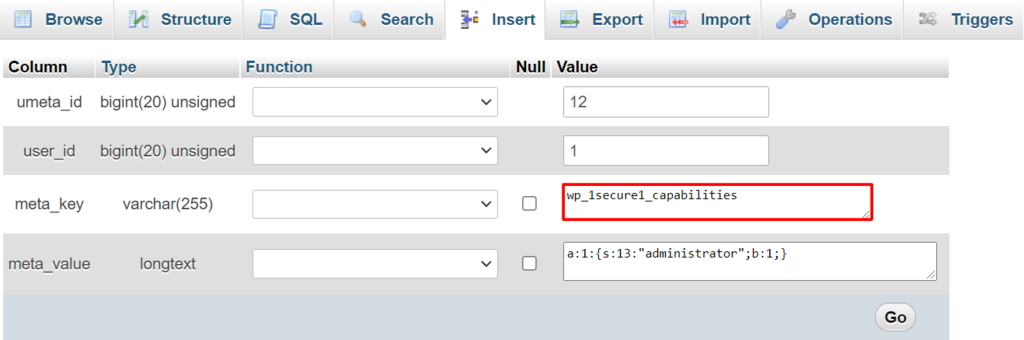
- The filter results will appear. Click the Edit button next to the targeted field.
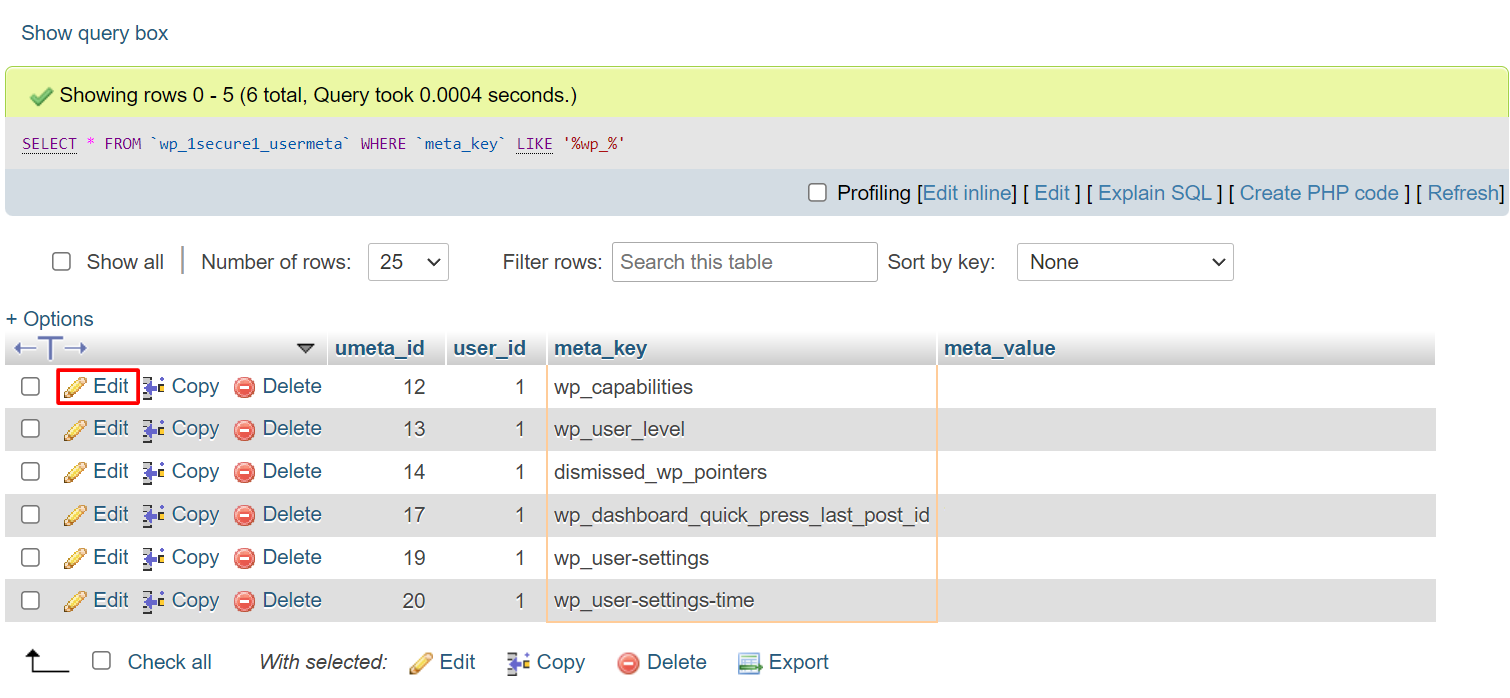
- Change the prefix value, and click Go. Perform steps 4 and 5 to all filtered values.
- Repeat from step 1 for the rest of the tables within the database to update all values with the wp_ prefix.
6. Disable XML-RPC
XML-RPC is a WordPress feature for accessing and publishing content via mobile devices, enabling trackbacks and pingbacks, and using the Jetpack plugin on your WordPress website.
However, XML-RPC has some weaknesses that hackers can exploit. The feature lets them make multiple login attempts without being detected by the security software, making your site prone to brute force attacks.
Hackers can also take advantage of the XML-RPC pingback function to perform DDoS attacks. It allows attackers to send pingbacks to thousands of websites at once, which can crash the targeted sites.
To determine whether XML-RPC is enabled, run your site through an XML-RPC validation service and see whether you receive a success message. This means that the XML-RPC function is running.
You can disable the XML-RPC function either by using a plugin or manually.
Disabling XML-RPC Using a Plugin
Using a plugin is the faster and simpler way to block the XML-RPC feature on your website. We recommend using the Disable XML-RPC Pingback plugin. It will automatically turn off some of the XML-RPC functionalities, preventing hackers from performing attacks using this WordPress security flaw.
Disabling XML-RPC Manually
Another way to stop all incoming XML-RPC requests is by doing it manually. Locate the .htaccess file in your root directory and paste the following code snippet:
# Block WordPress xmlrpc.php requests
<Files xmlrpc.php>
order deny,allow
 deny from all
 allow from 000.00.000.000
</Files>
To allow XML-RPC to access a particular IP, replace the 000.00.000.000 with the IP address or delete the code line altogether.
7. Hide the WordPress Version
Hackers can break into your site easier if they know which version of WordPress you’re running. They can use that version’s vulnerabilities to attack your site, especially if it’s an older WordPress version.
Luckily, it’s possible to hide the information from your site using the WordPress Theme Editor. Follow the steps to do so:
- From your WordPress dashboard, navigate to Appearance → Theme Editor.
- Choose your current theme and select the functions.php file.
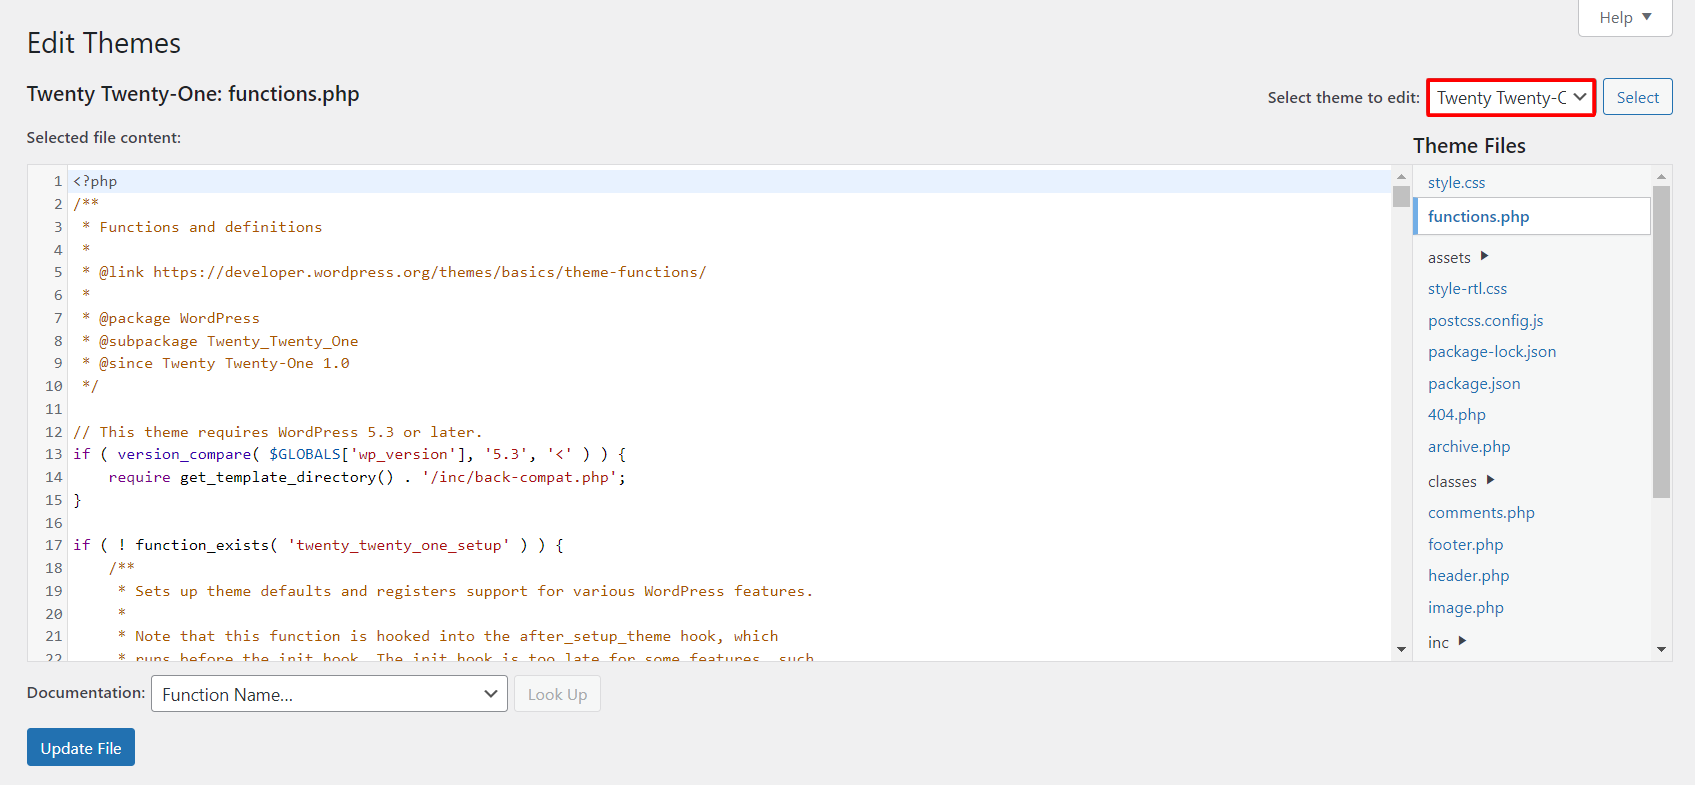
- To remove the version number from the header and RSS feeds, paste the following code to the functions.php file:
function dartcreations_remove_version() {
return '';
} add_filter('the_generator', 'dartcreations_remove_version');
- WordPress generator meta tag also displays the WordPress version number. Add this line to get rid of it:
remove_action('wp_head', 'wp_generator');
- Click Update File to save the changes.
8. Block Hotlinking
Hotlinking is the term used when someone displays your website’s asset, usually a picture, on their website. Every time people visit a website with hotlinks to your content, it uses up your web server resources, slowing down your site.
To see if your content was hotlinked, type the following query in Google Images, replacing yourwebsite.com with your domain name:
inurl:yourwebsite.com -site:yourwebsite.com
To prevent hotlinking, use an FTP client, a WordPress security plugin, a CDN, or edit the control panel’s settings.
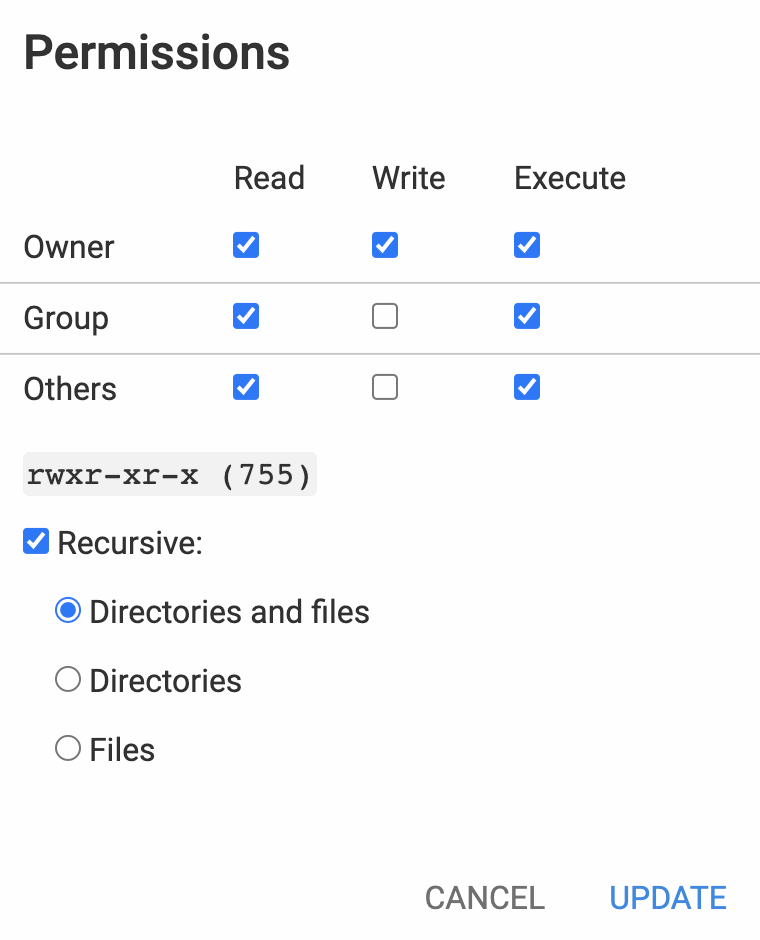
9. Manage File Permissions
Prevent hackers from gaining access to your admin account by determining which users can read, write, or execute your WordPress files or folders.
You can use your web host’s File Manager, FTP client, or via command line to manage file and folder permissions.
Generally, permissions are set by default, which may vary depending on different files or folders. Specifically for the wp-admin folder and wp-config file, make sure only to allow the Owner to write it.
Why Do You Need to Secure a WordPress Website?
If your WordPress website gets hacked, you risk losing important data, assets, and credibility. Furthermore, these security issues can jeopardize your customers’ personal data and billing information.
The cost of cybercrime damages can reach up to $10.5 trillion per year by 2025. Surely you don’t want to become a hacker target and contribute to that.
Based on WPScan Vulnerability Database, these are some of the most common types of WordPress security vulnerabilities:
- Cross-site request forgery (CSRF) – forces the user to execute unwanted actions in a trusted web application.
- Distributed denial-of-service (DDoS) attack – incapacitates online services by flooding them with unwanted connections, thus rendering a site inaccessible.
- Authentication bypass – gives hackers access to your website’s resources without verifying their authenticity.
- SQL injection (SQLi) – forces the system to execute malicious SQL queries and manipulate data within the database.
- Cross-site scripting (XSS) – injects malicious code that turns the site into a transporter of malware.
- Local file inclusion (LFI) – forces the site into processing malicious files placed on the web server.
We recommend reading our other article to learn more about identifying and fixing a hacked WordPress site to help minimize data and financial loss.
Suggested Reading
Check out our guide about web application security and protect your site from cyber attacks.
Conclusion
Cyberattacks may come in different forms, from malware injection to DDoS attacks. WordPress websites, in particular, are common targets for hackers due to the CMS’s popularity. Therefore, WordPress website owners must know how to secure their sites.
However, securing a WordPress site is not a one-time task. You need to continuously reassess it since cyberattacks are ever-evolving. The risk will always be there, but you can apply WordPress security measures to reduce those risks.
We hope this article has helped you understand the importance of WordPress security measures and how to implement them.
Feel free to leave a comment if you have any questions or more WordPress security tips.
Other WordPress must-knows
How to Install WordPress
How to Clear Cache in WordPress
How to Optimize Images in WordPress
How to Speed Up WordPress
How to Duplicate Pages in WordPress
How to Improve WordPress Security FAQ
Does WordPress Need a Firewall?
Setting up a website firewall is necessary as it helps guard your WordPress site against hacking attempts or other forms of cyberattacks by blocking unwanted traffic. Since WordPress doesn’t have a built-in website firewall, you can set it up by downloading a plugin like Sucuri.
Is WordPress Easily Hacked?
As a platform, WordPress is a secure and safe to use. WordPress security is not only about the technology but also about the human factors. No matter how safe the platform is, your site can easily be hacked if you don’t take other security measures (use strong passwords etc).
Why Is My WordPress Not Secure?
If your browser shows that your WordPress site is not secure, that means your site doesn’t have an SSL certificate or the SSL isn’t configured correctly. Consider installing one or switching to HTTPS to fix the issue.
Is Security Plugin Necessary for WordPress?
Yes, installing a hack scanner security plugin such as Jetpack and Sucuri can help protect your site for the long term. Remember to only install the necessary ones as having too many plugins can break your site.
How Do I Secure My WordPress Site Without Plugins?
Start by making sure that you use a secure WordPress hosting. Then, configure your site for better WordPress security: manage file permissions, disable PHP error reporting and XML-RPC, restrict access to wp-config.php, and block hotlinking from other websites.
Why Does WordPress Get Hacked So Much?
Many WordPress sites get hacked because the site owner doesn’t use enough security measures. This leaves sites with various vulnerabilities that open the way for potential attackers. Attackers also regularly target WordPress-powered websites because it’s used by almost half of the existing websites.
Why Is My WordPress Site Being Attacked?
Your WordPress site might have security vulnerabilities like outdated plugins, weak passwords, and unprotected access to the wp-admin directory. Apply regular website maintenance and use our WordPress Security Checklist to ensure you’ve applied sufficient security measures to your site.
What Is the Best WordPress Security Plugin?
We recommend Wordfence or Sucuri as the best WordPress security plugins. Both are similar, offering malware a WordPress scanner, web application firewall, and traffic monitoring. Sucuri is great if you have an online store, but if you’re looking for a free plugin, then Wordfence is a great option.

Leo is a Content Specialist and WordPress contributor. Armed with his experience as a WordPress Release Co-Lead and Documentation Team Representative, he loves sharing his knowledge to help people build successful websites. Follow him on LinkedIn.

Comments
September 07 2020
Thanks For this Awesome Tips. Just one Question Do you feel we need Any plugins like wordfence etc after Taking these Steps? i have read these plugins slows down the site and also security is something which should be taken care by hosting company rather than a Plugin so Any help. Like i am asking for serious Business Sites with lakhs of traffics. and last thing would u suggest using sucuri CDN and WAF or cloudflare is Enough?
November 11 2020
Hey Aditya. You can definitely use plugins such as Wordfence, but they do slow the website as they spend your resources (it takes more RAM, CPU power etc to run each plugin). As for the CDN - CloudFlare should be enough. You don't want to add more than 1 CDN as they may conflict with each other.
January 16 2022
Hi, In point no. 13. Using .htaccess for Better Security, the code has to be added to the .htaccess in wp-admin folder. It is not explicitly mentioned here. I added the code to ,htaccess in root directory (public_html) and the site started giving 403 forbidden error to any non-admin visitor. Please check the link here https://www.wpbeginner.com/wp-tutorials/protect-your-admin-folder-in-wordpress-by-limiting-access-in-htaccess/
January 18 2022
Hi! Thanks for your input - I've passed it to the team to alter add an explicit note about it within the text :)
May 21 2022
To protect wp-config.php, are we to paste the code below in the general .htaccess or create a new .htaccess in wp-config.php order allow,deny deny from all
May 24 2022
Hi there! Yes, you should use
allowanddenyin your existing .htaccess file; you can find more detailed guide here -> How to block IPs via .htaccess fileMarch 10 2023
This article should be updated. There is no need to manually rename all tables with new prefixes. 1. Open your database in PhpMyAdmin. 2. Click on the database name in the menu to the left to unfold all tables. 3. Select all tables that start with wp_; you should have 12 in total. 4. Click With selected to open the drop-down menu and select Replace table prefix. Type in wp_ in the From-field, and the new name in the To-field, in this example, hostinger_. Click Continue to make the change.
March 10 2023
Hello there! Thank you for your input, it definitely looks like a much more efficient way. We will be sure to test it out and add it as soon as possible.
July 28 2023
Hi, i plan to make a shared hosting wordpress, so is this kind of good tips are already applied by Hostinger?
August 04 2023
Hello there! The tutorial gives you options what you personally can do to your website to improve it's security. From our side we offer an option to turn on automatic WordPress updates, an integrated malware scanner and give all the freedom to do things like managing hotlinks, permissions, setting password for specific directories.