How to Add JavaScript to HTML: A Complete Guide

In this tutorial, we’ll show you how to add JavaScript to HTML. The beginning will include a short introduction to JavaScript, while the rest of the guide will focus on various ways of adding JavaScript to HTML.
Download complete HTML cheat sheet
If you want to display static content, for example, a set of images, then HTML can do the job for you. However, static pages are slowly becoming a thing of the past. Most of the content today is interactive and includes flashy slideshows, forms, and menus. They enhance user experience and add dynamicity to the website.
This is achieved by scripting languages and JavaScript is one of the most famous in this regard. It lets developers make websites that interact with the user and vice versa. Even though there are many other languages available, none of them is as popular as JavaScript. In order to utilize it to the greatest potential, it’s used in tandem with HTML.
How to Add JavaScript to HTML
There are two ways to add JavaScript to HTML and make them work together. Now that we have talked about JavaScript and have seen what some of its advantages can be, let’s take a look at some of the ways we can link JavaScript to HTML.
How to Add JavaScript Directly to a HTML File
The first way to add JavaScript to HTML is a direct one. You can do so by using the <script></script> tag that should encompass all the JS code you write. JS code can be added:
- between the <head> tags
- between the <body> tags
Depending on where you add the code the JavaScript in your HTML file, the loading will differ. The recommended practice is to add it in the <head> section so that it stays separated from the actual content of your HTML file. But placing it in the <body> can improve loading speed, as the actual website content will be loaded quicker, and only then the JavaScript will be parsed. For this example, let’s take a look at the following HTML file that is supposed to show the current time:
<!DOCTYPE html>
<html lang="en-US">
<head>
<meta charset="UTF-8">
<meta name="viewport" content="width=device-width, initial-scale=1">
<script>JAVASCRIPT IS USUALLY PLACED HERE</script>
<title>Time right now is: </title>
</head>
<body>
<script>JAVASCRIPT CAN ALSO GO HERE</script>
</body>
</html>
Right now, the above code doesn’t involve JavaScript and hence can’t show the actual time. We can add the following code to make sure it displays the correct time:
var time = new Date();
console.log(time.getHours() + ":" + time.getMinutes() + ":" + time.getSeconds());
We will surround this code by <script> and </script> tags and put it in the head of the HTML code to ensure that whenever the page loads, an alert is generated that shows the current time to the user. Here’s how the HTML file will look after we add the code:
<!DOCTYPE html>
<html lang="en-US">
<head>
<meta charset="UTF-8">
<meta name="viewport" content="width=device-width, initial-scale=1">
<title>Time right now is: </title>
<script>
var time = new Date();
console.log(time.getHours() + ":" + time.getMinutes() + ":" + time.getSeconds());
</script>
</head>
<body>
</body>
</html>
If you want to display the time within the body of the page, you will have to include the script within the <body> tags of the HTML page. Here’s how the code will look when you do so:
<!DOCTYPE html>
<html lang="en-US">
<head>
<meta charset="UTF-8">
<meta name="viewport" content="width=device-width, initial-scale=1">
<title>Time right now is: </title>
</head>
<body>
<script>
let d = new Date();
document.body.innerHTML = "<h1>Time right now is:  " + d.getHours() + ":" + d.getMinutes() + ":" + d.getSeconds()
"</h1>"
</script>
</body>
</html>
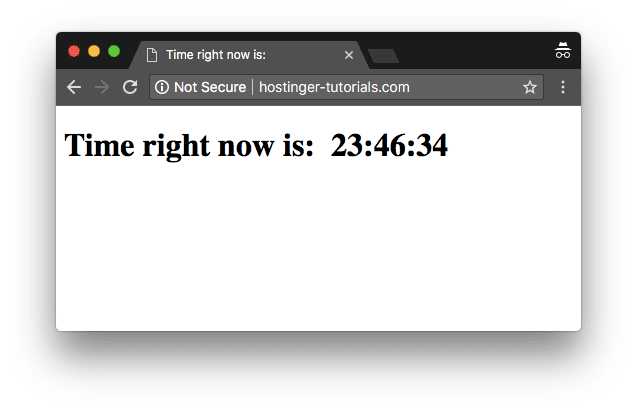
Here’s what the final result would look like:
How to Add JavaScript Code to a Separate File
Sometimes adding JavaScript to HTML directly doesn’t look like the best way to go about it. Mostly because some JS scripts need to be used on multiple pages, therefore it’s best to keep JavaScript code in separate files. This is why the more acceptable way to add JavaScript to HTML is via external file importing. These files can be referenced from within the HTML documents, just like we reference CSS documents. Some of the benefits of adding JS code in separate files are:
- When HTML code and JavaScript code is separated, the design principle of separation of concerns is met and it makes everything a lot more sustainable and reusable.
- Code readability and maintenance is made a lot easier.
- Cached JavaScript files improve overall website performance by decreasing the time taken by pages to load.
We can reference the JavaScript file within HTML like this:
<!DOCTYPE html>
<html lang="en-US">
<head>
<meta charset="UTF-8">
<meta name="viewport" content="width=device-width, initial-scale=1">
<title>Time right now:</title>
</head>
<body>
</body>
<script src="js/myscript.js"></script>
</html>
The contents of the myscript.js file will be:
let d = new Date();
document.body.innerHTML = "<h1>Time right now is:  " + d.getHours() + ":" + d.getMinutes() + ":" + d.getSeconds()</h1>"
Important! Here it’s assumed that the myscript.js file is present in the same directory as the HTML file.
JavaScript Example to Validate an Email Address
JavaScript powers your application by helping you validate user input at the client side. One of the most important user inputs that often need validation is email addresses. This JavaScript function can help you validate the entered email address before sending it to the server:
function validateEmailAddress(email) {
var re = /^(([^<>()[\]\\.,;:\s@\"]+(\.[^<>()[\]\\.,;:\s@\"]+)*)|(\".+\"))@((\[[0-9]{1,3}\.[0-9]{1,3}\.[0-9]{1,3}\.[0-9]{1,3}\])|(([a-zA-Z\-0-9]+\.)+[a-zA-Z]{2,}))$/;
return re.test(email);
}
function validate() {
$("#result").text("");
var emailaddress = $("#email").val();
if (validateEmailAddress(emailaddress)) {
$("#result").text(emailaddress + " is valid :)");
$("#result").css("color", "green");
} else {
$("#result").text(emailaddress + " is not correct, please retry:(");
$("#result").css("color", "red");
}
return false;
}
$("#validate").bind("click", validate);
In order to attach this function to a form input, you can use the following code:
<form>
<p>Enter an email address:</p>
<input id='email'>
<button type='submit' id='validate'>Validate!</button>
</form>
<h2 id='result'></h2>
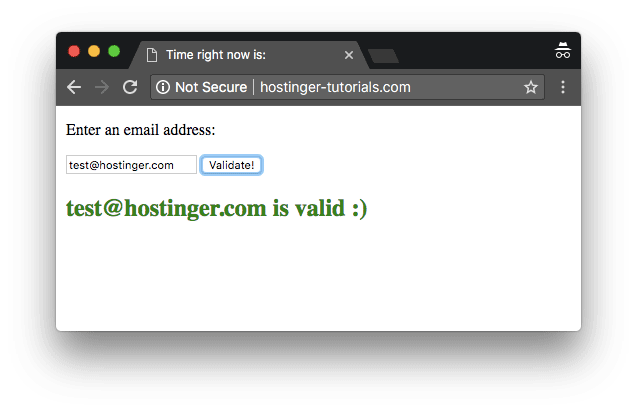
Here’s the result that you would get after combining all the ingredients together in a HTML file:
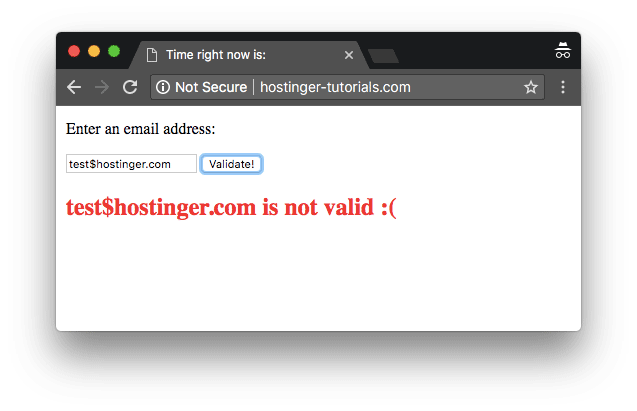
And if the validation is incorrect, the result will differ:
Congratulations! You have learned how to add JavaScript to HTML with a few basic examples.
Advantages of JavaScript
JavaScript was first known as LiveScript. But because Java was the talk of the town (the world really), Netscape deemed it right to rename it to JavaScript. Its first appearance dates back to 1995 within Netscape 2.0. Here are some of the best advantages of using JavaScript:
Minimalized Server Interaction
It’s a well-known fact that if you want to optimize the performance of a website, the best way is to reduce the communication with the server. JavaScript helps in this regard by validating user input at the client-side. It only sends requests to the server after running the initial validation checks. As a result, resource usage and amount of requests to the server reduces significantly.
Richer, User-Friendly Interfaces
By using JavaScript, you can create interactive client-side interfaces. For example adding sliders, slideshows, mouse roll-over effects, drag-and-drop features and so on.
Immediate Feedback to the User
By using JavaScript, you can ensure that users get an immediate response. For example, let’s imagine a user has filled a form and left one field empty. Without JavaScript validation, they will have to wait for the page to reload only to realize that they left an empty field. However, with JavaScript, they will be alerted instantly.
Easy Debugging
JavaScript is an interpreted language, which means that written code gets deciphered line by line. In case any errors pop up, you will get the exact line number where the problem lies.
Conclusion
In this article, we talked about the two different ways to add JavaScript in HTML code and once you get a hang of things, the possibilities of doing great things by using the two programming languages are endless. JavaScript can be used in combination with HTML to power modern web applications that are intuitive, interactive and user-friendly. By using simple client-side validation, it reduces server traffic and improves the overall efficiency of the website.


Comments
March 08 2018
Thanks so much for the post. Really great, thank you!
May 11 2022
Itís hard to find experienced people in this particular topic, but you seem like you know what youíre talking about! Thanks
May 12 2022
Happy to hear you enjoyed the read!