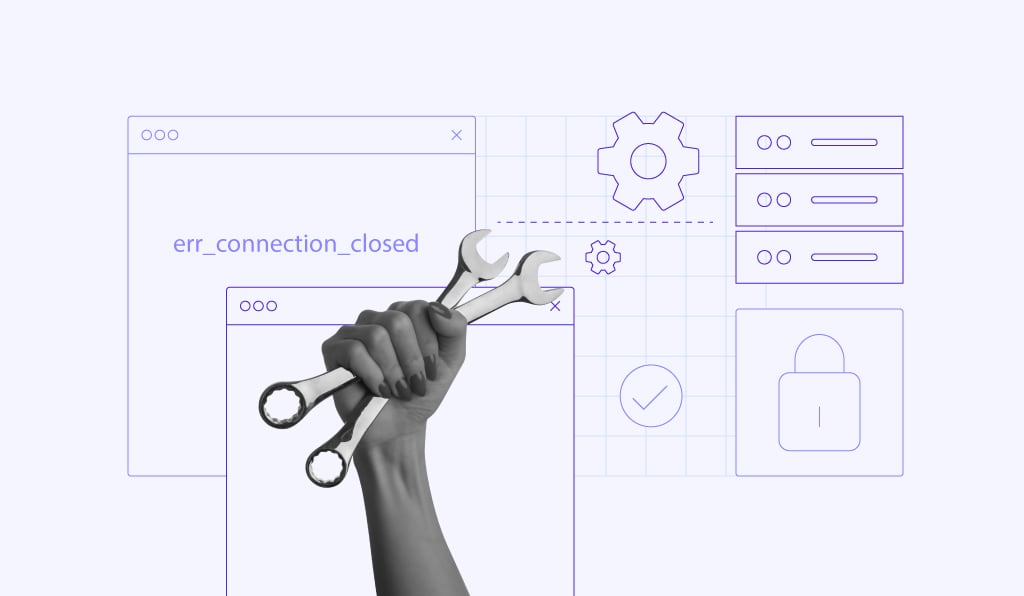
How to Fix the 403 Forbidden Error in 2024 (12 Methods)
403 Forbidden is a standard HTTP status code that indicates that the web server understands the request but refuses to authorize it due to permission issues. Client-side misconfigurations often cause this HTTP error.
The 403 Forbidden error can hurt your site’s user experience and bounce rates. With our help, you should be able to resolve them in no time.
This beginner-friendly tutorial will cover everything you need to know about this error code, including its causes and the 12 effective methods to fix it.
Download Comprehensive HTTP Status Codes Cheat Sheet
What Is the 403 Forbidden Error?
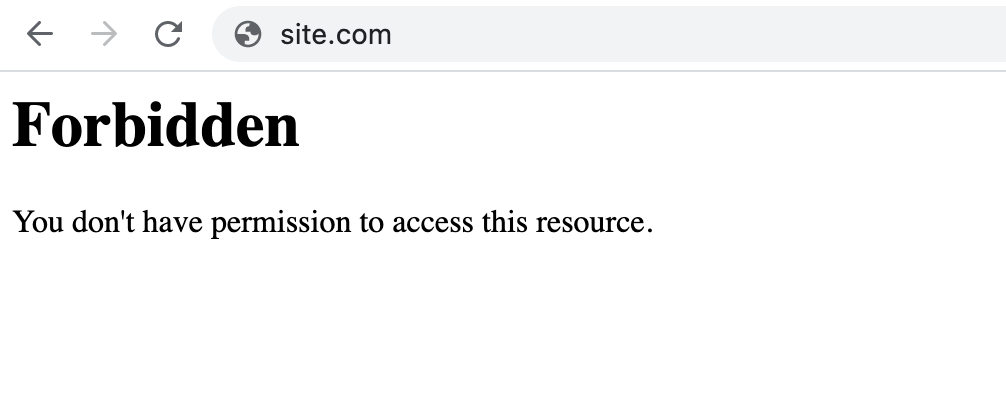
A 403 Forbidden error means the server acknowledges your request but denies access, typically due to authorization issues, a corrupt .htaccess file, or IP address blocking, indicating a client-side problem with accessing the resource.
| Error code | 403 Forbidden Error |
| Error type | Client-side error |
| Error variations | Forbidden: You don’t have permission to access [directory] on this server HTTP Error 403 – Forbidden Error 403 – Forbidden 403 Forbidden request forbidden by administrative rules 403 Forbidden Access Denied – You don’t have permission to access Error 403 HTTP 403 Forbidden |
| Error causes | Access misconfiguration Corrupt .htaccess file Missing index page Broken WordPress plugin Wrong IP address Malware infection New web page link Empty website directory |
What Causes the 403 Forbidden Error?
Here are potential causes that can trigger the 403 Forbidden error:
- Misconfigured file and folder permission settings ‒ users don’t have the necessary permissions to access sensitive files or certain parts of a website.
- Corrupt .htaccess file ‒ misconfiguration and malware can break the .htaccess code.
- Missing index page ‒ the index.html or index.php file, which serves as the default homepage template, isn’t available in the website’s directory.
- Incompatible WordPress plugin ‒ a WordPress plugin might be conflicting with another plugin, or it was incorrectly configured.
- Incorrect IP address ‒ the domain name points to an inaccurate IP address whose website blocks your access.
- Malware scan ‒ your website’s security measures can limit access to specific resources to prevent malicious attacks.
- New web page link ‒ the webpage link was recently updated, making it different from the cached version.
- Empty website directory ‒ the URL is trying to access your website’s directory instead of a file.
How to Fix the 403 Forbidden Error
If you discover pages returning a 403 Forbidden error, either through using a website crawler or by simply noticing it, there’s no need to panic. Here are 12 effective strategies to address this issue, ensuring that your website remains accessible and operates optimally. These solutions will help you resolve and prevent potential downtime, keeping your site running smoothly.

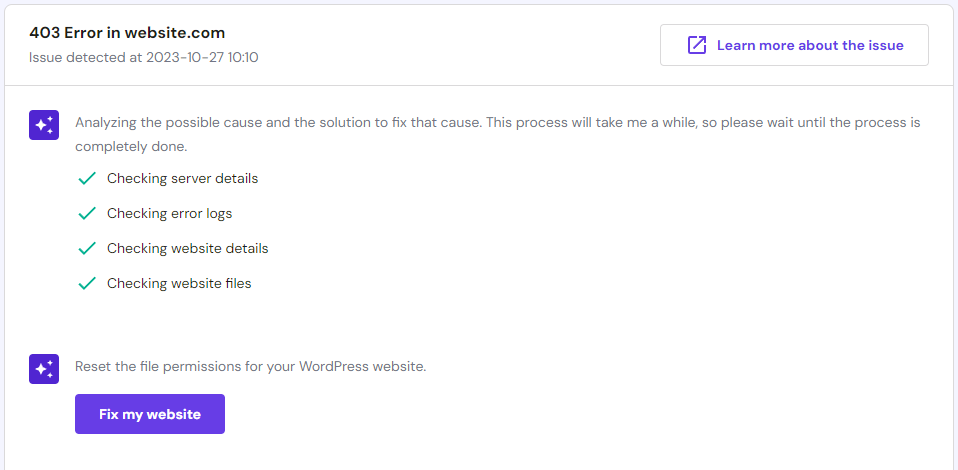
1. Use Hostinger AI Troubleshooter
Although still in beta, Hostinger’s built-in AI Troubleshooter provides actionable solutions to streamline troubleshooting. Hostinger users can use it to fix the 403 Forbidden error with a few clicks.
Here’s how to use Hostinger AI Troubleshooter:
- On hPanel, navigate to WordPress → AI Troubleshooter (beta). You can check the Help page to see if it detects the 403 Forbidden error on your website.
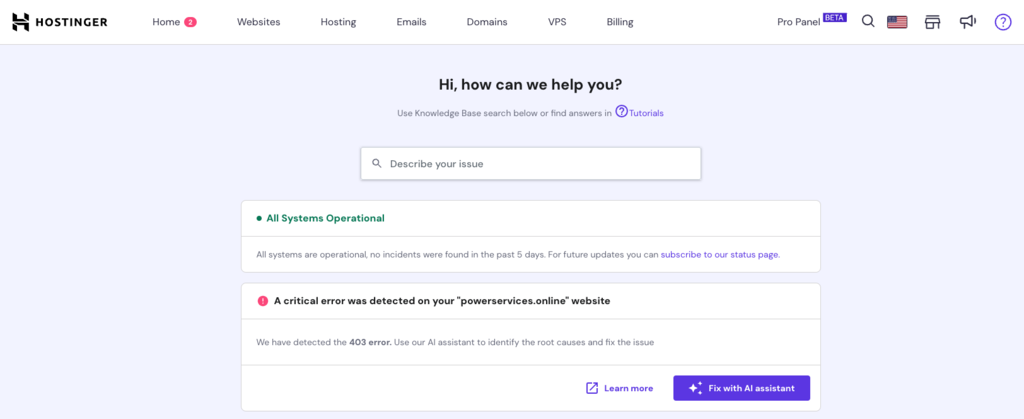
- Click on the Fix with AI assistant button to see its troubleshooting recommendations.
- Select Fix my website if you approve its corrective action. Otherwise, choose Try another solution so the AI will come up with another solution.
More Reasons to Use Hostinger
Besides AI Troubleshooter, all our WordPress hosting plans come with an object cache feature, auto-updates, and vulnerabilities scanner for optimal website performance and user experience. Take advantage of the 30-day money-back guarantee to test our hosting services risk-free.
2. Clear Your Browser Cache and Cookies
The browser cache speeds up website loading on future visits. However, if the web page’s link changes, it can cause a mismatch with the cached version and trigger the 403 HTTP status code. Browser cookies – small files that remember your preferences and details – are also a common culprit of the 403 Forbidden error.
While caches are dedicated to improving website loading speed, cookies focus on personalizing your browsing experience. That’s why a forbidden page error usually occurs on a frequently logged-in website.
Keep in mind that this method will force the browser to re-request site files, requiring you to sign in again on most websites.
Here are the steps to clear cache and cookies on Google Chrome. The steps are similar in Firefox and Safari:
- Click on the three-dot icon in the top right corner and select Settings.
- Locate Privacy and security → Clear browsing data.
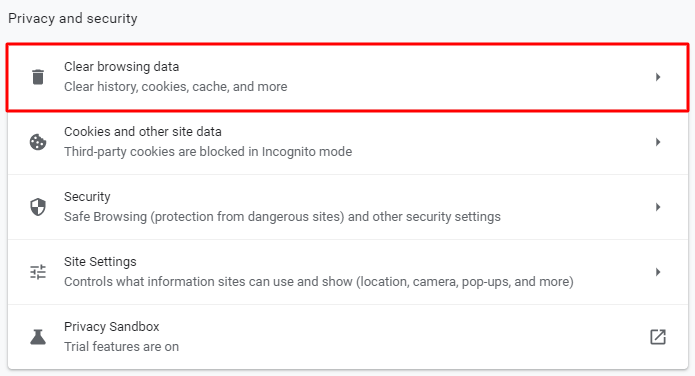
- Use the drop-down menu to choose the time range. We recommend choosing All time to remove all the old files. Then, select Cookies and other site data and Cached images and files.
- Click Clear data to erase them.

After completing these steps, try revisiting and logging into the problematic website to see if it fixes the error. This method also works for other errors, like the 400 Bad Request.
3. Disable VPN Temporarily
A virtual private network (VPN) can trigger a 403 Forbidden error on websites that block access from VPN servers due to security or regional restrictions.
To test this theory, temporarily disconnect your VPN and retry accessing the web page. If this resolves the error code, consider switching to a different VPN server or contact your VPN
4. Disable CDN Temporarily
A content delivery network (CDN) is a network of servers that caches and delivers content from the closest web server to the user, reducing load times and bandwidth usage.
If your website uses a CDN, it may cache a 403 forbidden error due to issues like file permissions, IP blocking, and incorrect .htaccess rules. Temporarily bypassing CDN helps determine whether the source of the error is the original web server or the CDN itself.
We automatically enable our in-house CDN for our Business Web Hosting plan and above. Follow these steps to troubleshoot 403 Forbidden by disabling Hostinger CDN temporarily:
- Navigate to Performance → CDN from hPanel.
- Find the CDN status section and click Disable.
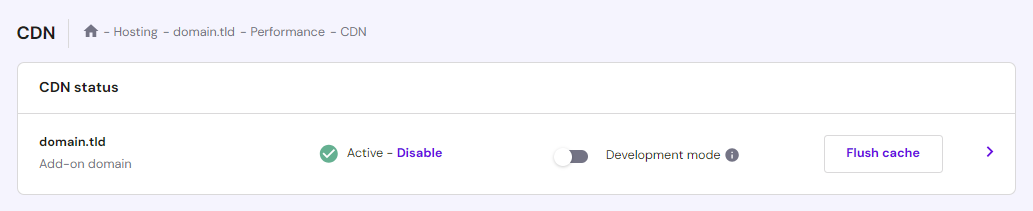
- If this fixes the issue, keep the CDN disabled for now and contact our support team for troubleshooting assistance.
5. Scan for Malware
.htaccess is a web server configuration file that primarily works by altering the Apache web server settings. Located in your website’s root directory public_html, it contains a set of rules for how your website should behave in certain situations, including who can access what resources or pages.
If your WordPress site is infected with malware, it can inject unwanted code into the .htaccess file. Having the rules changed can cause the HTTP status code 403.
Hostinger users can leverage our built-in scanner to remove malware in WordPress. You don’t need to purchase third-party integrations because the automated tool can scan your websites for malware for free.
Here’s how to do it:
- On hPanel, navigate to Security → Malware Scanner.
- If no malware is found, this section will display your hosting plan’s name and the time since the last scan.
- Otherwise, the malware scanner will summarize detected malicious files in the past 30 days and the actions taken to fix them.

For extra security, use a WordPress malware scanner plugin to identify malicious software on your WordPress website. The top WordPress security plugins, such as Sucuri and Wordfence, offer this feature.
If the error persists after fixing the infected file, we recommend creating a new .htaccess file.
6. Restore the .htaccess File
If your .htaccess file is infected or misconfigured, replace it using an FTP client or file manager.
For Hostinger users, follow these steps to locate and create a new .htaccess file. If you’re using cPanel, the steps should be similar:
- On hPanel, navigate to Files → File Manager.
- Open the public_html directory and locate the .htaccess file. Right-click on it and select Download to create a backup on your local computer.
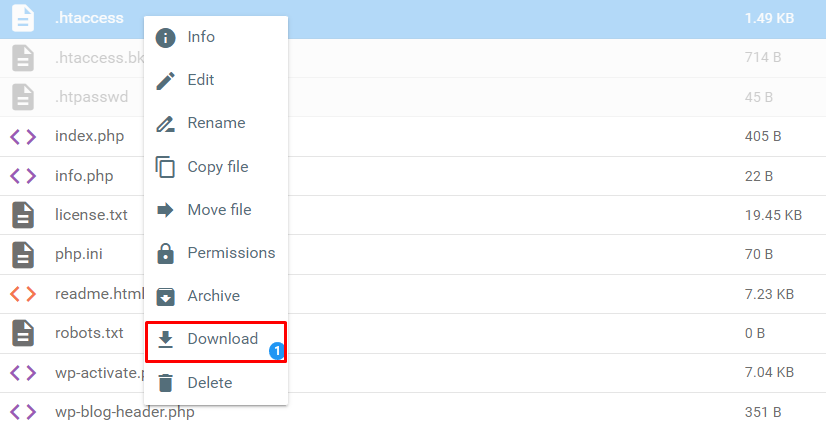
- Delete the current .htaccess file from your hosting account.
- Create a new server configuration file by clicking New file and naming it .htaccess without any extensions.
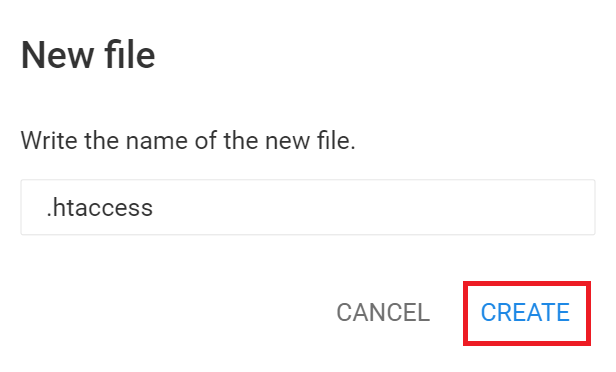
- Copy the following code to the new file, then Save it.
# Enable URL Rewriting
RewriteEngine On
# Rewrite rule to redirect requests to index.php
RewriteCond %{REQUEST_FILENAME} !-f
RewriteCond %{REQUEST_FILENAME} !-d
RewriteRule ^(.*)$ index.php?/$1 [L]
Pro Tip
Check out our guide for tips on using File Manager at Hostinger to manage website files. We also have a tutorial covering the server configuration file in greater detail, including how to locate it in cPanel.
Alternatively, follow these steps for WordPress websites:
- Log in to your WordPress dashboard and select Settings → Permalinks.
- Click the Save Changes button at the bottom without making any modifications. It will generate a new .htaccess file for your WordPress site.
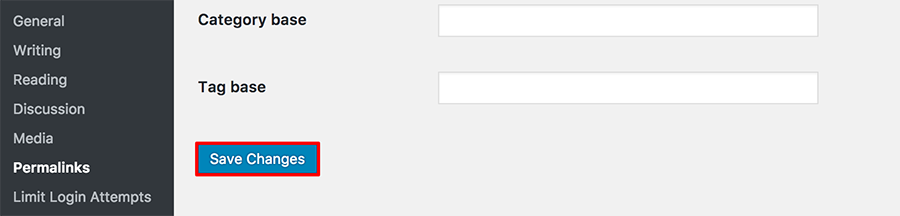
Try to re-access the web address. If this method fixes the 403 Forbidden error code, it indicates a corrupted .htaccess file.
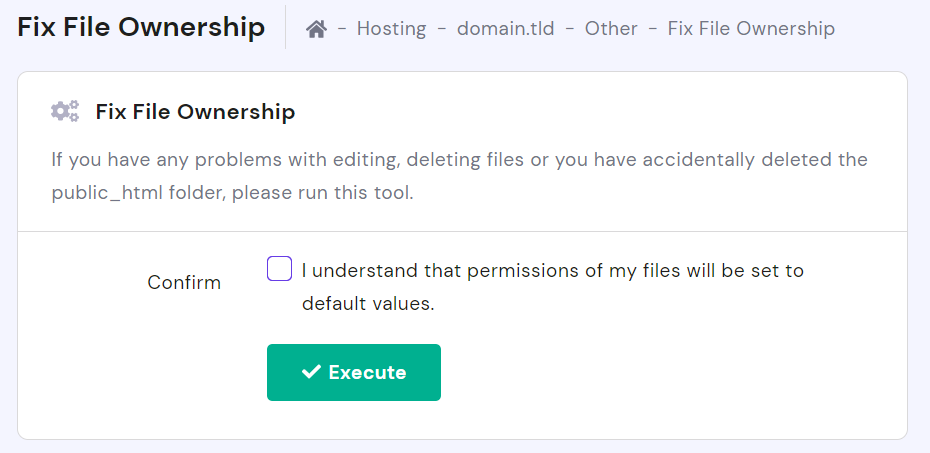
7. Reset File and Directory Permissions
Websites have unique file permissions that control how users can read, write, and execute data. If misconfigured, it can cause HTTP 403 forbidden errors.
With Hostinger, you can fix file permission issues in just one click. To access the built-in tool on hPanel, look up Fix File Ownership in the search bar.
Select the confirmation checkbox and click Execute. The tool will automatically assign default permissions to all website files and folders.
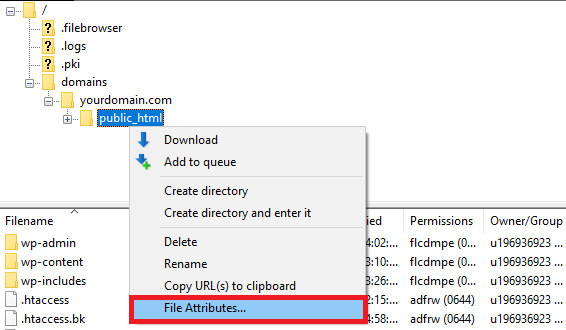
Alternatively, configure an FTP client like FileZilla to reset file and folder permissions manually. Keep in mind that this method requires an understanding of FTP protocol and file permissions.
Here’s how to reset file permissions using FileZilla:
- Make sure FileZilla is connected to your website.
- Right-click on the public_html directory and select File Attributes.
- In the Numeric value field, enter 755. This value allows only the owner to read, write, and execute the file or directory, preventing others from modifying it.
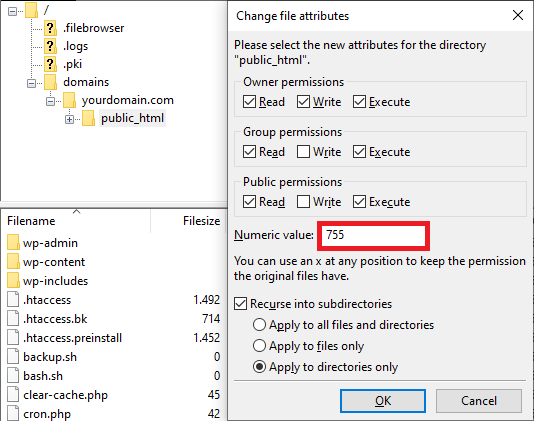
- Select Apply to directories only, and click OK.
- After changing directory permissions, repeat steps 2 and 3. This time, enter 644 in the Numeric value field and select Apply to files only. The 644 value allows the owner to read and write, while others can only read.
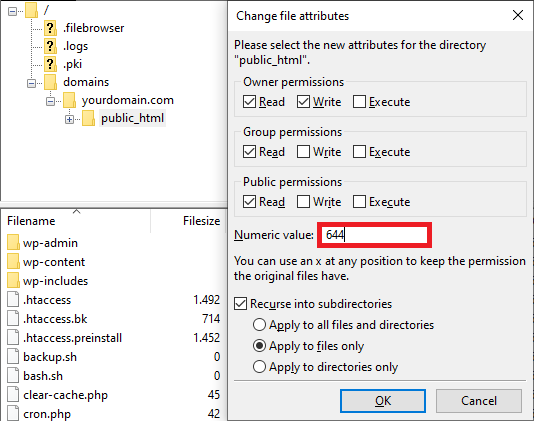
After applying the correct permissions, reaccess your website to check if the permission error persists.
Are You on Linux?
Check out our article on how to change file permissions and owners in Linux.
8. Disable WordPress Plugins
If the previous methods fail, check whether an incompatible or problematic WordPress plugin is causing the HTTP 403 error.
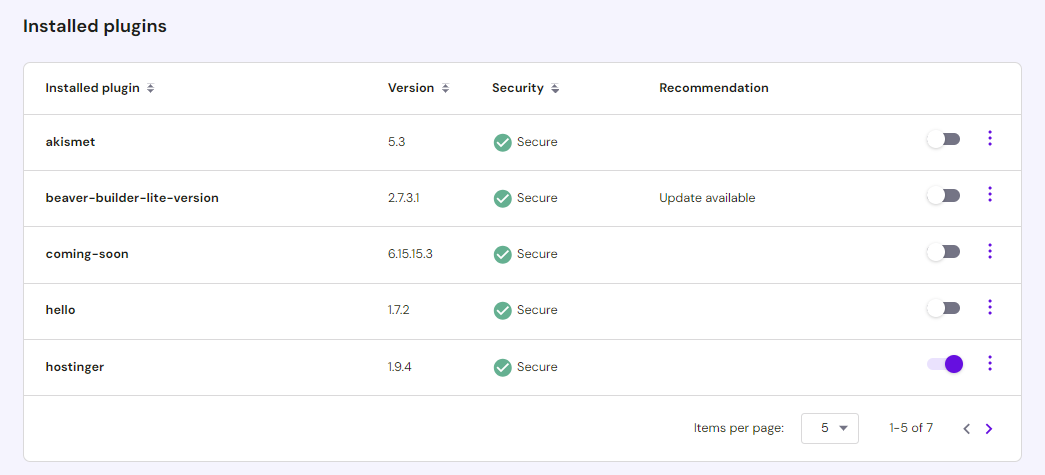
Hostinger users can disable their WordPress plugins straight from hPanel. Go to WordPress → Security and scroll down to the Installed plugins section. Disable the plugins one by one by clicking on the toggle.
If you’d rather disable the plugins manually, use a file manager or an FTP client. Here’s how to do it via the hPanel file manager:
- Navigate to the wp-content folder in public_html.
- Locate the plugins folder and rename it to disabled-plugins. This will make the folder temporarily unrecognizable by the web server, deactivating all plugins simultaneously.
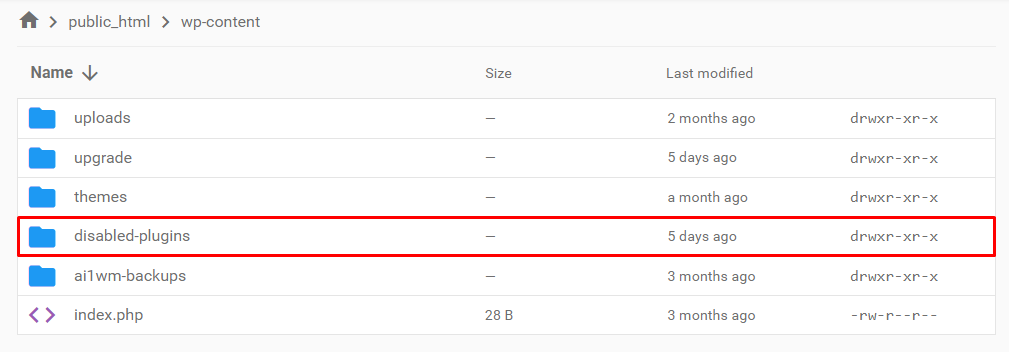
- Now, try accessing your website. If HTTP error 403 Forbidden is gone, a problematic plugin was likely causing the issue.
- Revert the folder’s name to plugins to re-enable all plugins.
- Go to Plugins → Installed Plugins from your WordPress dashboard and Deactivate all plugins one by one. Whenever you deactivate a plugin, check if it resolves the error. This step will help identify the faulty plugin.
- Once identified, update or remove the plugin to fix the issue.
9. Verify the A Record
The 403 Forbidden error can occur if your domain points to an incorrect IP address, denying you access even with valid credentials. To prevent this, ensure your domain points to your hosting provider’s IP address.
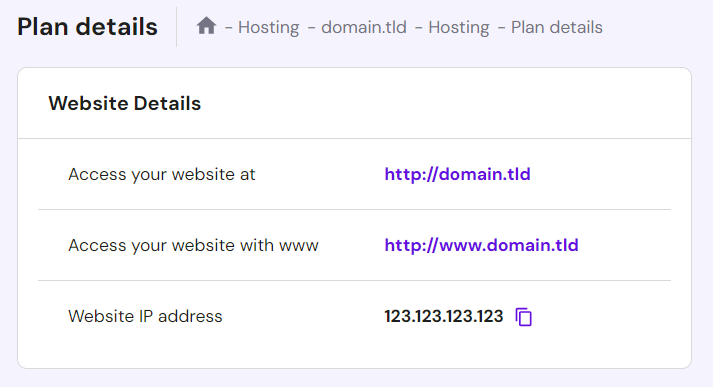
Hostinger users can navigate to Plan Details on hPanel to find their website’s IP address.
Follow these steps to check if the domain A record is pointed correctly via hPanel:
- From the hPanel dashboard, navigate to Advanced → DNS Zone Editor.
- You will find a list of DNS records. Locate the A records by scanning the Type column.
- Examine the IP addresses in the Content column.
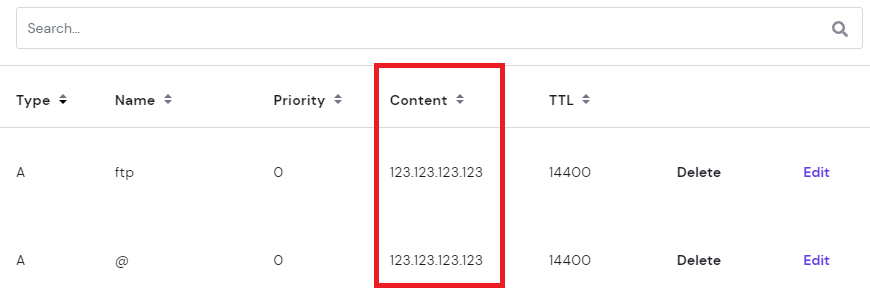
- If the A records don’t point to the correct IP address, click Edit to modify them. Once you’re done, click Update.
Editing an existing A record may affect any services or subdomains currently using it. If changing the existing A records doesn’t resolve the error or disrupt other operations, consider creating a new one.
On hPanel, you can create a new A record in the Manage DNS Records section. Select A as the Type and input the valid IP address in the Points to field. Then, click Add Record.

10. Update Nameservers
If you’ve migrated to a new hosting provider and forgot to update your nameservers, your domain might still point to the old host and lead to a 403 error status code.
To resolve this issue, you must update your domain’s nameservers.
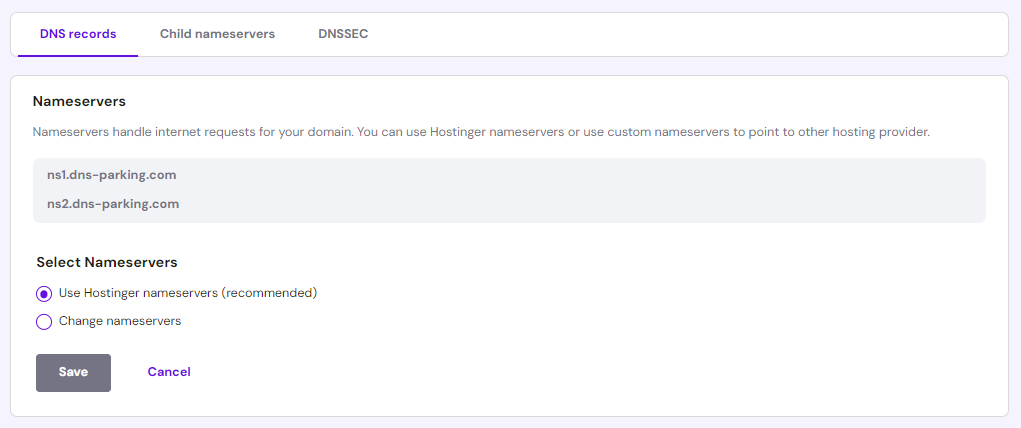
If you have recently migrated to Hostinger, here’s how to change your nameservers to Hostinger’s:
- Go to Domains and select Manage next to your domain.
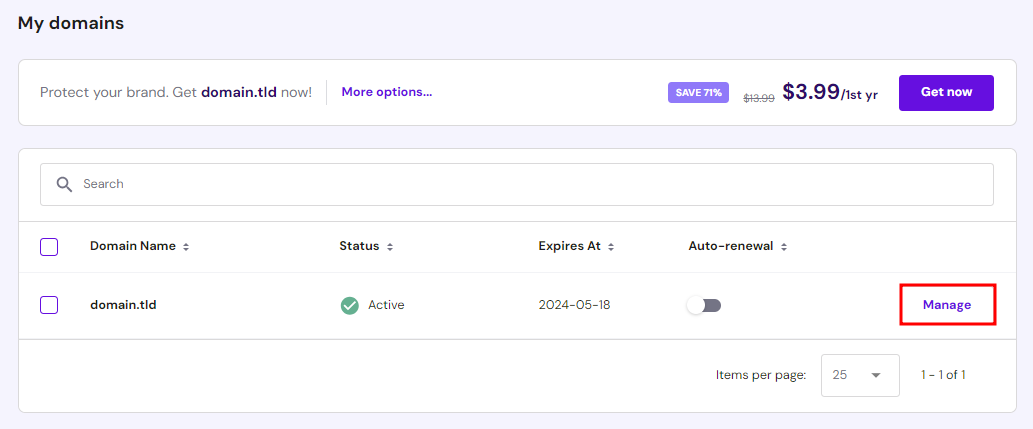
- Click on the Change link in the Nameservers section.
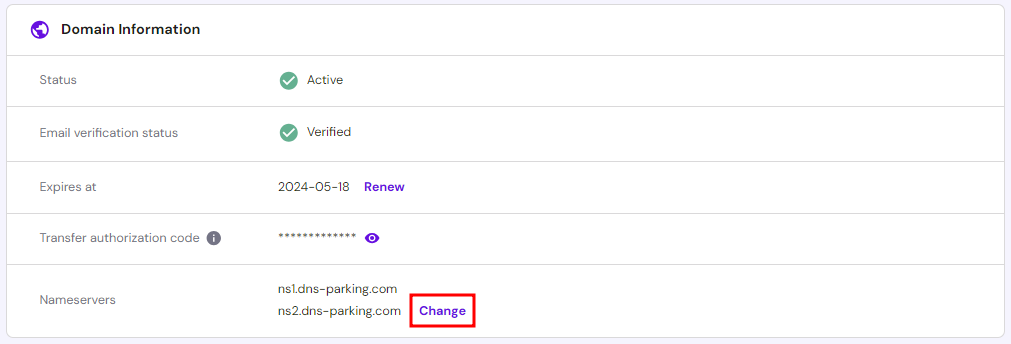
- Pick the Use Hostinger nameservers option and click Save.
11. Upload an Index Page
These two final methods are more technically complex. If you’re unsure of the steps, contact your hosting provider’s support team for troubleshooting assistance.
Most web servers disallow directory browsing for security reasons. Instead of showing what’s inside a folder on the page, they’ll show a standard web page.
Moreover, attempts to access a directory without a standard web page, usually in index.html or index.php format, result in a 403 Forbidden error message.
First, check whether your website’s homepage name is index.html or index.php. If not, rename it in the FTP client or file manager.
Another way to resolve this issue is to upload an index page to your public_html directory and create a redirect to your existing homepage. Here’s how to do it:
- Access the public_html directory using an FTP client or file manager.
- Create a New File named index.html or index.php inside the root directory.
- Open the .htaccess file in the root directory. Insert the following code snippet to redirect index.php or index.html to your existing homepage. Be sure to replace homepage.html with the actual name of your page.
Redirect /index.html /homepage.html
- Save the changes, then check your website’s homepage to see if the problem is resolved.
Whichever method you choose, we strongly advise against enabling directory browsing to resolve the 403 Forbidden error. This can expose your directory’s content to the public, leading to security risks.
12. Edit File Ownership
Incorrect file ownership can trigger the 403 Forbidden error, particularly in Linux-based computers or VPS hosting. If you’re using a VPS with SSH access, you can modify file ownership by connecting your VPS to an SSH client like PuTTY.
After connecting to the SSH server, check the ownership using the following SSH command:
ls -l [file name]
The result will resemble the following:
-rwxrw-rw- 1 [owner][group] 22 Sep 22 10:00 filename.txt
Pay attention to the owner and group sections. The correct ownership should match your hosting account’s username. Otherwise, utilize the chown Linux command to adjust file ownership.
Here’s the basic syntax for the chown command:
chown [owner][:group] [file name]
For example, if your username is John, use the command below:
chown John filename.txt

Learn How to Fix the 403 Forbidden Error With Hostinger Academy
Watch this video if you need help visualizing the troubleshooting steps.

Conclusion
The 403 Forbidden error can disrupt your website’s functionality and lead to a poor user experience. Multiple causes can trigger this HTTP error, including incorrect file permissions, a corrupted .htaccess file, faulty plugins, and IP blocking errors.
Let’s recap the 12 most effective 403 Forbidden solutions:
- Use Hostinger AI Troubleshooter
- Clear the web browser cache and cookies
- Disable VPN temporarily
- Disable CDN temporarily
- Scan for malware
- Restore the .htaccess file
- Reset the site’s file permissions
- Disable WordPress plugins
- Verify the A record
- Update nameservers
- Upload an index page
- Modify file ownership
Focusing on 403 Forbidden error prevention is key. Conduct regular security audits, document access controls, and update web server software to avoid future errors.
Suggested Reading
Check out our website troubleshooting guide for best practices on diagnosing and fixing a broken website.
403 Forbidden Error FAQ
This section will answer some of the most common questions about the 403 Forbidden error.
Can Incorrect File Permissions Cause a 403 Error?
Yes. When file permissions are misconfigured, the website can block access to the requested resource. This causes an authentication failure that prevents users from viewing or accessing specific files or directories. Properly configuring file permissions can prevent the 403 error.
Can Server Misconfigurations Cause a 403 Error?
Yes. Misconfigured web server settings and files like .htaccess can restrict access to certain resources, resulting in a 403 Forbidden error.
Is It Possible to Customize the 403 Error Page?
Yes. Website administrators can create custom error pages to display an informative message that aligns with the website’s branding. This custom page also lets an administrator provide specific instructions to resolve the 403 error.

Ariffud is a Technical Content Writer with an educational background in Informatics. He has extensive expertise in Linux and VPS, authoring over 200 articles on server management and web development. Follow him on LinkedIn.

Jordana is a Senior Content Writer with over 5 years of experience in digital marketing and web development. When she’s not busy with work, she dabbles in creative writing and movie reviewing. Follow her on LinkedIn.

Comments
March 04 2019
Thanks for the post. The fix for me was one of the plugins that was causing it.
August 30 2019
oh, very helpful!!! thanks!
April 21 2020
FINALLY!! After going through and checking Cloudflare security settings, Sucuri firewalls, Wordfence IPs, deleting/disabling ALL plugins, checking web server resources and a whole lot more 'fixes' that so many others have recommended ... simply deleting the .htaccess file did the trick. Thank you so much for a great resource!
March 01 2022
I have a problem of my website, last few month , 15days gap, a file downloaded instead of opening my site, everytime I change .htaccess file, change version of php, then open my site, but why this happen everytime, what is the permanent solution?
March 01 2022
Hi there, it looks like your website might be hacked - I would suggest to contact your host and check out this guide on how to fix a hacked website if necessary.
May 13 2020
Thank you, this was very helpful!
June 11 2020
I am so happy this worked and I did not contact anyone from support. * THE MORE YOU KNOW*
July 05 2020
Thanks. This has cured the error on my site. You might want to add to the article that it can take quite some time for the Permissions to change. So far mine are still going and taking over half an hour.
July 07 2020
Happy to help, Bernie! :) If your changes take a while to reflect, try clearing your browser cache. We have a tutorial for that here.
August 06 2020
good
August 21 2020
Just I can say Thank thank and thank you this was very helpful You are perfect
August 25 2020
You are very welcome, Reza! Thank you for your kind words!
August 22 2020
I had this anonymous mail from wordcamp@wordpress.com which registered itself as an admin to my website and later i am still unable to retrieve it after doing all the steps given above I need instant help
November 11 2020
Hey Harshit! :) Looks like your website got hacked. Check this guide here. You can also follow our guide here on how to clean your website up! :) Good luck.
September 08 2020
Thank You so much. 403 forbidden issue solve: it was because the .htaccess file was corrupted. How? 1) Downloaded the .htaccess from Cpanel to have a backup of it. and then, deleted the file. 2) Generated a fresh .htaccess file, by login to the WordPress dashboard, and click on Settings › Permalinks. 3)Without making any changes I clicked on the save changes button at the bottom of the page. and it generated a fresh .htaccess file for me And my issue just got fixed
November 11 2020
Hey Muhammad. Thanks for the input. Glad it worked.
September 26 2020
Hi,i i did everything but still my issue is not resolved. What else can be the problem. Is it possible to have a problem from hosting provider?
November 18 2020
Hey there Zubair. Please make sure you are pointing to the correct nameservers/IP address. Additionally, you can message our Success team and they will gladly help you out.
November 13 2020
I have tried all 3 above methods to explained but my problem is still not resolve. Please let me know if any other solution is possible. 403 Forbidden Access to this resource on the server is denied!
February 02 2021
Hi there! If this doesn't help, I'd suggest you contact our Customer Success team to help you troubleshoot ;)
November 18 2020
Thank you so much for this. I tried so many other "solutions" from other sites, but this went straight to the issue and I could fix it in minutes. Deleting .htaccess instantly solved my problem. You officially rock!
February 09 2021
Happy it helped, Trevor!
November 30 2020
403 Access Denied I have seen these error on my site and it's not solved by the above answer. Please help me.
February 09 2021
Hi! It could be that the issue is coming from your host's side. If all of the options above didn't help resolve it, I'd suggest checking with your host to help you troubleshoot :)
December 09 2020
I have a website (wordpress) and this works well. If I log in as a member this works fine but if I log in as an administrator I get “Forbidden You don’t have permission to access on this server.” in front page and admin page. If I delete cookies the site is online again. I follow all step I delete .htaccess file I have change the permitions in all folders (755) and all files (644) with ftp. I have rename plugin folder, but nothing... Any idea?
February 09 2021
Hi, Panos! If disabling .htaccess and plugins didn't help, I'd suggest checking with our Customer Success team - they'll be happy to help you troubleshoot further :)
May 06 2021
Arts council England website keeps giving me a '403 forbidden' error- nginx. what has happened? am i blacklisted? Arts council wales and Scotland works for me -so do other websites. arghhh! help!
May 13 2021
Hi Tracey, The error could be coming from the website you are trying to access. They may need to fix their permissions before you are able to access it again.
August 03 2021
You forgot to include that wp-config.php needs to then be changed back to 600 or you'll be letting the world access your config file.
September 24 2021
Hi Paul, that's a good point - thanks for pointing that out! However, it will only be accessible from inside of the server, so as long as your server isn't compromised, it shouldn't be an issue. You can read more about it over here :)
March 04 2022
good work
March 10 2022
Over the past couple of days, I've been seeing an increase in traffic across multiple sites I manage getting 403 - Forbidden errors, and the URLs they're generating them from are not ones the public should be able to access. It's always the same IP address with a known malicious user-agent triggering this error code and being blocked by WordFence. So I'd add that another cause of this error is your file permissions doing their job properly and stopping a bad actor from gaining unauthorized access to areas of your site or server they should not have access to.
March 16 2022
Hi Jason, that's a very good point - thanks for pointing that out and sharing!
March 23 2022
Solves problem forbidden
April 21 2022
I have a Wordpress site showing "Forbidded:You don't have permission to access this resource." Now I follow all the instructions here and even remove all files just leaving the domain. But still it is showing the forbidden error. Help please.
April 25 2022
Hello there, I would suggest to reset all of your permissions to default and make sure you have a /public_html folder along with an index.php or index.html file in there. If that doesn't help, it would be best to contact your hosting provider to check if everything is well on their end and that your IP is not being blocked. In case you're hosting with Hostinger, you can reach our Customer Success team here.
June 04 2022
I am still getting the 403 forbidden error, even after I followed the steps you provided in the tutorial that didn't apply to WP, as I don't use WP. I don't understand why this is happening. Sometimes it appears to load fine, and other times, it gives me the 403 error. I tried using two different browsers and the same thing happens on both. Sometimes it works and other times it doesn't. Please help.
June 07 2022
Hi there! Most of the methods mentioned in the article (apart from plugins) are applicable to any website, so I'd suggest going through them again and making sure you've tried them all ?
October 24 2022
i cant open my website. so how can i edit public_html folder along with an index.php ??
October 28 2022
Hi, TO edit public_html, you do not need for the website to be running, as website files are edited from the File Manager or an FTP client. You can check out this article to learn how to use File Manager.
March 09 2023
i need 403 solution
March 10 2023
Hey there! If you see a 403 Forbidden error it's usually related to permissions. First make sure that your domain is properly pointing to your hosting provider since incorrect A record can cause 403. Next up, double check file permissions from your hosting provider File Manager, depending on the file/folder type permission values will be different. Another possible cause is .htaccess file or plugins that create restricting rules inside .htaccess file, best bet would be to reset it to its default values. Hope this helps!
April 04 2023
I build my own website using python. As per instruction I have tried all the applicable solutions but to no avail. Initially I was redirected to the hostinger page. One info as per an article in your website was to delete the default.php file when being redirected to hostinger, but after deleting the default.php I was being shown Error: 403. Also after double clicking the "public.html" I only see my website folder and nothing other than that, I don't see .htaccess Now how do I navigate. (is .htaccess something that is present when using wordpress ? )
April 07 2023
Hello there! Public_html folder is where all of your website files should be located along with the index.php or index.html file. A quick test to see if everything is working properly is to create an index.html file on domains/yourdomain.tld/public_html/index.html, as for contents you can use code from here. After that, visit your website and you should see the generic landing page. As for .htaccess it can be used on any type of website not only WordPress and it can be responsible for protecting your site with a password, creating a custom-made error page or redirecting visitors to another pages, more about it here. Now lastly, keep in mind that Python websites are only supported on our VPS plans, so if you are using shared hosting, it won't work and you would need to migrate your files to a VPS. If I missed something or you have any additional questions, feel free to contact our live support and we will gladly help you!
November 15 2023
Thank you for this im a high school student and this really helped me i was wondering why my websites we'rent working thank you
November 16 2023
You're welcome! If you have any more questions, feel free to ask. Happy coding ?
March 30 2024
Nice elaboration