WordPress GitHub: How to Incorporate and Use GitHub for Better Website Development
GitHub is an essential tool for web developers. By storing your project database on its cloud-based remote server, different users can track, manage, and change it anytime.
Integrating WordPress with GitHub can improve your website development process and make your team’s workflow more efficient.
This article will cover all about WordPress and GitHub integration. We will explain why you should use GitHub and provide step-by-step instructions to integrate it with WordPress. Finally, we will recommend WordPress GitHub plugins to help your development tasks.
Why Should You Choose GitHub for WordPress Development
Before discussing GitHub, we will explain what Git and version control are. They are essential for understanding GitHub and how it can improve your website development workflow.
What Are Version Control and Git
Version control is a system for tracking changes in a set of files, such as software development codes. It stores all versions of your project files in a repository or repo for short.
There are two main types of version control systems – centralized and distributed.
Centralized version control systems require users to connect to the main repository to make changes. When the repository encounters a problem, users can’t access or modify it.
Meanwhile, distributed version control systems allow users to make modifications without accessing the main repository. Users can clone the repository and modify files on their local machine.
Git (Global information tracker) is the most popular distributed version control system. Since Git is hosted on a remote server, multiple people can access and work on the same project simultaneously.
There are various Git hosting platforms, but GitHub is the most popular. It also offers additional features on top of the essential Git functionality.
When developing a WordPress site, you may need to edit plugins, themes, or core files. Although you can edit WordPress files with only text editors, it is a tedious process that’s prone to errors.
GitHub creates a version control that backs up your WordPress files. It also shortens the development process, allowing you to immediately apply changes to the server.
Important! WordPress doesn’t recommend modifying your core WordPress files except for wp-config.php. You should only modify a core file when it’s faulty and not without creating a backup first.
What Are the Benefits of GitHub
GitHub has many benefits for web developers, including:
- Version control. This platform stores different versions of your project and tracks every change. You can identify each change and revert to a previous version when needed.
- Free web hosting. GitHub offers hosting services for WordPress websites. This way, you can apply changes to the website directly on GitHub, increasing efficiency.
- Integration with WordPress. WordPress has various GitHub plugins with features that can help your development projects.
- WordPress plugin and theme repositories. Many developers use GitHub repositories to store their themes or plugins. If a plugin or theme is unavailable in WordPress’s official library, you can likely install it from GitHub’s repository.
- User-friendliness. The GitHub desktop application has a user-friendly visual interface, making it easier to use than the typical command-line Git. And since it has comprehensive documentation, it is an excellent option for Git beginners.
How GitHub Benefits Distributed Teams
The main benefit of using GitHub is easy collaboration, thanks to features such as:
- Cloud-based repository. GitHub lets users clone the main repository on their local machine. This way, developers can make changes to the repo offline and merge them with the version on the cloud when finished.
- Branching. Git branches simplify task distribution. They let team members work on independent development lines simultaneously without clashing with each other.
- Pull request. This feature lets you assign up to 10 people to work on a specific task. This way, you can know what others are working on and review the changes before applying them to the main repository.
How to Create a Local WordPress Environment for Git
Before using GitHub, create a local version of your WordPress site. This local development site is for testing changes, including new themes, plugins, or designs.
Any modifications on your local WordPress site will not affect the live website until you deploy them.
Local WordPress Tools
Use a local web development tool to create a WordPress environment on your machine. Based on the functions, there are two tool types – general-purpose and WordPress development tools.
General-purpose tools let you create any web development environment. They support all Content Management Systems (CMS), but you must install the CMS manually.
Although you can use general-purpose tools for WordPress development, we recommend WordPress-specific development ones instead. They are pre-installed with WordPress, making them more convenient.
For this tutorial, we will use Local WP. This development tool has a Graphical User Interface (GUI), making it user-friendly and ideal for beginner web developers. Follow these steps to set up Local:
- Visit Local’s release note web page.
- Download Local’s latest version for your operating system.
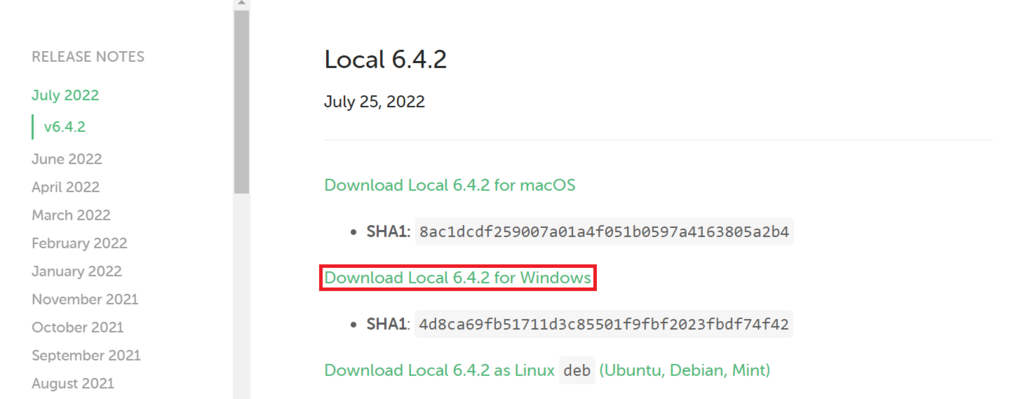
- Run the Local installer. Follow the installation guide according to your operating system.
After the Local WordPress installation process finishes, create a local development site:
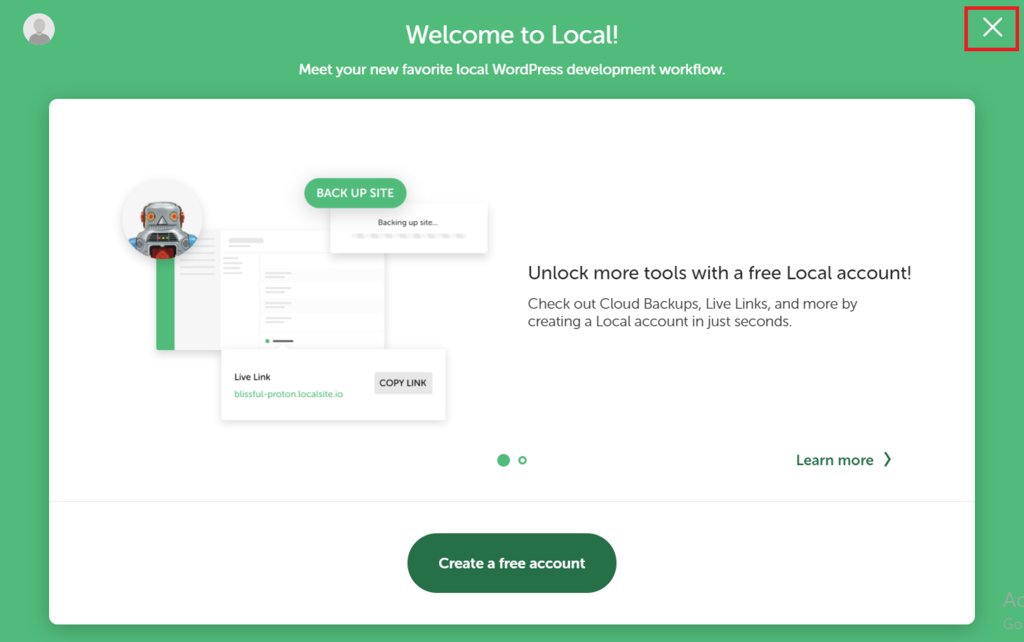
- Open Local. For now, skip the account creation step by clicking the X button.
- On the Terms of Service window, check the box and click I agree.
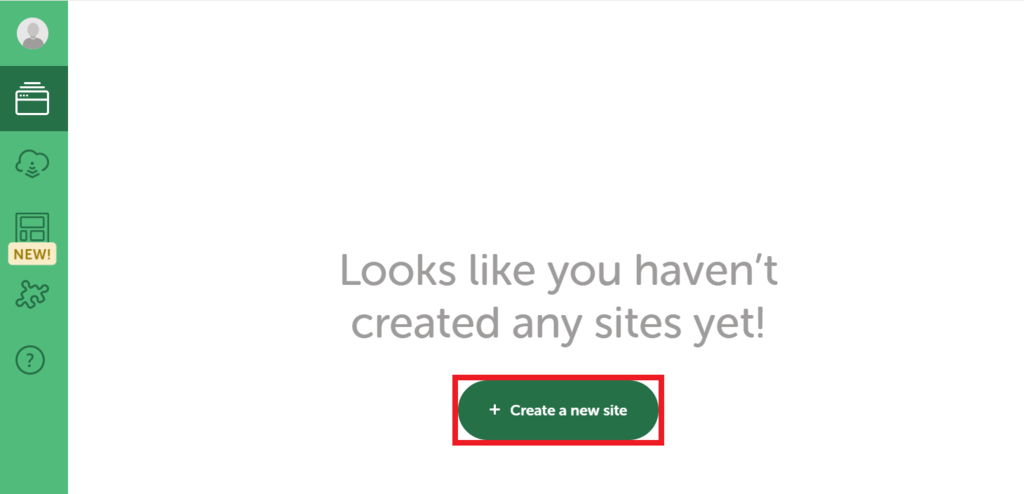
- On Local’s dashboard, click Create a new site.
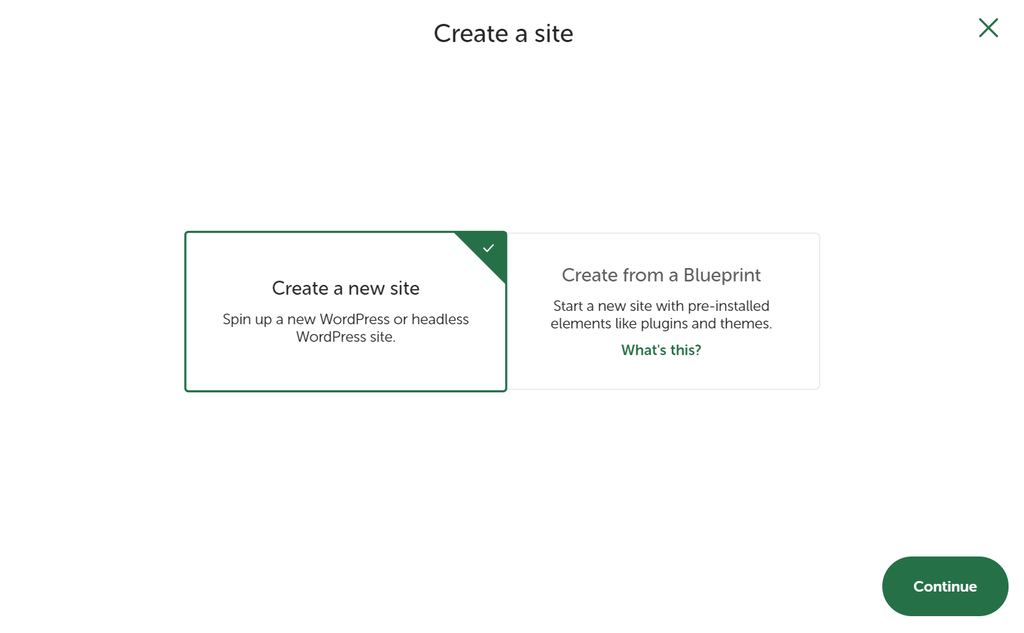
- Select Create a new site and click Continue to proceed.
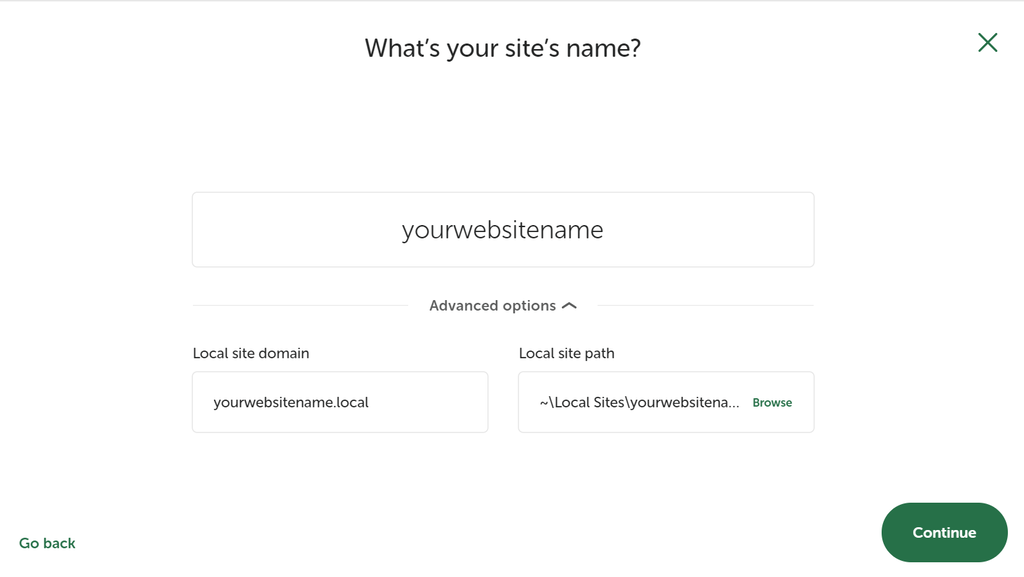
- Enter your website name and click Continue.
- Select your local environment settings. If you are unsure, select Preferred. Click Continue.

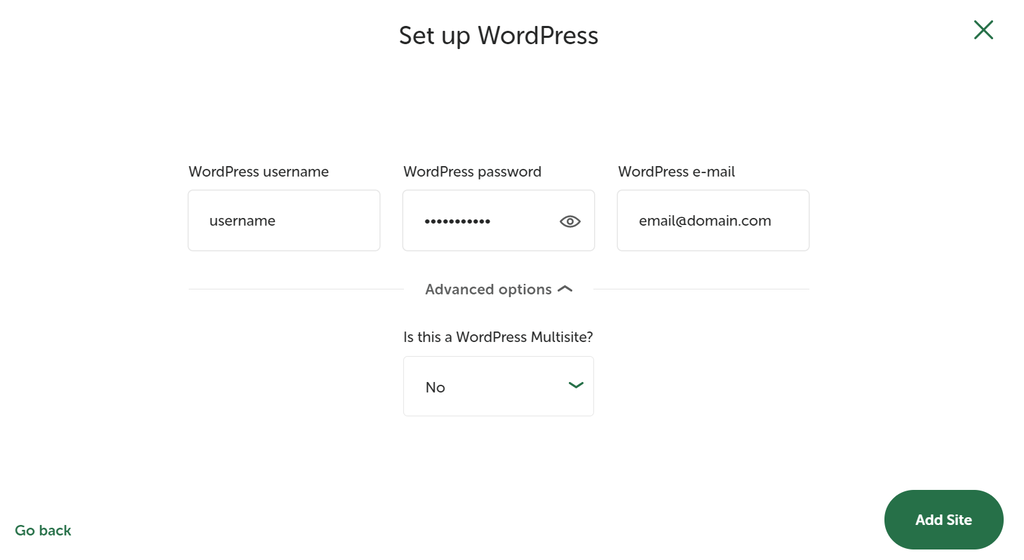
- Enter your WordPress account details. For WordPress multisite, select Yes under Advanced options. Click Add Site to confirm, and your new site will appear on the Local dashboard.
Once your local environment is ready, install a text editor to change your site data. With Local, you can install VSCode directly from its dashboard:
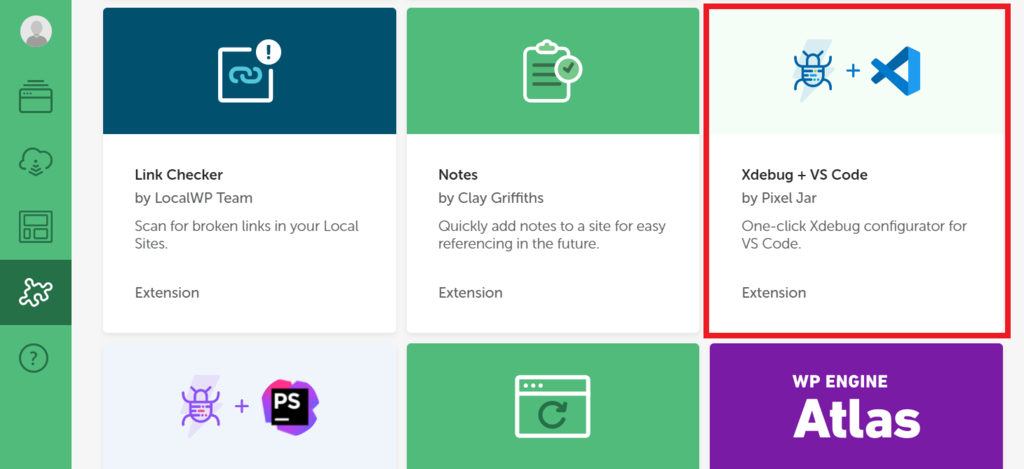
- From the Local dashboard, open the add-ons menu represented by the puzzle icon on the left sidebar.
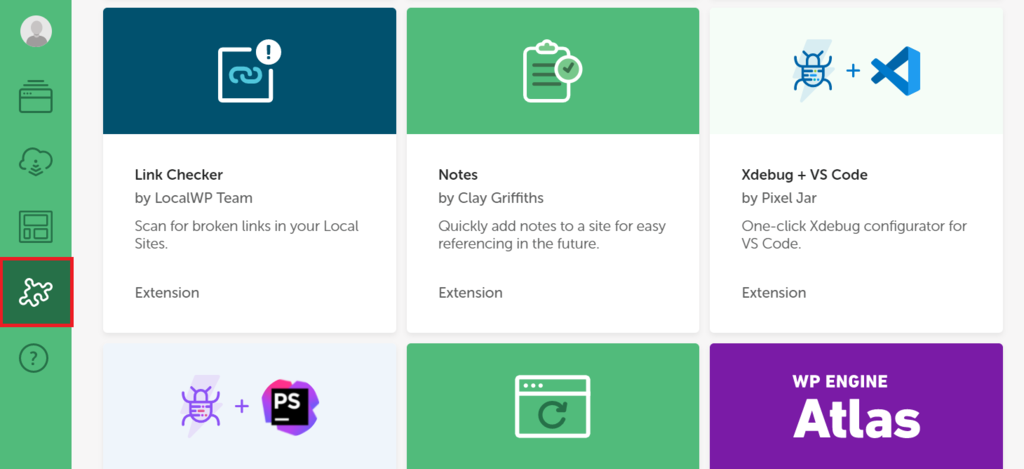
- Click Xdebug + VS Code.
- The installation window will show. Click Install Add-on.
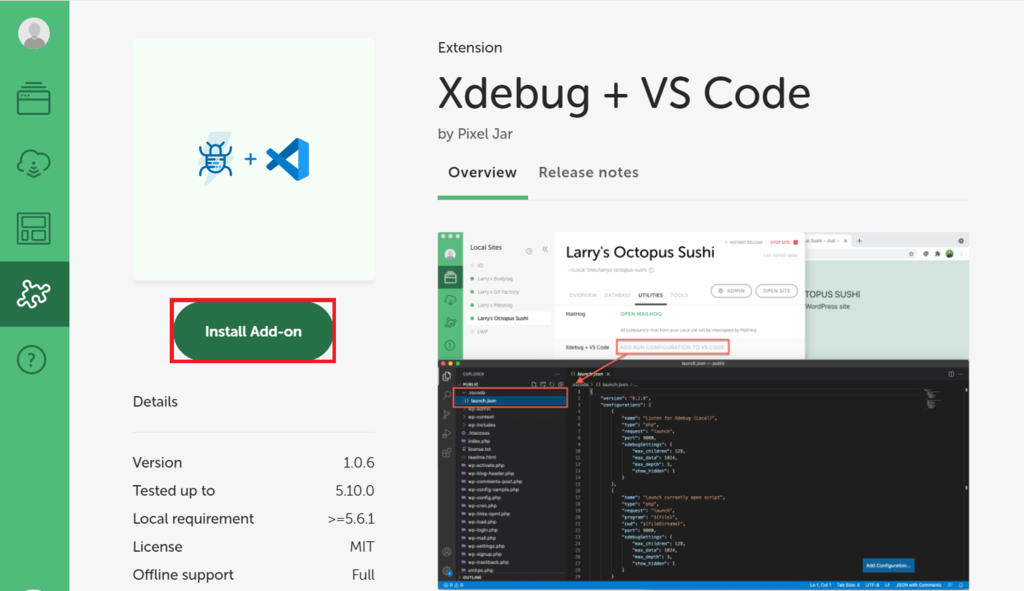
- Wait until Local finishes installing and restarting.
How to Install Git Locally
You must install local Git first to use the GitHub remote repo. Your local Git repository is where you will commit changes before pushing them onto GitHub.
A machine running the latest Linux or macOS may have Git pre-installed. Check by typing git –version in the Terminal.
For Windows, type git version into the Command Prompt.
If Git is already installed, your command-line application will return Git’s version number. Otherwise, it will tell you that Git is an unknown command or ask whether you want to install it.
You can manually download the Git installer and run it on macOS, Linux, or Windows. Alternatively, download one of the Git GUI clients if you prefer working with a user-friendly interface instead of the command line.
Git installation steps differ depending on your operating system. This tutorial will show you how to install Git on the Windows command line interface:
- Download the Git installer for Windows.
- Run the installer. Click Next and Finish to complete the installation using the default option.
- Open the Windows Start menu and search Git Bash. Press Enter.
- Verify if Git is already installed by executing the git version command.

Now, create a local repository using Git Bash. If you are unfamiliar with Git, read our basic Git commands article to learn its basics.
For example, here is how to create a repository for WordPress’ Twenty Twenty default theme:
- Explore the wp-content directory and open the twentytwenty theme folder.
- Right-click anywhere on the folder and click Git Bash Here.
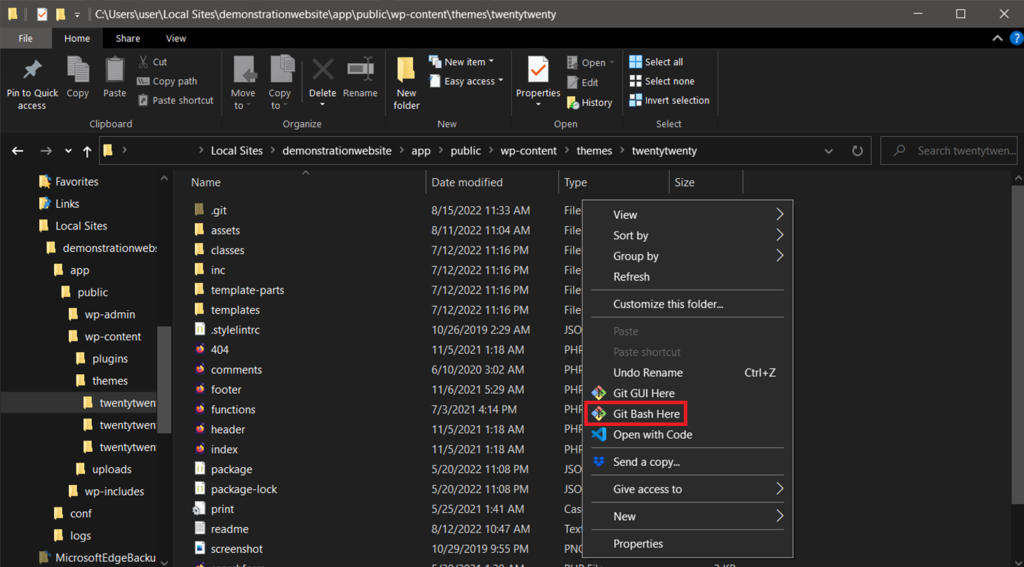
- A Git Bash window will open. Type git init and hit Enter.

- Type git add . and press Enter.
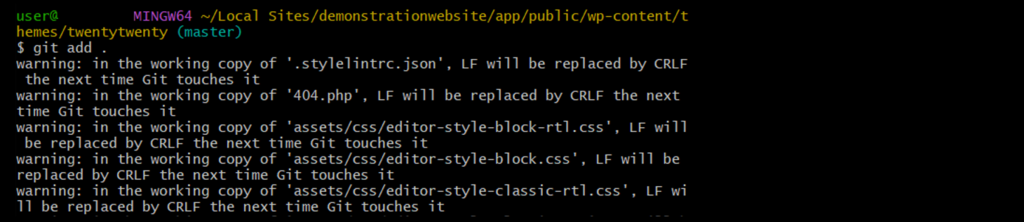
- Type git commit -m “message” and hit Enter. Replace the message with any phrase, but make sure it is clear and descriptive.

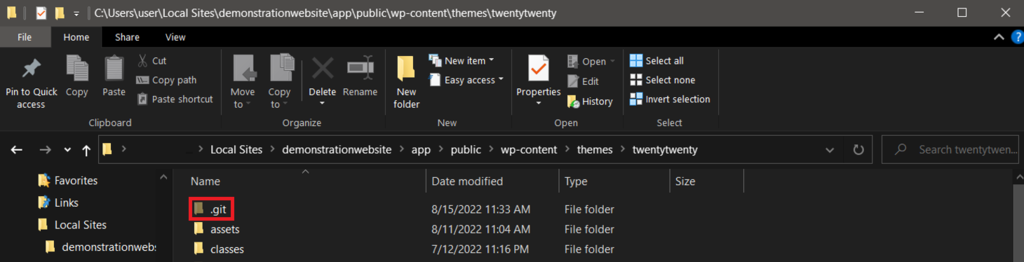
If successful, a hidden .git folder should show up.
How to Create and Commit to Your First GitHub Repository
Now, you will learn how to create a repository on GitHub and push the local one there. The GitHub repository is where all the team members will work on applying their changes.
How to Register for a GitHub Account
If you already have a GitHub account, skip this section and sign in to your account. Otherwise, do the following:
- On your web browser, go to GitHub and click the Sign up button on the top right of the page.

- Enter your email address and click Continue to proceed.
- Create a username and password. Then, choose whether you want to receive news and updates. Click Continue.
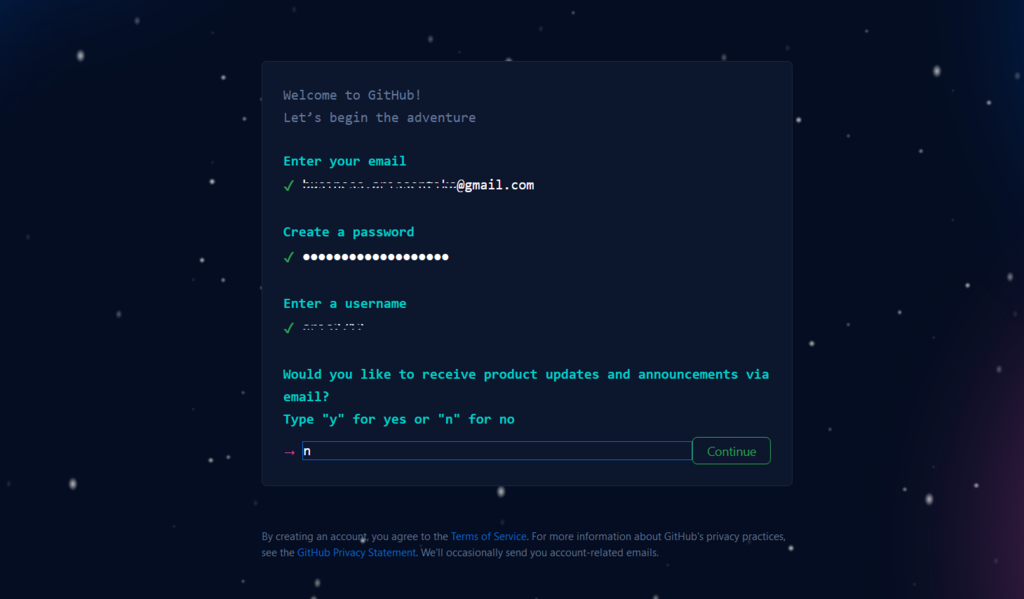
- Verify your account by clicking Start Puzzle and solving it. Then, select the Create Account button.
- Check your email inbox for a launch code from GitHub. Type the code into the Enter code boxes and hit Enter.
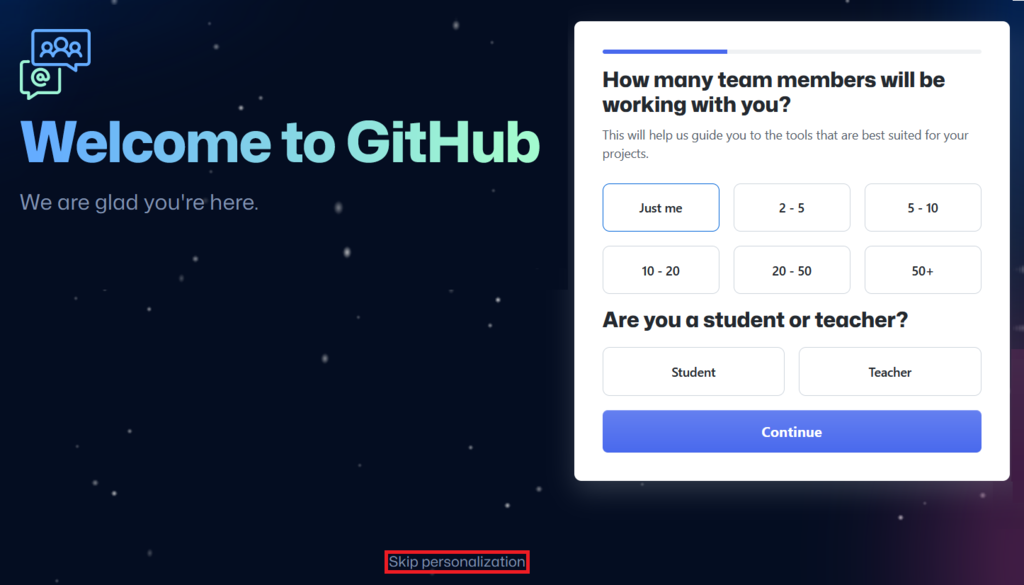
- Answer some questions to automatically configure the GitHub account based on your preferences. Otherwise, click Skip personalization.
- Choose either the Free Account or Team Account.
- Wait until GitHub redirects you to your account page.
How to Create Your First GitHub Repository
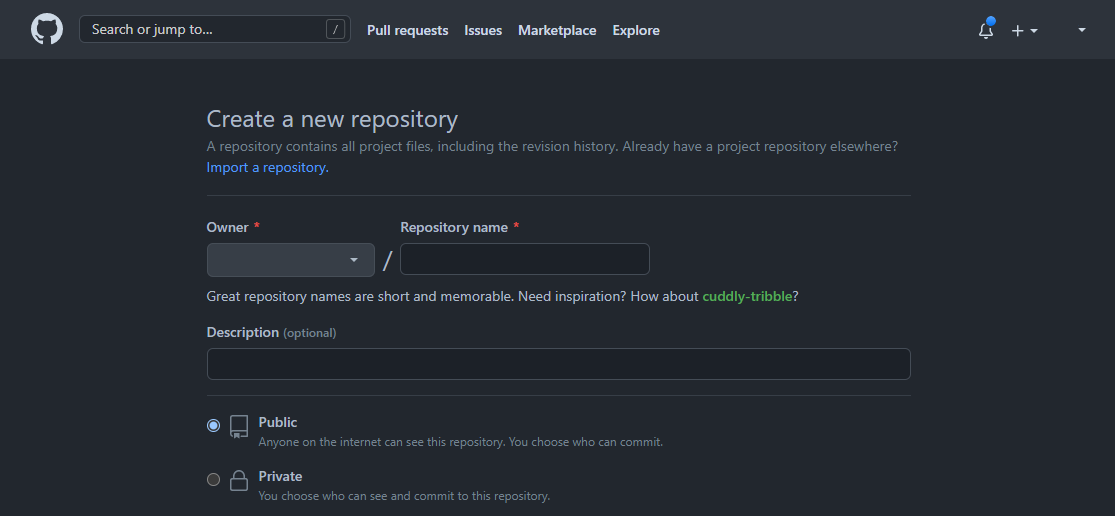
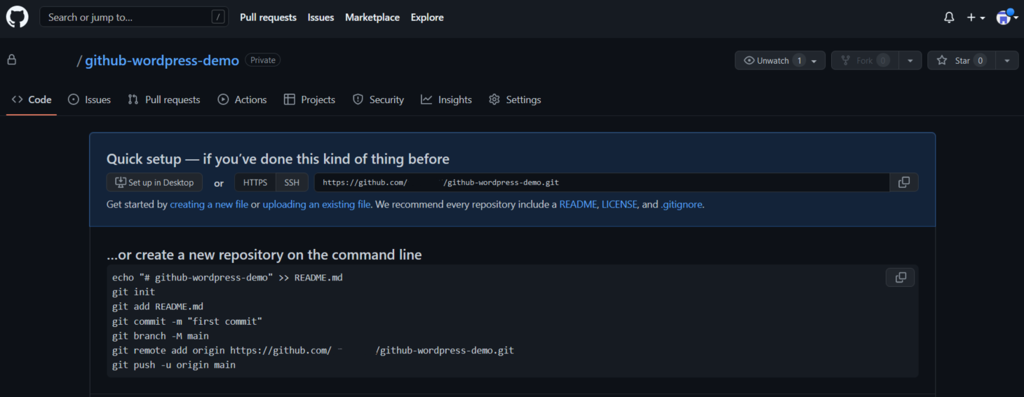
To create a new repository, sign in to your GitHub account. Then, on any page:
- Click the + icon on the top right of the page. From the drop-down menu, select New repository.

- On the Create a new repository page, select an Owner and enter your Repository name. Optionally, add a Description for your repository.
- Select your repository’s visibility. Refer to GitHub’s guide on repositories for more information.
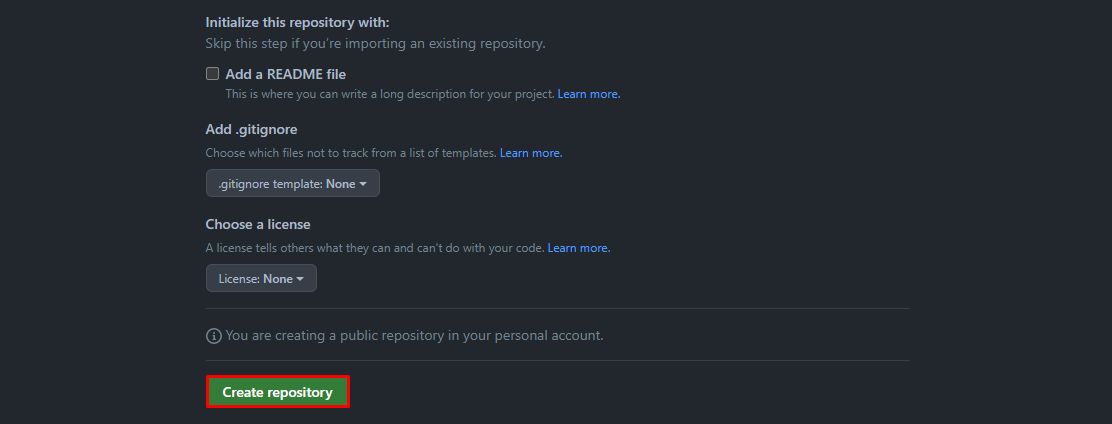
- Since we are pushing the local repository, skip Initialize this repository with: and click Create repository. Once created, GitHub will show your new empty repository.
How to Make Your First GitHub Commit
After creating a GitHub repository, make your first commit by uploading your local repository data:
- Open your GitHub repository.
- Under the Quick setup section, find and copy the repository’s URL.
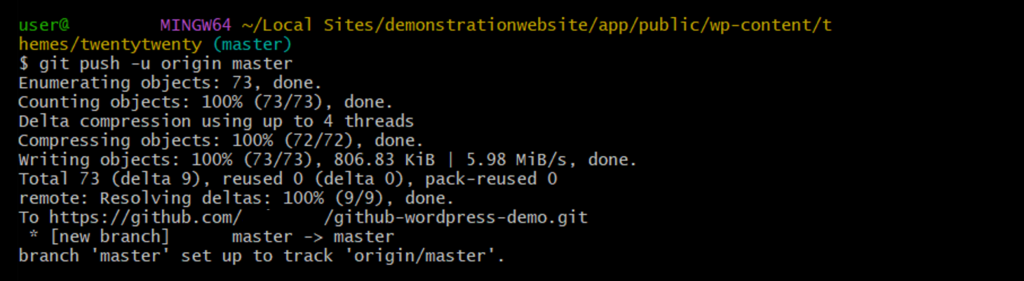
- Open Git Bash. Type git remote add origin URL and press Enter. Don’t forget to replace URL with your repository’s link.

- Type git push -u origin master and hit Enter.
- The connect to GitHub window will appear. Select Sign in with your browser.
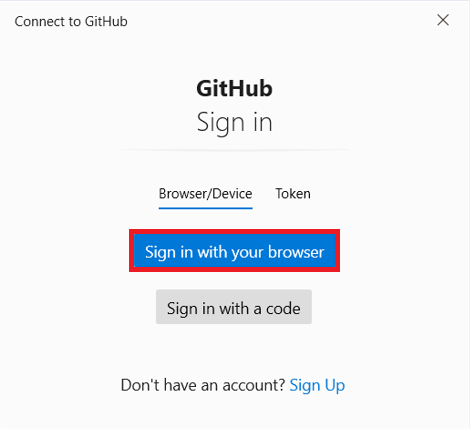
- Sign in by entering your GitHub username and password.
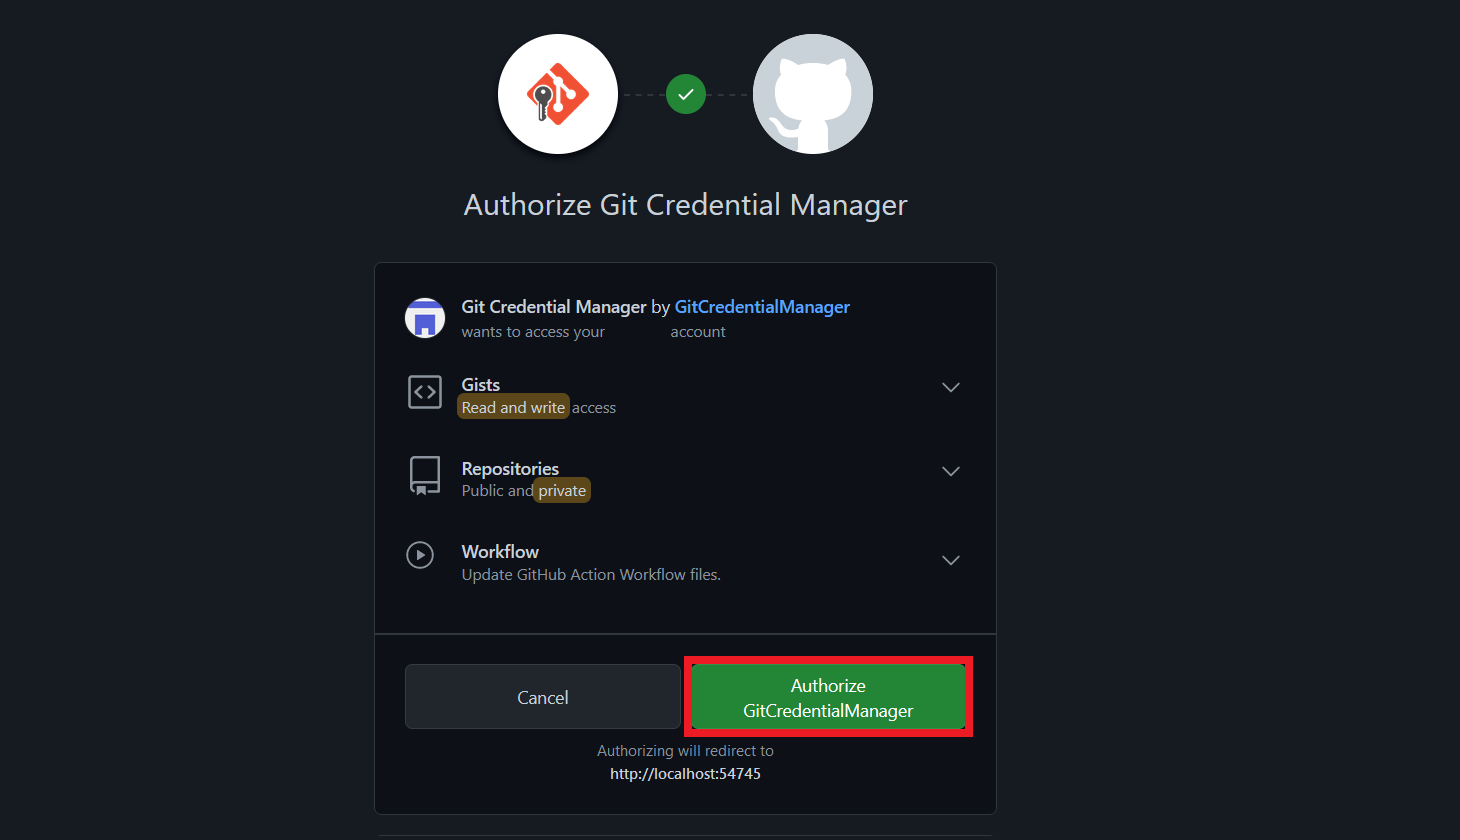
- In the authentication screen, select Authorize GitCredentialManager.
- Open your GitHub repository, and your local repository’s file should appear.
After you make changes to your local repository, push it to GitHub. It will update your GitHub repository with the new changes from the local version.
How to Fetch Updates From GitHub to Your Local Computer
After pushing your local repository’s files to GitHub, other users can make changes to them. To apply these changes to your local repository, you must fetch the updates from GitHub.
Fetching means downloading and merging updates into your local repository. While pull also downloads the updated repo, it doesn’t automatically merge the data with your working files.
The steps for fetching updates from GitHub are:
- Open your project folder. In this example, we will open the Twenty Twenty WordPress theme folder.
- Right-click anywhere and select Git Bash Here.

- Type git fetch URL and press Enter. Your local repository should now be updated.

How to Use GitHub for WordPress Development
After preparing all the tools, you can start using GitHub to work on your site development. Here is a sample workflow for changing your site’s theme:
- Fetch your website theme’s GitHub repository.
- Make changes to the theme and test it on the local server.
- Open the theme’s folder → right-click anywhere → select Git Bash Here.
- Type git add and press Enter. This tells Git that you want to include the changes for the next commit.
- Apply the changes to the local repo by executing the git commit command.
- Push your updated local repo to GitHub with the git push -u origin master command. Replace master with the branch name when pushing changes to another branch.
- Once ready, apply the changes to the live site by deploying your remote repo.
There are many ways of deploying remote repositories to the live production server. The most convenient method is to use a WordPress GitHub plugin, like WP Pusher.
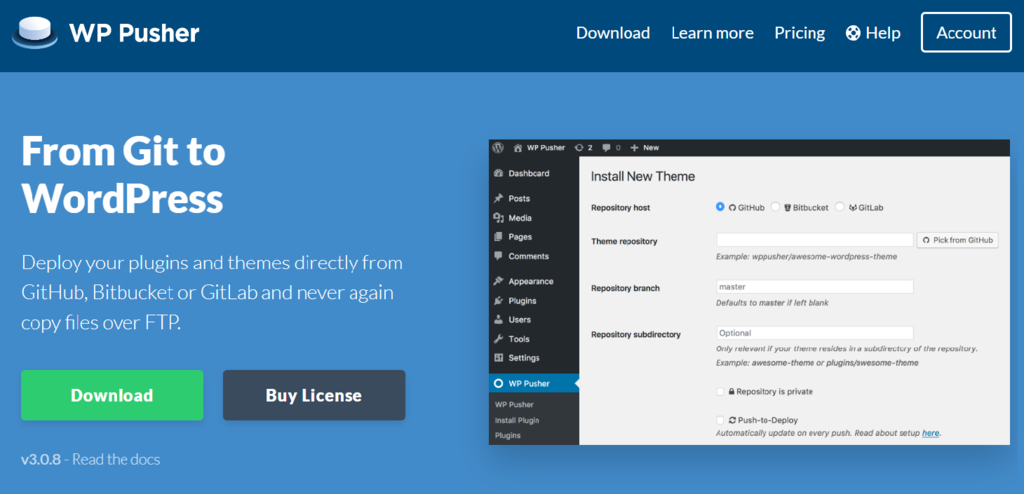
Here is how to use WP Pusher to deploy your GitHub repo to the live website:
- Download and install the WP Pusher plugin.
- On your WordPress sidebar, navigate to WP Pusher.

- Navigate to the GitHub tab and click Obtain a GitHub Token.
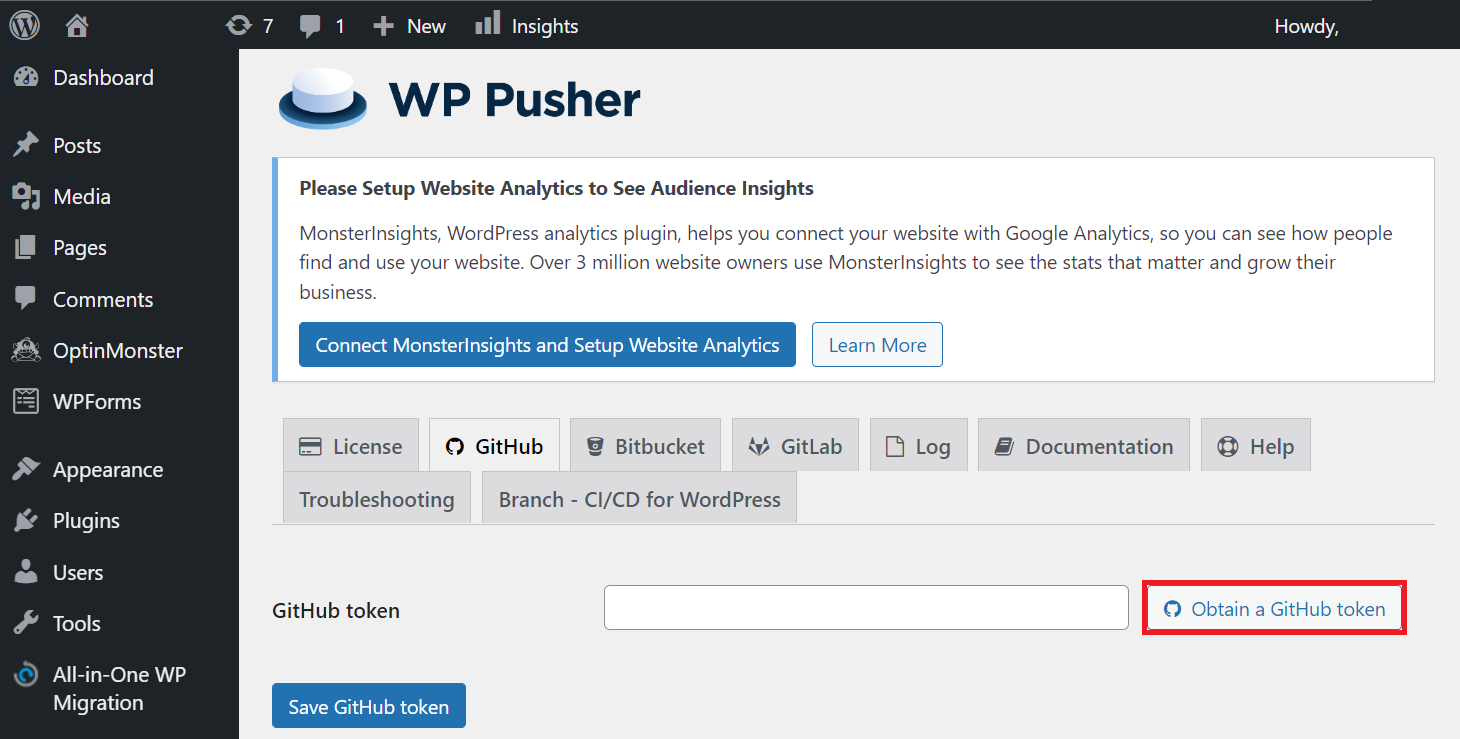
- An authentication pop-up window will appear. Authorize WP Pusher to access your GitHub account.
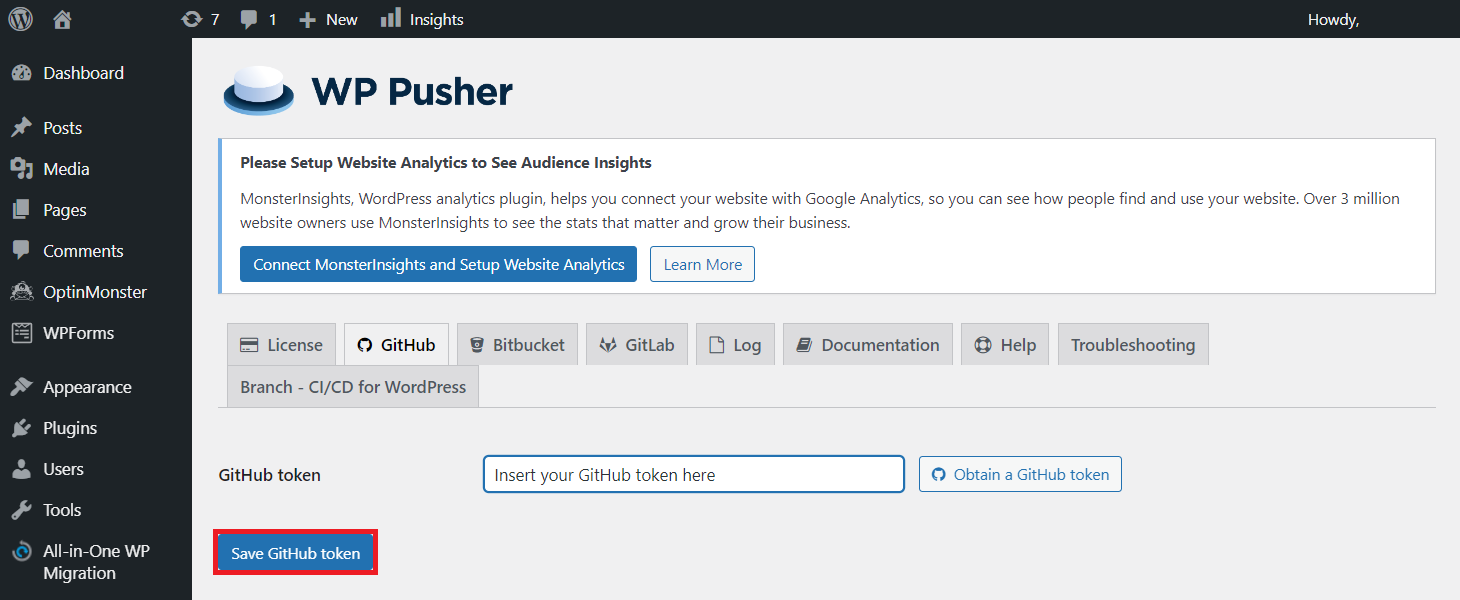
- Copy the token from the pop-up window and paste it into WordPress.
- Click the Save GitHub token button to confirm.
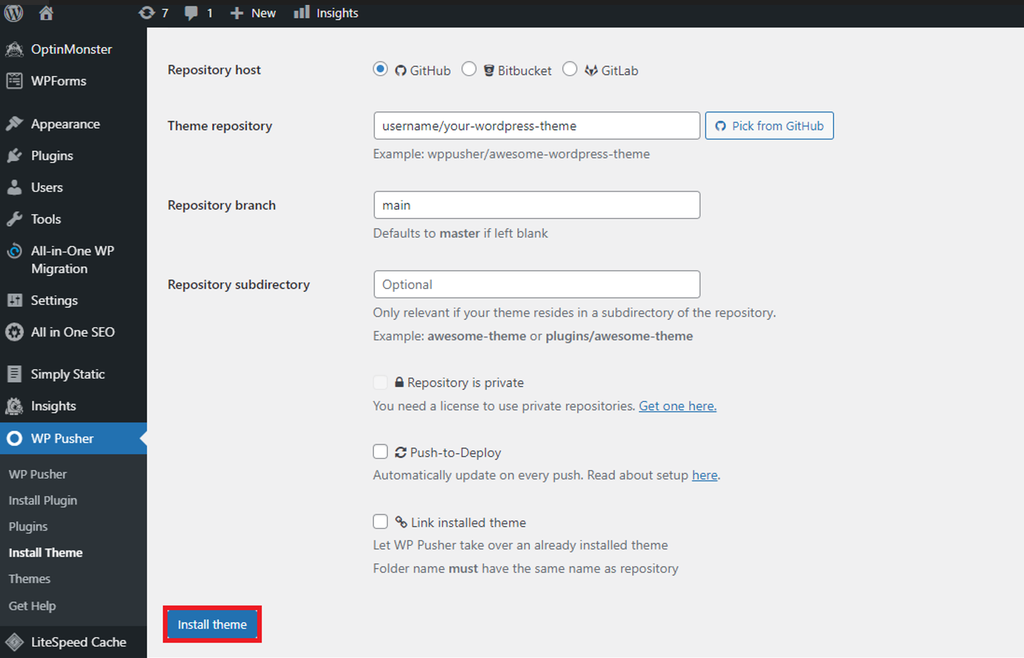
- Navigate to the WordPress sidebar → WP Pusher → Install theme or Install plugin. In this example, we will Install a theme.
- Fill in the Theme repository field with your GitHub repository’s name.
- For the Repository branch field, enter main.
- Click the Install theme button.
- After the installation, navigate to Appearance → Themes → and Activate your newly deployed theme.
Whenever you push changes to repositories, go to WP Pusher → Plugins or Themes → Update. Otherwise, your changes will not show up on the live site.
Extra Resources for GitHub WordPress Integrations
Aside from improving development workflows, integrating WordPress with GitHub has other purposes. For example, you can install plugins or themes from GitHub and host your website on this platform.
How to Install WordPress Plugins and Themes From GitHub
WordPress developers typically have GitHub repositories for their themes or plugins. If these themes or plugins are unavailable in the WordPress official library, you can install them from GitHub.
The steps to install a theme and a plugin are similar. Here’s how to download and install a WordPress plugin from GitHub:
- Open GitHub and look for the plugin you want to install.
- On the plugin’s GitHub repository page, click Code → Download ZIP.
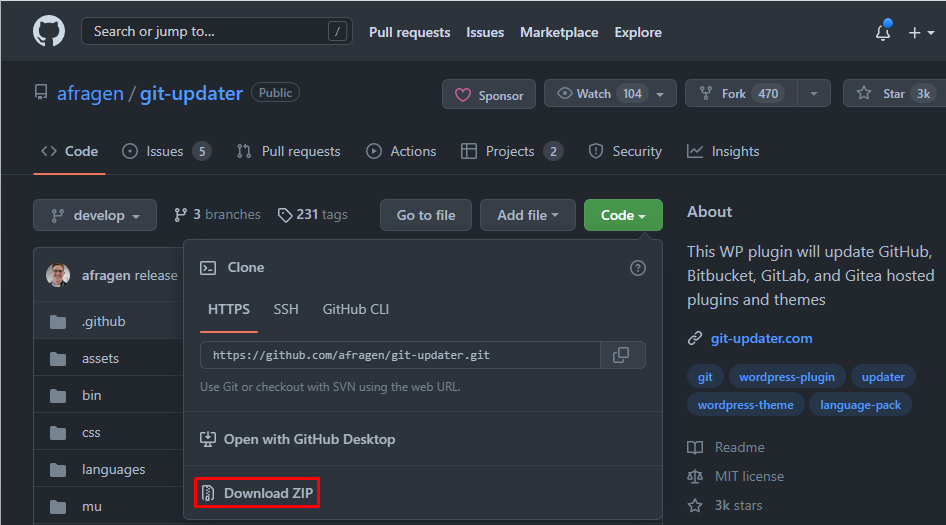
- Select your desired directory and click Save.
- After it finishes downloading, install the WordPress plugin manually.
GitHub Pages for Static WordPress Hosting
GitHub offers a free hosting service called GitHub Pages. It lets you create a static site directly from your GitHub remote repo.
However, it will convert your WordPress website into static, omitting dynamic functionalities. A static site is ideal for a simple portfolio, blog, or project demonstration page.
Also, websites hosted on GitHub Pages will use a github.io domain by default. To change it, purchase a domain from a registrar like Hostinger.
To host your WordPress website on GitHub Pages, follow these steps.
1. Create a New GitHub Pages Repository
A GitHub Pages repository is where you store your static site’s data. Creating one is the same as creating a new GitHub repository. However, in this case, the repository’s name will be username.github.io.
After creating a remote GitHub Pages repository, clone it to your local machine:
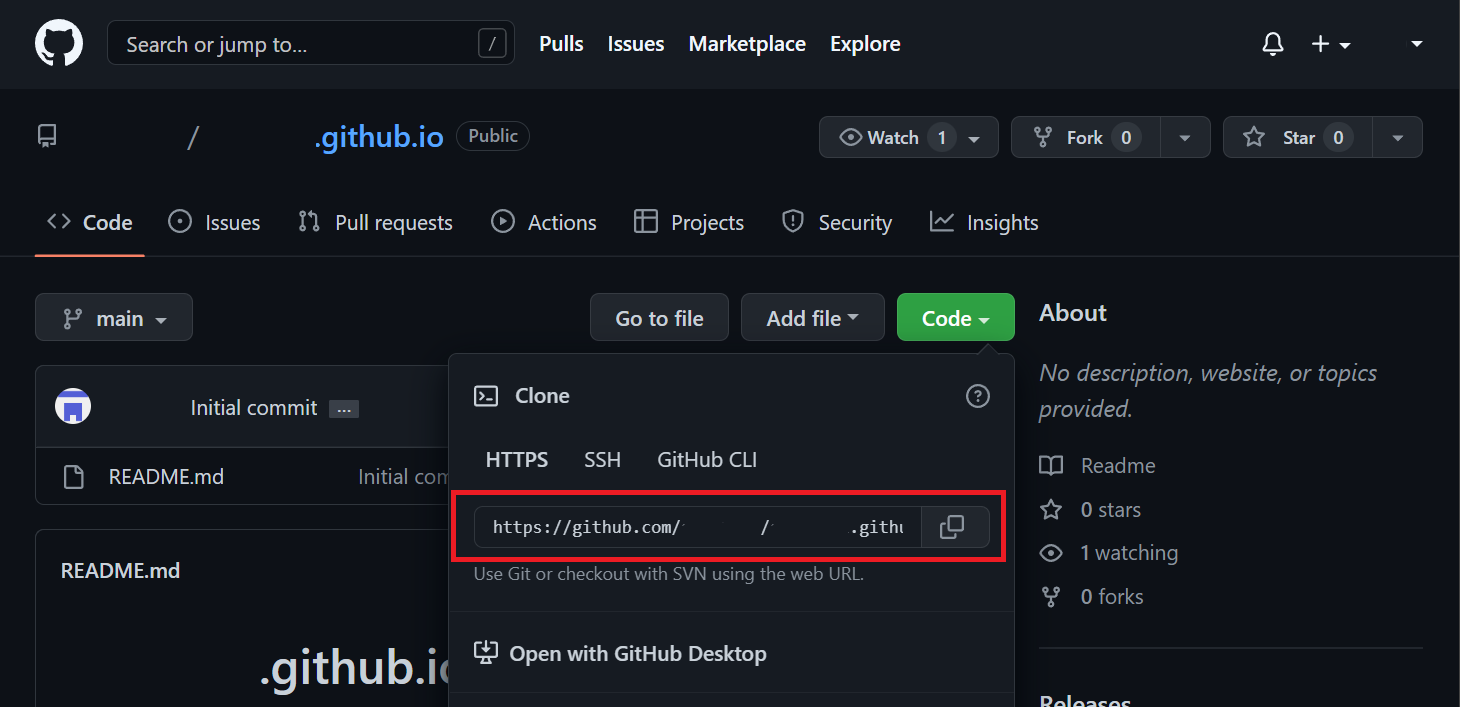
- Open GitHub and navigate to the repository’s page.
- Click Code and copy the repository’s URL.
- Navigate to the folder where you want to save the repository.
- Right-click anywhere and select Git Bash Here.
- Type git clone URL and hit Enter. A new folder with your GitHub Page repository’s name should show up.

2. Create a WordPress Site
The WordPress site will be your development environment. It’s where you will make changes to the live website’s content and design hosted on GitHub pages.
Using tools like Local, you can host your WordPress GitHub Pages sites on a local server. Otherwise, use web hosting services to allow other WordPress users to access it remotely.
When hosting your development site remotely, set it to private to prevent users from visiting while it’s still in the works.
Check our WordPress tutorial to learn more about installing and using the CMS. Once your site is created, configure its content and design.
3. Convert the WordPress Site to Static HTML
GitHub Pages only supports static pages. Since WordPress sites are dynamic, convert them to static before deploying.
There are different methods to convert your WordPress site, but using a plugin is the most common. In this tutorial, we will use the freemium plugin Simply Static.
To convert a WordPress site using Simply Static, set up the plugin first:
- Download and install the Simply Static plugin.
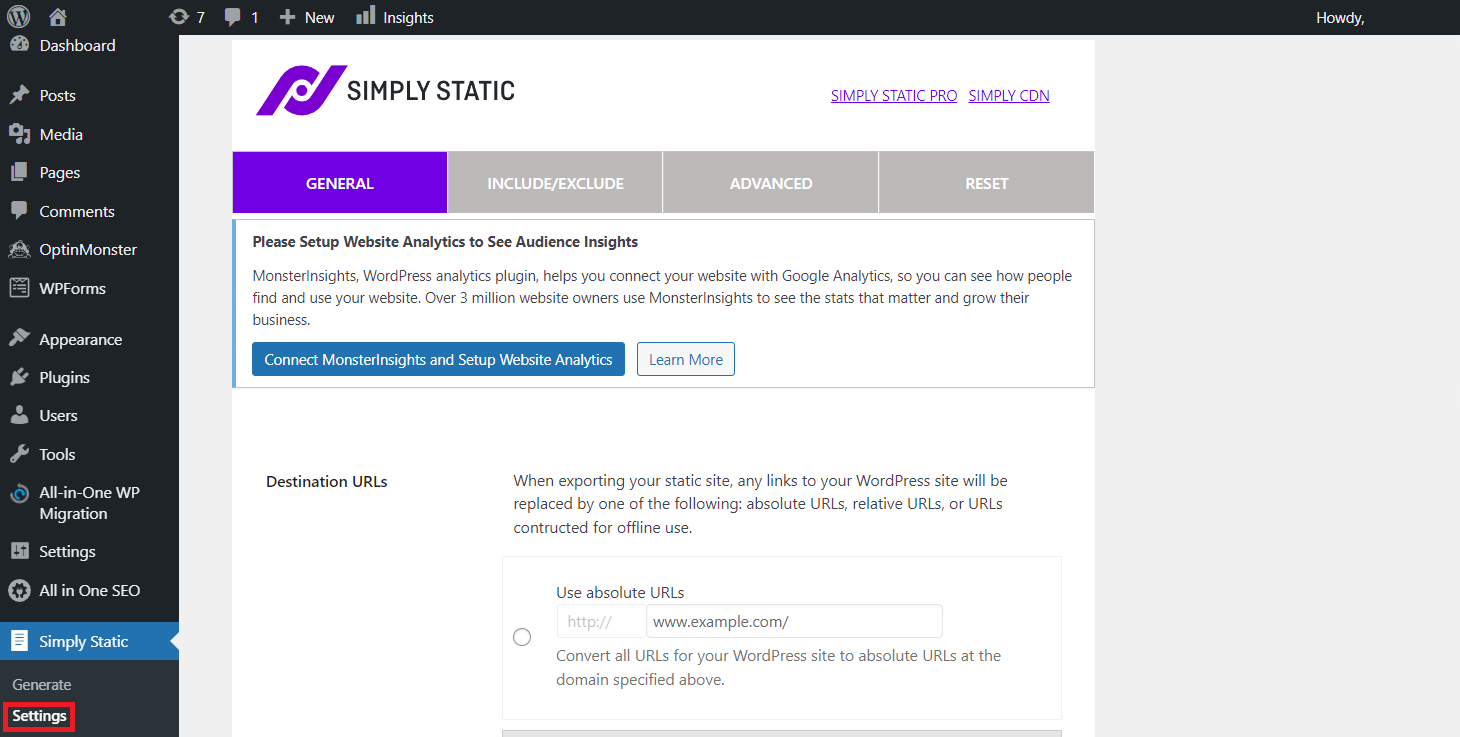
- Navigate to the WordPress dashboard sidebar → Simply Static → Settings → General tab.
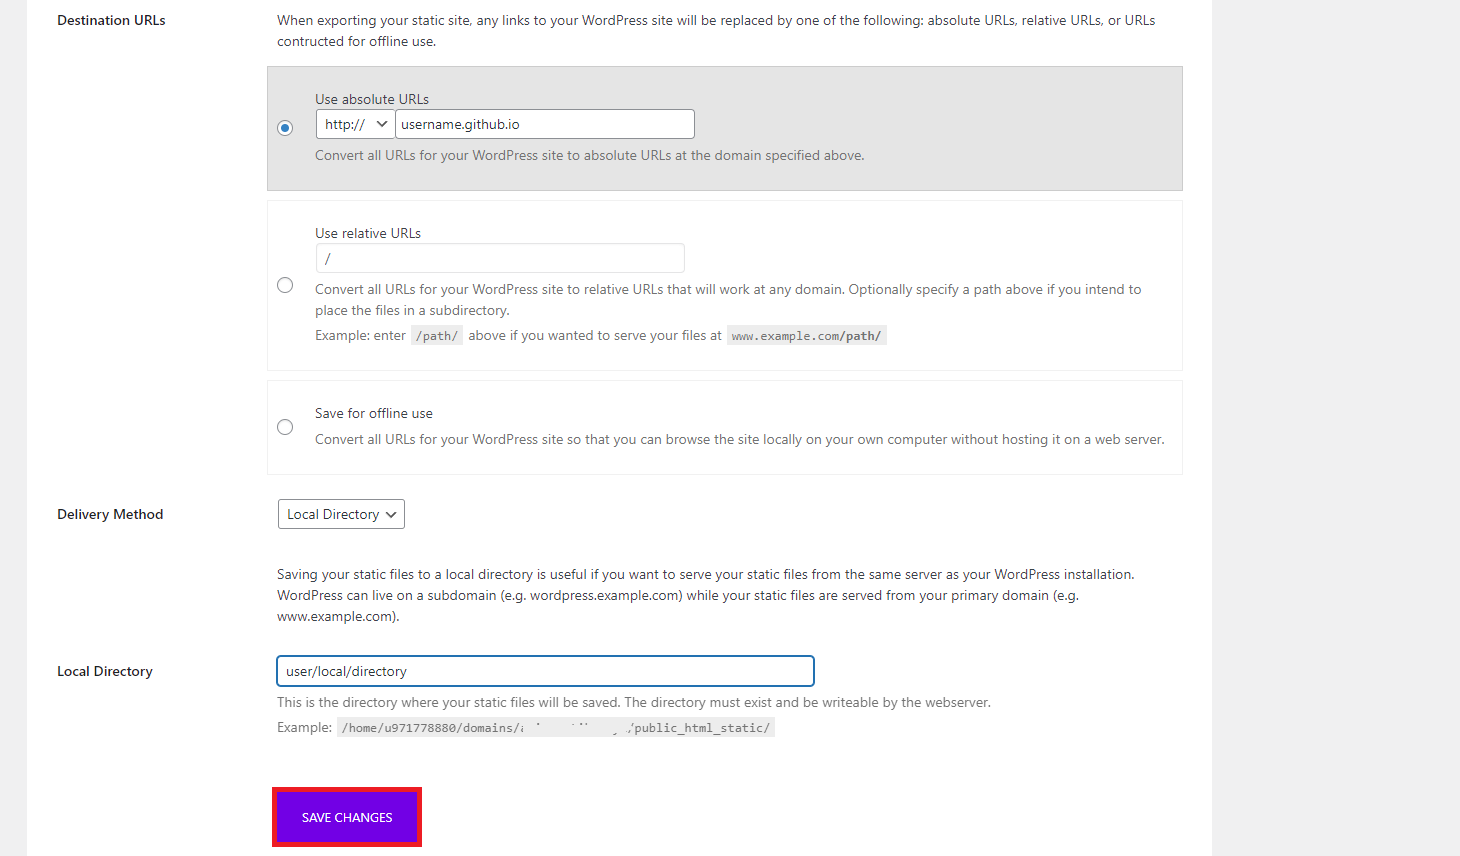
- Under Destination URLs, select Use absolute URLs.
- Enter your GitHub Pages’ site URL. For sites with the free github.io domain, the URL is username.github.io.
- For the Delivery Method, select Local Directory.
- Enter the local path to your GitHub Pages repository clone. This is where Simply Static will save your site’s HTML files.
- Click Save Changes.
After the configuration completes, it is time to convert your WordPress site:
- Navigate to your WordPress dashboard’s sidebar → Simply Static → Generate.
- Click the Generate Static Files button. Wait until the export process completes.
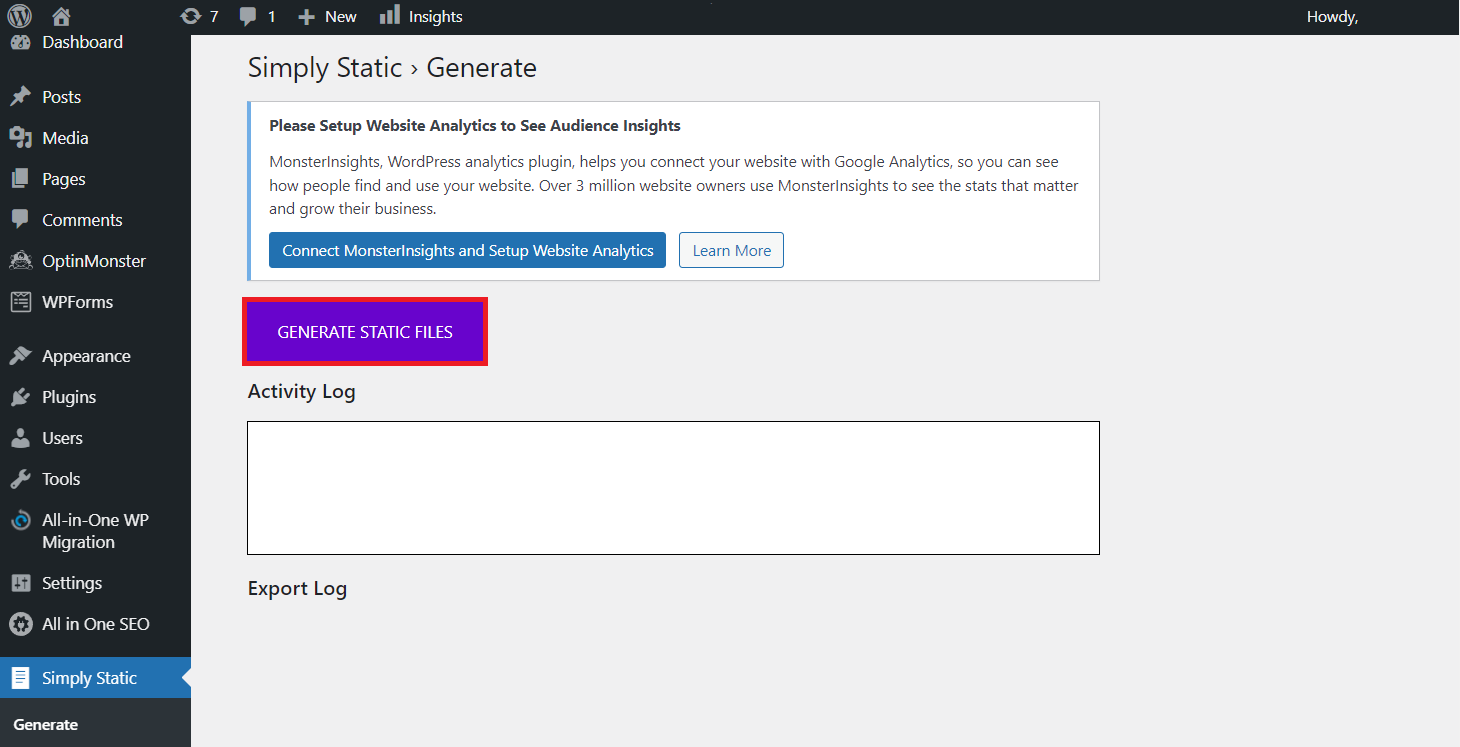
- Open your local GitHub Pages repository. If the export succeeded, the HTML files should show up.
4. Deploy the Site to GitHub Pages
Deploy your static WordPress site to GitHub Pages to make your site live. Unlike other hosting services, pushing to the GitHub Pages repo will automatically deploy changes to the live site.
To deploy your site, push the HTML files to your GitHub repo:
- Copy your GitHub Pages repo’s URL.
- Open your local repository folder.
- Right-click anywhere and select Git Bash Here.
- Enter git remote add origin URL and hit Enter. If the error: remote origin already exists message shows up, you have already added the remote repository. In this case, proceed to the next step.
- Push all the files to the GitHub repository by typing git push origin -u master and press Enter.
- If GitHub asks you to sign in, select Sign in with your browser and enter your username and password.
After pushing the HTML files to your GitHub Pages repository, you can now access the live site.
Whenever you make changes to your site, create new HTML files and push them to the GitHub Pages repository. If you are using the GitHub desktop client, click Push Origin.
If you prefer automatically deploying your site’s HTML files to GitHub Pages, consider purchasing Simply Static’s pro version. It starts at $99.99.

Popular WordPress GitHub Plugins
Using plugins can further optimize your workflow, making WordPress development more efficient. Here are our picks for the three best GitHub WordPress plugins, each with different purposes:
1. WP Pusher
WP Pusher helps deploy a new theme or plugin to your live WordPress site using the repository’s URL. It lets you install a theme and plugin directly from the WordPress dashboard.
WP Pusher ensures a more effective workflow for users who frequently update their plugins or themes. It is also useful for installing plugins or themes unavailable in the WordPress library.
To install a WordPress theme using WP Pusher, simply enter its repo link and click the Install button. The plugin also has Themes and Plugins sections that list all installed plugins and themes.
WP Pusher is available in free and premium versions. The premium plan offers more features, starting at $99/year. It also comes with a 30-day money-back guarantee.
Key Features:
- Multi-platform support. WP Pusher integrates with multiple Git-based repo services, including GitHub, GitLab, and Bitbucket.
- Push-to-deploy. Automatically updates WordPress themes or plugins every time users push to Git.
- Multisite support. This plugin will work for all websites within a WordPress multisite network.
2. Git Updater
Git Updater is a simple plugin for automating updates to GitHub-hosted WordPress themes, plugins, and language packs.
Git Updater must have authorized access to the repositories to work properly. Additionally, it requires themes and plugins’ style.css files to include specific lines of code.
The plugin can periodically check for newer updates on your theme and plugin repositories. If it detects a newer version, it will automatically deploy the changes on the live server.
Git Updater offers free and pro versions. The pro versions start at $30/year and come with additional features, such as remote installations and branch switching.
Key features:
- Automatic updates. Automatically updates a theme, plugin, or language pack as a new version appears on the GitHub repository.
- Remote plugin and theme installation. Lets you install GitHub-based themes and plugins via the WordPress dashboard.
- Private and public repository support. Track updates from public and private repositories.
- Branch switching. Users can choose whether Git Updater looks to the master branch or other development branches.
3. GitHub Embed
GitHub Embed is an open-source plugin for embedding GitHub information into your website. It currently supports:
- Repositories
- User profiles
- Project milestones summary
- Project contributors
To embed GitHub information, simply paste the repo URL on your site. This plugin automatically fetches and applies any updates made to the embedded information.
GitHub Embed is especially useful for project websites. With this plugin, developers can keep information about their projects on the website up to date.
Best of all, this plugin and all its features are completely free.
Key features:
- Styling customization. The plugin has styling classes, allowing users to customize their embedded information to match their website design.
- Automatic information updates. GitHub Embed automatically updates embedded information every time a user makes a change on GitHub.
- Multi-information embedding. Users can embed multiple pieces of information on their sites.
- Milestone summaries. Provide details about your project’s progress, including the issues, due dates, and milestone descriptions.
Conclusion
GitHub is a Git hosting service that allows developers to collaborate on projects more efficiently. The platform has version control, tracking, and branching features, enabling simultaneous and organized development of the same project.
Integrating WordPress with GitHub will improve your website development workflows. This article has explored each step to integrate GitHub with WordPress.
GitHub integration lets users install WordPress plugins from their repositories and host a WordPress site on GitHub Pages. Additionally, plugins like WP Pusher, Git Updater, and GitHub Embed can automate some integration processes.
We hope this article has helped you understand how to use GitHub to support your WordPress projects. If you have any questions, don’t hesitate to leave us a comment.

Aris is a Content Writer specializing in Linux and WordPress development. He has a passion for networking, front-end web development, and server administration. By combining his IT and writing experience, Aris creates content that helps people easily understand complex technical topics to start their online journey. Follow him on LinkedIn.


Comments
April 18 2023
I have a question. when we use github for our wordpress website, basically we do a local environment for our wordpress site which will connect with github and github connect with our live site. I mean When I change something on local site it will update the github and then automatically will be updated our live site. Here I have a question, Can we customize the design by any page builder on local pc by this process? I want that I will customize on local pc then I will update the customization by pusher plugin or something else to my github and live site? Is it possible? Please let me know. Thanks
April 21 2023
Hello there! Posts and content are stored on wp_posts database table. So, in this case only Git pusher wouldn't help since it only handles the files side. In order to sync databases too you would need an additional plugin like WP Migrate DB Pro. Here's a post about pushing database changes to a live site.