What Is the 413 Request Entity Too Large Error, How to Fix It and Avoid It
The 413 Request Entity Too Large error occurs when users attempt to upload a file whose size is larger than the web server’s limit. Although this server limit can help prevent back-end overloading and downtime, it can lead to issues when set too low.
While this HTTP status code might not indicate serious problems, encountering the 413 error can harm website usability and the user experience.
In this WordPress tutorial, we will explain what the 413 Request Entity Too Large error means and how to solve it. You will also learn the best practices to avoid the issue from returning and other related errors.

What Does 413 Request Entity Too Large Error Mean?
The 413 Request Entity Too Large error means the size of client requests on your website or web application is too large. It occurs when users attempt to write information on the database, like uploading a file or filling up a form.
Hosting providers have specific configurations on their servers that determine the maximum file size of uploads. Usually, they are sufficient for basic tasks like posting an article, but some website features might cause users to send larger amounts of data.
If the requested resource or uploaded file size exceeds the limit, the server will close the connection and return the 413 Request Entity Too Large error code.
This problem might also trigger other error messages, like HTTP Status Code 413 or 413 Payload Being Too Large. It is also related to the 400 Bad Request error, which is commonly due to permission issues.
How to Fix 413 Request Entity Too Large Error in WordPress
In this section, we will explore four effective methods to fix the 413 Request Entity Too Large error on WordPress.
Important! Since two of the methods involve modifying important WordPress files, back up your files before proceeding. Also, make sure you have administrator access to the server files.
1. Modify the functions.php File
In WordPress, the functions.php file defines your website’s functionalities. It contains several rules, including those limiting your website’s maximum request or file size. Increasing the values of these functions.php rules should fix the 413 Request Entity Too Large error.
We recommend modifying your child theme’s functions.php to ensure the changes persist after an update. With that in mind, create one before proceeding with the solutions.
We’ll show you three ways to access the functions.php file: via the WordPress dashboard, hPanel, and an FTP client.
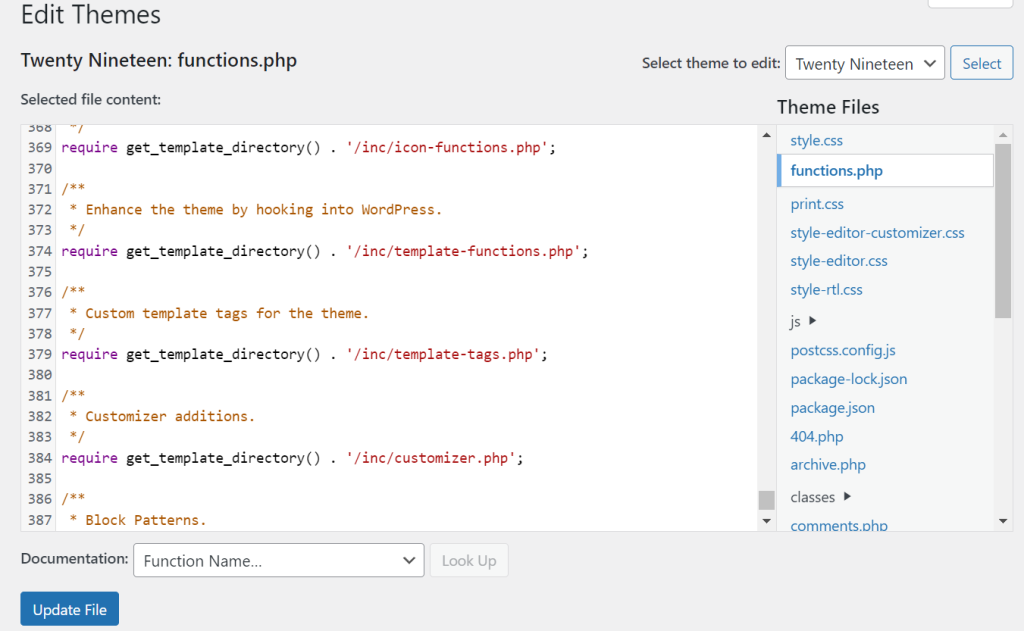
From the WordPress dashboard, go to Appearance → Theme file editor. Search for the functions.php file on the Theme Files sidebar.
If you can’t access the WordPress dashboard, use your hosting provider’s control panel or an FTP client like FileZilla. Use your hosting control panel if you can, as FileZilla lacks a built-in code editor.
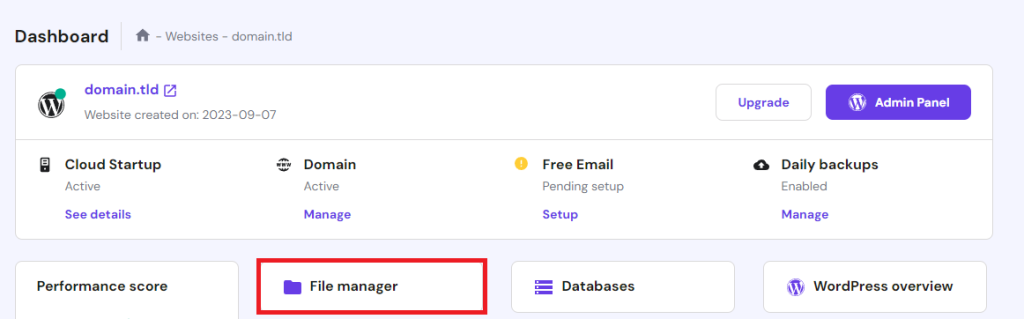
For Hostinger WordPress hosting users, go to hPanel → Websites → Manage → File Manager.
Navigate to the wp-content folder and open your theme directory. Double-click the file to open the code editor.

Once you’ve opened functions.php, look for the lines containing the upload_max_size, post_max_size, and max_execution_time parameters. Increase the value, but avoid setting it too high since it might overload your server.
If you can’t find the rules, add the following code at the bottom of your file to change the maximum file sizes and execution time:
@ini_set( 'upload_max_size' , '256M' );
@ini_set( 'post_max_size', '256M');
@ini_set( 'max_execution_time', '300' );
Save the changes and check your website to see if the file uploads successfully. If the error still shows up, increase the numbers slightly or try the next methods.
Pro Tip
While you are in the root directory of your WordPress website, reset file permissions since the 413 error might also occur due to privilege issues. Check our guide to learn how to fix file permissions at Hostinger.
2. Modify the .htaccess file
The second method involves editing the .htaccess file, which contains your web server’s configurations, including authorization, caching, or optimization.
Since the file is crucial, be careful and don’t make any unnecessary changes. Also, create a backup before proceeding with the solution to restore the file more easily.
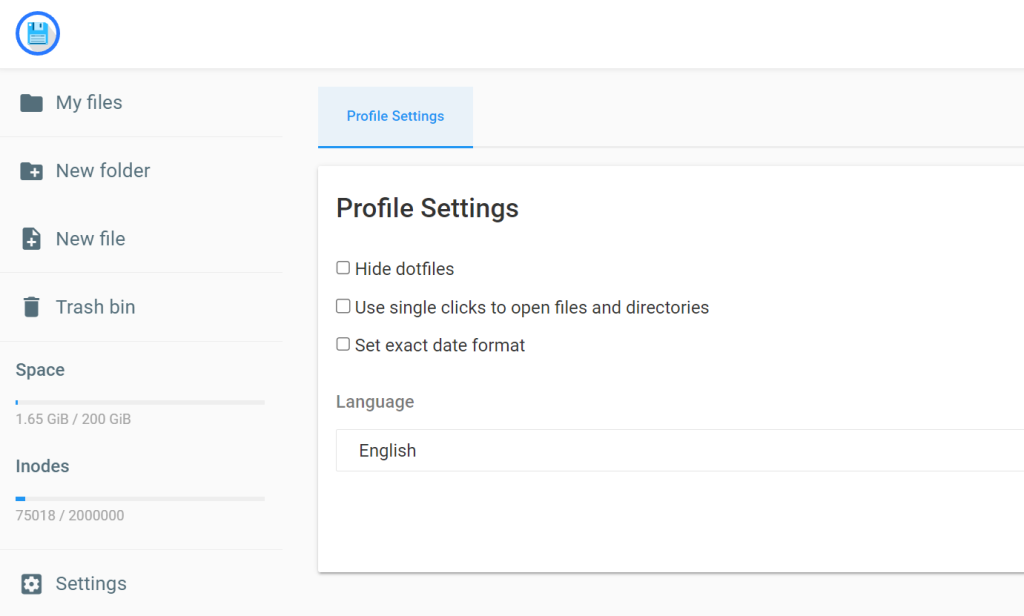
To access the .htaccess file, navigate to your website’s public_html folder via your hosting provider’s File Manager. If you can’t find .htaccess, choose to show hidden files. To do this on hPanel, go to Settings and uncheck the Hide dotfiles box.
Once you open the file, scroll down until you find the # END WordPress line at the end of the document. Paste the following after the line to increase the PHP upload size limit:
php_value upload_max_filesize 256M
php_value post_max_size 256M
php_value max_execution_time 600
php_value max_input_time 600
Save the changes and close the code editor window. Return to the WordPress admin area and check if the issue still prevents you from uploading large files.
3. Modify NGINX Configuration
If you host WordPress on a VPS hosting plan, you can modify the web server configuration to resolve the error.
The 413 Error Request Entity Too Large might occur if you set your web server to drop connection upon receiving large-sized requests. The rules vary depending on whether you run Apache, NGINX, or other web server software.
In NGINX servers, the client_max_body_size configuration lets you set the maximum size of the client request HTTP block. To resolve the issue, reconfigure NGINX to increase the maximum capacity limit for uploading files by editing the nginx.conf file using a text editor like Vi.
Instead of using a command-line interface, Hostinger VPS hosting users can connect to their website’s server via an SFTP client to edit their server configurations.
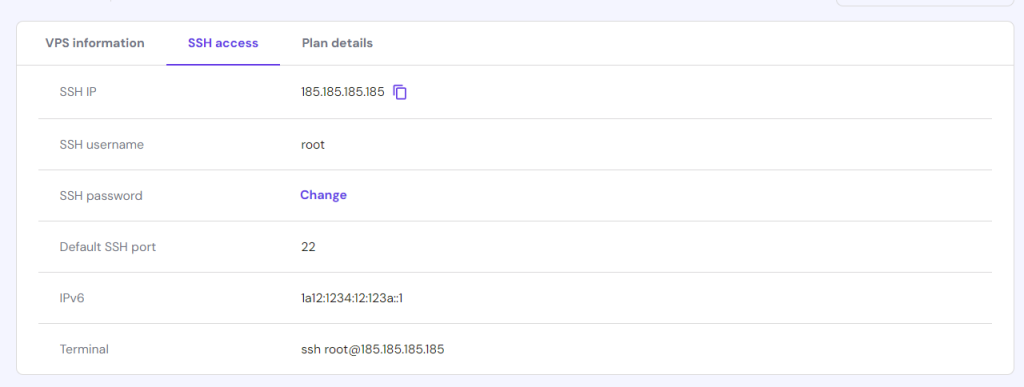
For this tutorial, we will access the nginx.conf file using an SSH client like PuTTY or Terminal. Hostinger users can find the login credentials in the SSH access tab in the VPS overview menu.
Once connected to your VPS, enter the following command in your Terminal to open the configuration file using Vi:
vi /etc/nginx/nginx.conf
Now, change the maximum request body size that the server allows by adding these lines. We will set it as 8 MB as an example, but make sure to change it according to your requirements:
# set client body size to 8M #
client_max_body_size 8M;
Save and close the file by entering :wq and hitting Enter. Return to the main Terminal interface, and restart NGINX to apply the changes by entering the following line:
nginx -s reload
For an Apache server, modify the limitrequestbody parameter’s value in the httpd.conf file using the same steps.
Now, reupload files to your website to check if the error 413 remains.
4. Use a WordPress plugin
If you use a content delivery network (CDN), the error might occur due to the caching server’s low upload size limit. Sometimes, your web host doesn’t allow you to change the value.
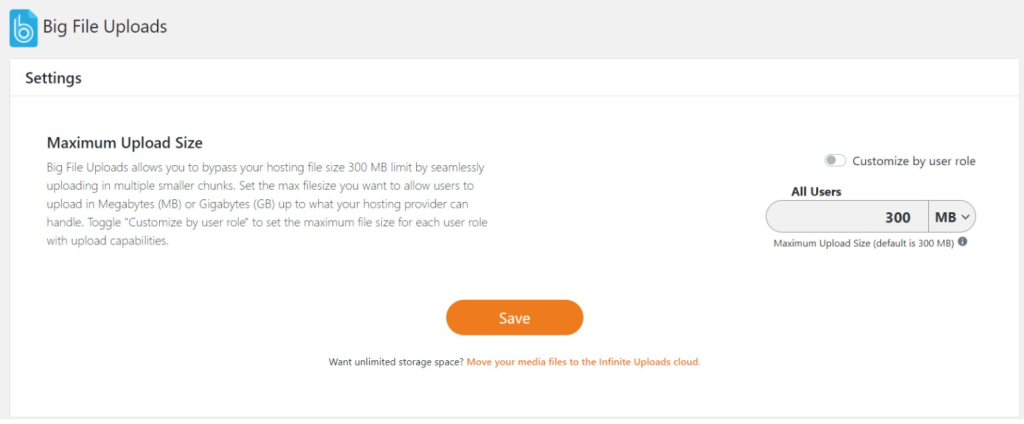
To resolve this problem, install a WordPress plugin like Big File Uploads that lets you bypass the maximum upload size rule in the back end.
After installing the plugin, navigate to your WordPress admin dashboard sidebar → Settings → Big File Uploads. On the configuration page, adjust the maximum upload size based on your needs.
We recommend this method only as a temporary solution because granting a plugin access to your web server configuration can pose a security risk.
It’s best to contact your web hosting provider to help you safely increase the file upload size limit. If you’re a Hostinger user, you can contact our Customer Success team 24/7 via live chat and email.
How to Avoid 413 Request Entity Too Large Error
Once you fixed the issue, consider the following measures to prevent the 413 HTTP error from returning.
Regularly Audit Server Settings
As your website features expand, you must update the server configuration files accordingly. This will ensure that all functionalities work properly to prevent errors including HTTP 413.
For example, change the max upload size setting if you enable a function that sends a large request.
Remember to test changes in a local development environment or a staging area before applying them to the live site. Otherwise, you might set the file upload size limit too high, overloading the server and causing more issues.
Implement Client-Side Validation
Add JavaScript or Python script that checks the client’s file upload size before submission to prevent oversized file uploads. It will reject input that exceeds the set limit.
Since the server won’t handle the request, the error won’t show up. Instead, you can display a warning about an invalid input and instructions on how to upload large files to your website correctly.
Enable Chucked Uploads and Caching
Enabling chunked uploads lets the client divide requests into smaller packets and send them sequentially to your server. It allows your server to accept larger files while using the default limit.
You can enable this feature by integrating the FileReader API into your WordPress site via functions.php. You can also enable file compression using the mod_deflate module in Apache web servers or gzip for NGINX.
For media library compression, WordPress users can use a plugin like WP Smush to optimize file sizes upon upload.
Troubleshooting Other 4xx Errors
In addition to the HTTP 413 issue, request-related issues can also trigger other 4xx WordPress errors. Here are some of the most common ones and their causes.
- 401 Unauthorized Error. The web server rejects requests due to the lack of authentication.
- 403 Error. The server acknowledges the request but denies access due to a blocklisted IP address or improper authorization.
- 429 Too Many Requests Error. The client sends the requests too frequently, exceeding the server’s rate limit.
- HTTP Error 431. The request’s header size is too large.
Check out our tutorials on the errors to learn about how to resolve them.
Conclusion
The error 413 Request Entity Too Large occurs when the client sends a request larger than the web server’s file upload limit. The website’s host will drop the connection, showing an empty page with the error message.
In this article, we have explained four effective methods to resolve the error on a WordPress site. Here’s the recap:
- Change the value of upload_max_size, post_max_size, and max_excution_time parameters in your theme’s functions.php file.
- Add new rules in your web server’s .htaccess file to change the upload_max_filesize, post_max_size, max_execution_time, and max_input_time.
- Modify the client_max_body_size parameter in your NGINX server configuration file via SSH.
- Install Big File Uploads to bypass the file size limit set by your web host or CDN.
To prevent the error from returning, regularly check if your server settings align with your website’s requirements. Also, consider implementing client-side validation, chunked uploads, and compression to allow users to send large files.
413 Request Entity Too Large FAQ
In this section, we will answer several commonly asked questions about the 413 Request Entity Too Large error.
What Is the Default Size of a 413 Request Entity Too Large?
The default upload size that triggers the 413 HTTP error depends on your web server, software, and hosting provider. For example, NGINX will show the message for request bodies larger than 1 MB.
Is There a File Size Limit That Triggers the 413 Request Entity Too Large Error?
Yes, the 413 Request Entity Too Large error will show up if the client sends a file larger than the default limit, like 128 MB in WordPress. However, there’s no exact value since the configuration varies depending on the web host and server administrators.
What Are the Common Causes of the 413 Request Entity Too Large Error?
Common causes for the 413 Request Entity Too Large error include the client sending large requests and the web server imposing a small upload size limit. It might occur when users enter data into a form or upload a file.

Aris is a Content Writer specializing in Linux and WordPress development. He has a passion for networking, front-end web development, and server administration. By combining his IT and writing experience, Aris creates content that helps people easily understand complex technical topics to start their online journey. Follow him on LinkedIn.

Leo is a Content Specialist and WordPress contributor. Armed with his experience as a WordPress Release Co-Lead and Documentation Team Representative, he loves sharing his knowledge to help people build successful websites. Follow him on LinkedIn.