How to Set Up Outlook: Setting Up Email on Microsoft Outlook 2019, 2016, and More
Microsoft Outlook allows users to easily organize their email accounts, contacts, and messages conveniently in one place. It is particularly helpful for professionals or business owners who want a centralized management area for their mailbox.
However, setting up Outlook can be tricky if you are using a custom email since you need to add various details to link the server. There are also different Outlook versions, each with a separate configuration process.
In this article, we will explain how to set up Outlook with Hostinger’s email hosting plan using different Outlook versions, including mobile.
Download guide to using Hostinger
Prerequisites for Setting Up Outlook
Before setting up Outlook, you need to complete a few steps to ensure a smooth configuration process.
Create a Business Email Hosting
For Outlook, we recommend creating a professional email address with a custom domain, like yourname@businessname.com. Compared to free addresses from Google or Webmail, it offers several benefits for your business.
For instance, the custom domain makes your email appear more credible and legitimate. Such a mailbox is also better protected since the provider hosts it on a private server and typically adds extra safety features.
For example, the Hostinger business email hosting plan, starting at $0.99/month, has built-in antivirus software and advanced anti-spam protection. Our email service also supports IMAP and POP, which Outlook needs to establish a connection with the mailing server.
In addition to an email hosting plan, you need a domain name from a registrar. If you choose the Hostinger Business Premium plan, you don’t need to worry about that as you’ll get a domain name for free. Otherwise, we recommend buying a domain name from Hostinger to simplify the setup process since you can manage all services from hPanel.
If you use Hostinger’s web hosting plan, you will get a free email and a custom domain. This means you don’t need to buy additional services before setting up Outlook.

Point Your Domain and Add MX Records
Pointing your domain ensures your email uses the correct server, enabling your mailbox to receive and send messages. At Hostinger, your domain should point to the right address by default. To check or change it, follow these steps:
- Log in to hPanel and select Domain from the top menu.
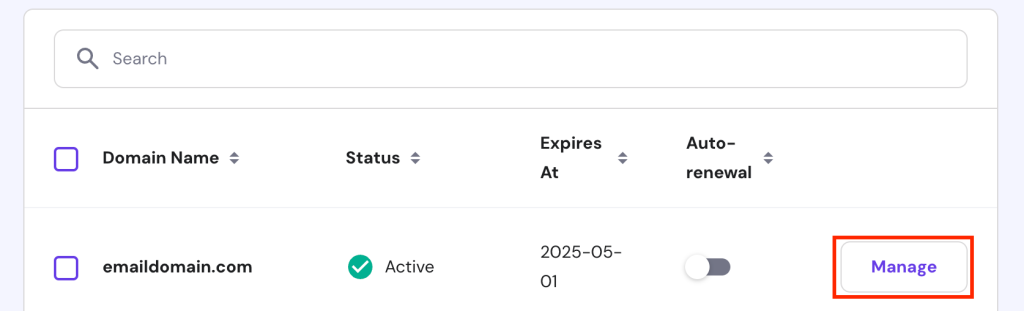
- Click Manage next to your email domain.
- From the sidebar, click DNS/Nameservers.
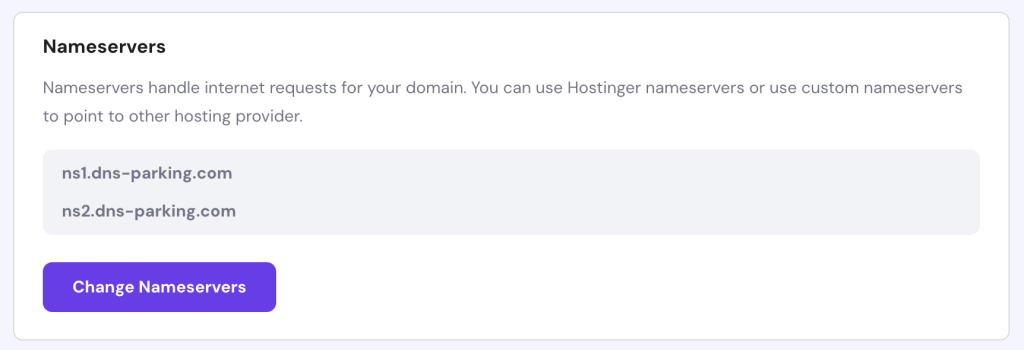
- If you see ns1.dns-parking.com and ns2.dns-parking.com, your domain is pointing correctly. Otherwise, click Change Nameservers.
- Enter the correct values from Step Four into the first and second fields. Click Save.
Now, let’s change the MX records. These are DNS settings that specify your email address server destination. To do so, navigate to the same DNS/Nameservers menu of your email domain.
From the DNS record list, check if you already have two MX settings with the following values:
- Name – @ for both records.
- Priority – 5 and 10.
- Mail server – mx1.hostinger.com and mx2.hostinger.com.
- TTL – default for both entries.
If the MX records’ values are incorrect, click Edit and enter the new setting. Click Update to save the changes.
Meanwhile, if you can’t find existing MX records, navigate to the Manage DNS records section. Enter your MX record settings in the respective fields and click Add Record. Remember to do so twice since you need two records.
Find the IMAP, POP, and SMTP Configuration Details
To configure Outlook, we must add the email address IMAP, POP, and SMPT settings to the client. Here’s how to find the details on Hostinger email:
- Log in to hPanel and click Emails on the top menu.
- Click Manage on the email domain you want to add to Outlook.
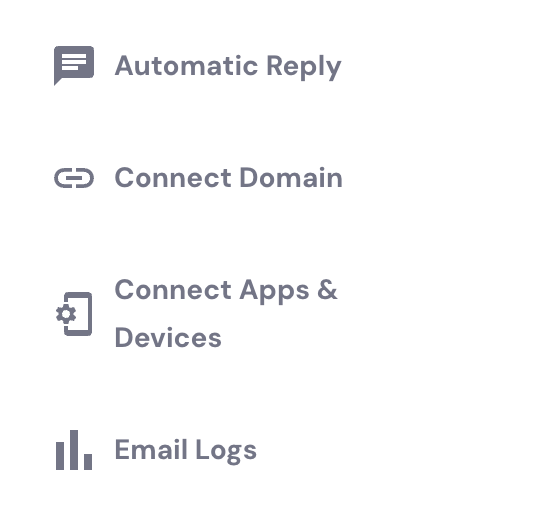
- Navigate to the sidebar and click Connect Apps & Devices.
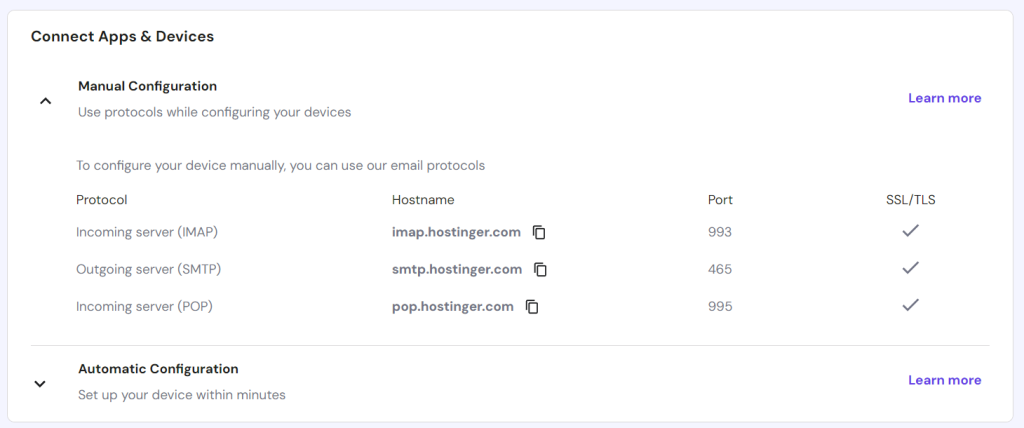
- Scroll down to the Configuration Settings section and click the arrow icon next to Manual Configuration.
- Copy and paste all the information into Notepad or write it down elsewhere. Alternatively, keep the tab open since we will use this info shortly.
How to Set Up an Email Account on Outlook
Now that you have all the required details let’s set up your email in Outlook. Skip to the respective section if you are configuring the client on a particular device.
Microsoft Outlook 2019
Here are the steps to configure Microsoft Outlook 2019 using a Hostinger professional email account:
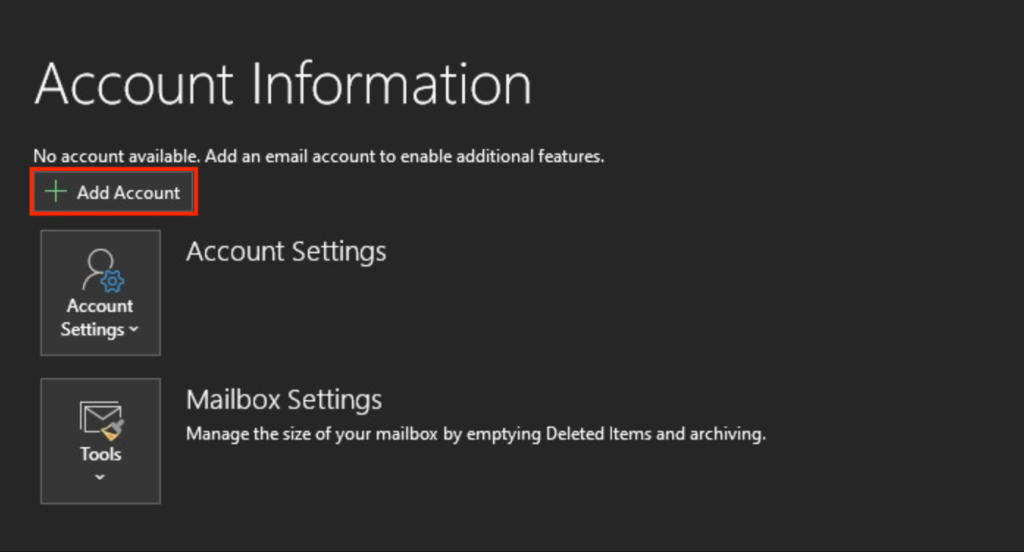
- Open Outlook and add your email address. If you have configured Outlook previously, go to File → Add Account instead.
- Expand the Advanced options menu and check the box to set up the account manually. Click Connect.
- In the Advanced setup menu, select either IMAP or POP. In this tutorial, we will use IMAP, but we will explain their differences a bit later.
- Enter your custom email address password and click Connect.
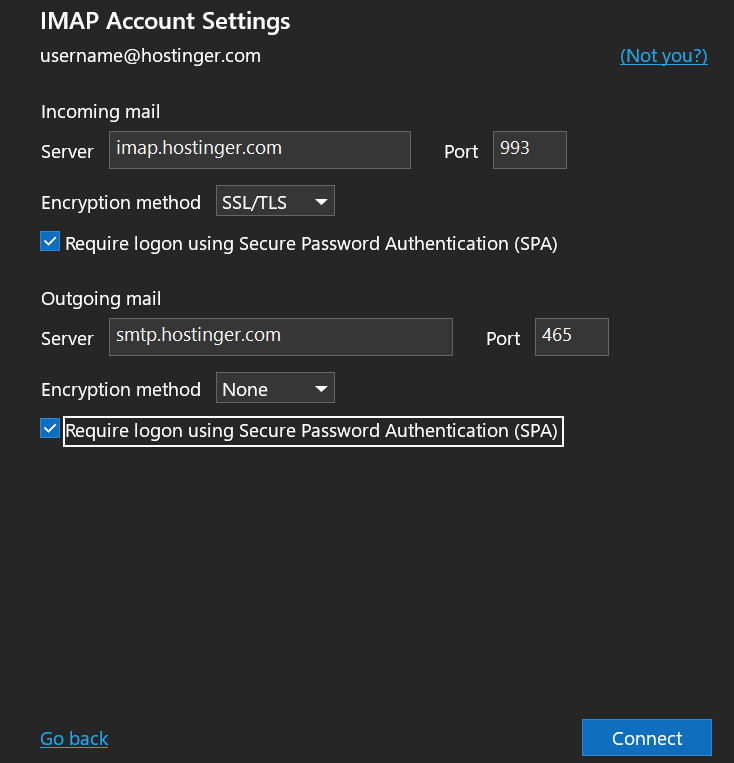
- Fill in the incoming and outgoing mail fields with the details you have obtained from hPanel.
- Select SSL/TLS for the IMAP encryption method and leave the SMTP one to None. Make sure both Require logon using Secure Password Authentication (SPA) options are checked. Click Connect to confirm.
- Enter your email password again if Outlook asks for it. Click Connect.
- Now, you should see a message confirming that your account has been added successfully. Click Done to finish.
If you encounter an error, click Change Account Settings and check if all the details are listed correctly.
Microsoft Outlook 2016
The general procedure to set up Hostinger email on Outlook 2016 is similar to the 2019 version, but there are additional steps. Here’s how to do so:
- Open Microsoft Outlook and you should see the initial welcome screen. Click Next.
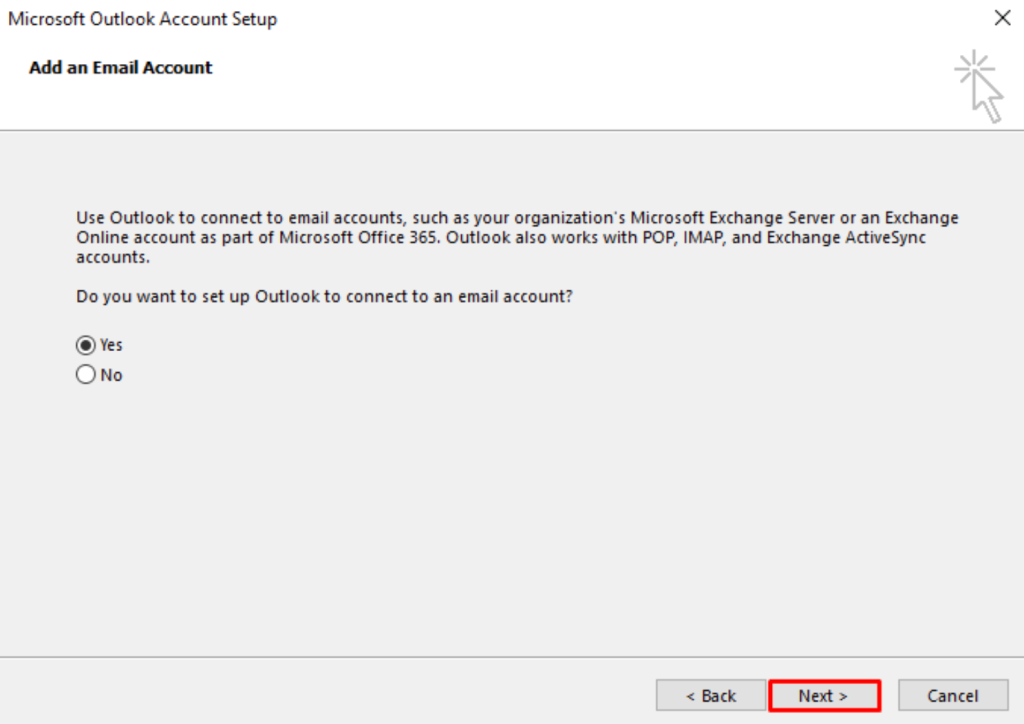
- Outlook will ask if you want to want to connect the application to an email account. Select Yes and click Next.
- Choose the Manual setup or additional server types option and select Next.
- Select the POP/IMAP option. Click Next.
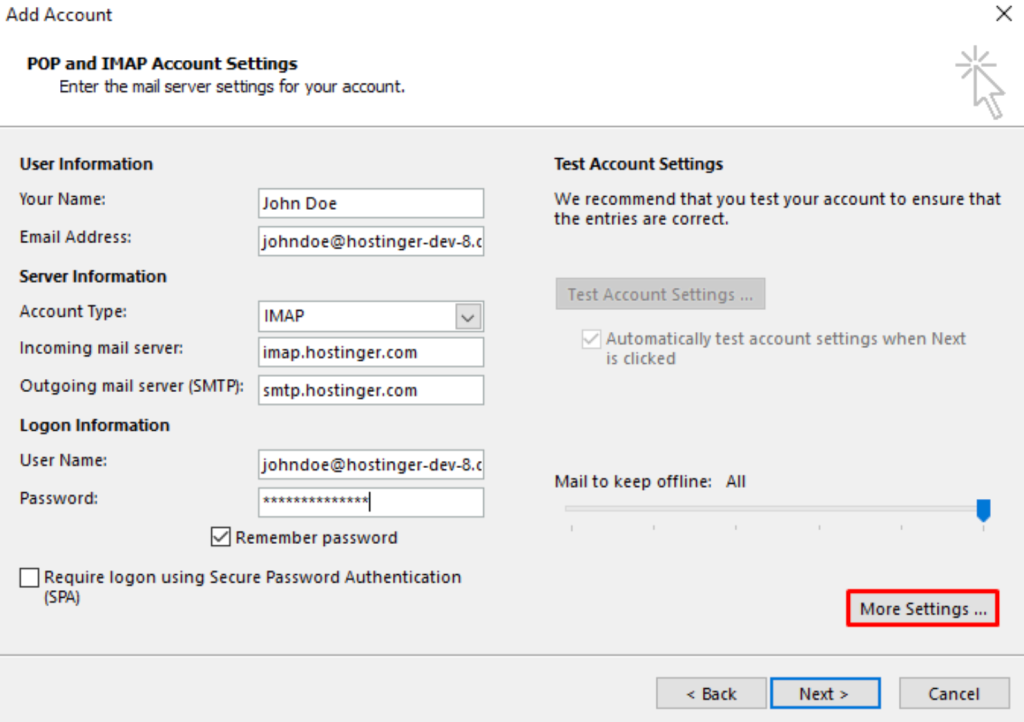
- Under the User Information section, enter your name and custom email address.
- Select POP/IMAP as the Account Type. We will use IMAP for this tutorial.
- Enter the details you have copied from hPanel into the Incoming and Outgoing mail server sections.
- Under Logon Information, enter your email address and password. Tick Remember password.
- Click More Settings and select the Outgoing Server tab.
- Check the My outgoing server (SMTP) requires authentication option and select Use same settings as my incoming mail server.
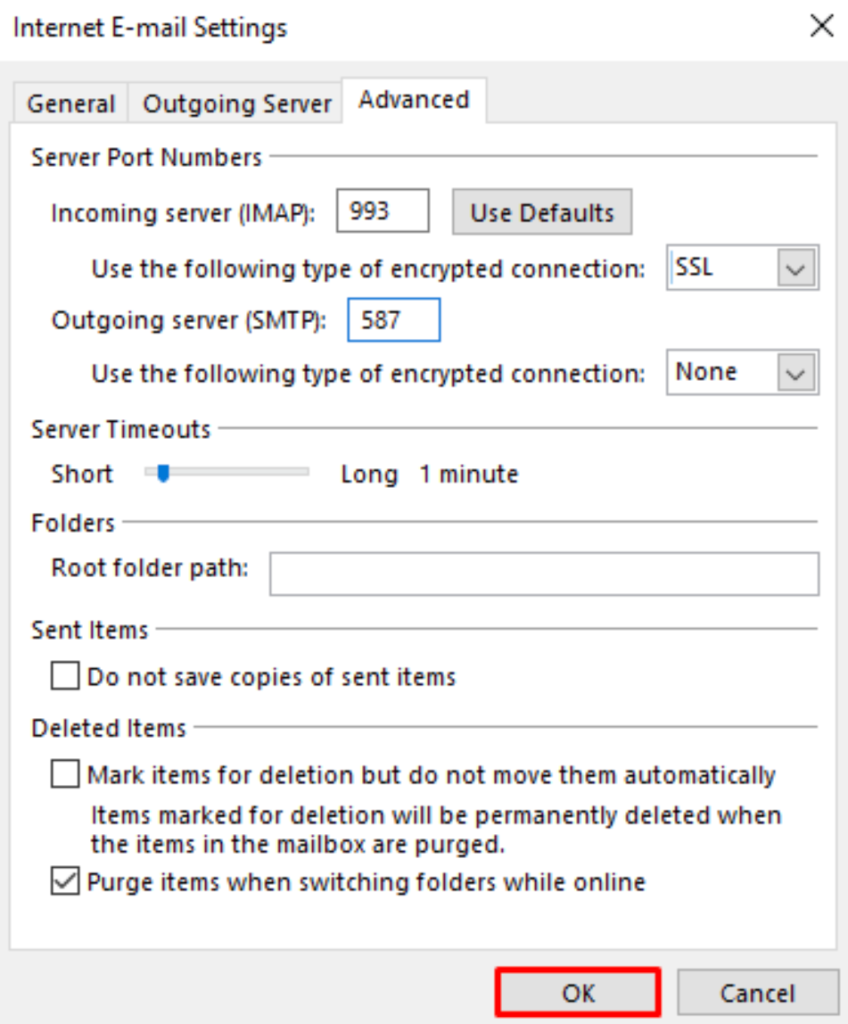
- Navigate to the Advanced tab. Enter Hostinger’s email server port numbers in the Incoming server (IMAP) and Outgoing server (SMTP) fields.
- For IMAP’s Use the following type of encrypted connection option, select SSL from the drop-down menu. Click OK to confirm.
- You will return to the previous window. Click Next.
- Outlook will check whether your email works properly. Wait until the process finishes, then click Close.
- Click Finish on the confirmation window to complete the process.
If you encounter an error, ensure you choose None as the SMTP encryption method and verify other settings.
Important! Microsoft will end the extended support for Outlook 2016 on October 14, 2025. If you are still using this version, we recommend upgrading immediately to avoid potential security risks.
Outlook for iOS
The steps for setting up the Outlook app for iOS are similar to those of the desktop version but with a different user interface. After downloading the application from the app store, open it and follow these steps:
- Open the Outlook for iOS application. Enter your custom email address and tap Add Account.
- On the Add Mail Account screen, select IMAP.
- On the configuration screen, enter your email address, display name, and account description.
- Under IMAP Incoming Mail Server, enter Hostinger’s IMAP incoming server hostname and port. Select SSL as the Port Security.
- Similarly, enter the SMTP Hostname and SMTP Port using the details you acquired from hPanel. For the Port Security method, use None.
- Add your business email address into the SMTP username field and enter the password.
- Click Sign In to complete the setup and wait until your email address is successfully connected.
Outlook for Android
In this section, you will learn how to set up Outlook using a Hostinger business account on an Android device. Once you downloaded the application from the Google Play Store, open it and do the following:
- On the Outlook welcome screen, tap Add Account.
- Enter your business email address and tap Continue.
- On the Choose Account type, select either IMAP or POP3. For this tutorial, we will use IMAP.
- Enter your display name and account description. Scroll to the next section.
- Configure the incoming mail server by entering the IMAP details you have acquired from hPanel. Use SSL/TLS as the Security Type.
- Add your email address as the IMAP Username and enter your password. Continue with the steps.
- Set up the outgoing mail server by adding your SMTP details and choosing None as the Security Type.
- Add your SMTP Username and Password, similar to IMAP login credentials. Then, click the checkmark at the top right corner to confirm.
Outlook via hPanel
If you are using Outlook on multiple devices, you can easily connect your email address via hPanel. You won’t need to add the IMAP or POP3 details whenever you set up a new app in another system. Here’s how to do so:
- Log in to hPanel and click Domain on the top menu.
- Click Manage next to the domain name you want to connect.
- Navigate to the sidebar and click DNS/Nameservers.
- Under Manage DNS Records, add two DNS configurations with the following settings:
- Type – CNAME for both records
- Name – autodiscover.domain.tld and autoconfigure.domain.tld. Replace domain.tld with your actual domain name.
- Points to – autodiscover.mail.hostinger.com and autoconfigure.mail.hostinger.com.
- TTL – 300 for both records.

Wait until the new DNS propagates worldwide, which usually takes up to 24 hours. You can check the progress using a DNS Checker to see if the CNAME records point to the correct addresses.
Once finished, open any Outlook application and add a new account. Enter your business email address and password.
That’s it! The mail client might take up to 10 minutes to link with your Hostinger mailbox.
Expert Tip
To set up an Outlook inbox for a Hostinger email address automatically, you will need an email address, proper MX records set up, and your domain pointed to Hostinger servers.

Setting Up Outlook With IMAP vs POP
Internet Message Access Protocol (IMAP) and Post Office Protocol (POP) are two methods for accessing email messages from the server. While you can use either to connect Outlook, there are important distinctions that make them suitable for different use cases.
IMAP
IMAP stores the messages in the application server instead of locally in the device storage. It lets you access your email mailbox anywhere, using different devices, so long as there is an internet connection.
While flexible, this protocol is slower than POP since you must manually open the email client to download the message and attachments.
POP
POP downloads messages and attachments automatically from the mailing service without the user having to open them manually. Then, it stores the data locally on your device, enabling offline access.
However, you can’t access the email from another system. It makes POP suitable if you often work offline and use a single computer or mobile device.
Pro Tip
Outlook has an auto-reply feature that lets you respond to messages when you are out of the office or offline. To set it up, open Outlook and go to File → Automatic Replies.
Select Send automatic replies, enter your message, and click OK to confirm. Optionally, you can enable this feature during a specific time and write a different message for people outside your organization.
Conclusion
Outlook helps you efficiently organize your business mailboxes and contacts using a single client. Before setting it up, ensure you have an email hosting plan from a provider like Hostinger and acquire the IMAP or POP details.
The general procedure to set up the client is similar regardless if you use Outlook 2019, Outlook 2016, iOS, or Android.
Here is a summary of the steps:
- Add a new account and enter your business email address.
- Select whether you want to use the IMAP or POP protocol.
- Enter the protocol details you have obtained from hPanel or your hosting control panel.
- Enable SSL/TLS encryption and check functionality.
IMAP is suitable for multi-device users since Outlook stores your messages within the client’s server. Meanwhile, POP downloads your emails to your device, enabling offline access but limited to a single computer.
How to Set Up Outlook FAQ
In this section, we will answer several questions about setting up the Outlook email client.
Can I Set Up Hostinger Email Services in Outlook for Free?
Yes, connecting your Hostinger email with Outlook is free! If you have any of our web hosting plans, you can set up the custom-domain email for free. Otherwise, purchase our business email service, starting at $0.99/month.
Why Is My Hostinger Email Account Not Recognized by Outlook?
If Outlook didn’t recognize your Hostinger email, you might have entered the wrong IMAP or POP information. A security setting issue can also cause the same error. To resolve it, try switching from SSL/TLS to no encryption.
Is It Possible to Configure Multiple Hostinger Email Accounts in Outlook?
Absolutely! To add a new account, simply open Outlook, add your email address and specify the IMAP or POP details. Note that certain steps might differ depending on your Outlook version and device.

Aris is a Content Writer specializing in Linux and WordPress development. He has a passion for networking, front-end web development, and server administration. By combining his IT and writing experience, Aris creates content that helps people easily understand complex technical topics to start their online journey. Follow him on LinkedIn.


Comments
August 05 2020
Domain: www.hsipl.com E-Mail ID: kailash.k@hsipl.com Not able to configure Outlook (Windows) & Bluemail (Android) with provided details for IMAP & SMTP Details. Regards, Kailash Kushwaha
November 06 2020
Hey Kailash. Some applications and/or devices may require specific encryption settings. This could differ even between 2 versions of Outlook itself. Play around with the SSL/TLS/NONE settings on the email clients and one of them will work as long as you are using the correct IMAP and SMTP details! :)
August 25 2020
My email doesn't work on Outlook. Not sure what I need to do to fix it, but have been working since inception to get this accurate. Have paid for transfer service but still NOT working!
November 11 2020
Hey there Justin! I see you mentioned "Have paid for transfer". Are you transferring the domain, perhaps? :) I can't check this but the emails may not work during the domain transfer if the MX records are not pointing correctly. Please double check this with our Customer Success team :)
September 29 2020
im not able to add email to outlook no matter in how i try to can you please help in this
November 18 2020
Hey Kalyan. Please message our Success team to help you out with the process.
October 31 2020
i reciver the emails if i loged in on webiste but i dont see and i cant send any email from outlook software to be know not all my email got the same problem.
February 02 2021
Hi there! If you're not able to receive emails to Outlook, it would suggest an issue with IMAP/POP connection - I'd suggest trying to connect with different encryption methods (SSL/TLS/NONE).
November 05 2020
Thanks. this was a great help
December 16 2020
Send test e-mail message: Outlook cannot connect to your outgoing (SMTP) e-mail server. If you continue to receive this message, contact your server administrator or Internet service provider (ISP).
February 09 2021
Hi there, Tanmay! It looks like the issue is coming due to connection to SMTP. Due to different versions of devices and apps, it could be that yours doesn't connect with the current settings. I'd suggest playing around with encryption types (SSL/TLS) and ports 587 and 465.
December 21 2020
Please do a section for Outlook mobile as the fields are different then what is shown and we can't get our email working.
February 09 2021
Hi there! If you tried all the options and weren't able to get your emails to work, don't hesitate to contact Customer Success team - they'll be happy to assist you :)
April 24 2021
Cannot find the send email in Outlook. I had setup hostinger email with IMAP/SMTP,, when i send an email, the recipient receives it, but i cannot find it in my sent email.????
April 26 2021
Hi Afshad, Let's check your settings to make sure you are saving your sent emails. Select File, and then Options. Under Outlook Options dialog, select Mail. Next, go to the Save messages section, enable the Save copies of messages in the Sent Items folder option and Select OK. If this doesn't fix the issue, please contact Support to help :)
September 22 2021
Was Helpful, thanks a lot.
September 25 2021
thank you so much.
September 30 2021
I could use Outlook with the email but I could not use Calendar function. Any idea how I can enable this?
October 05 2021
Hi Melvin, Google Calendar synchronisation via CalDAV is only available with email services that provide calendar (e.g. Titan). Please note that if you're using Hostinger free emails, calendar will not be available.
October 20 2021
Hi, I am configuring my Office 365 account with my domain, How many time can be necessary to refresh a new TXT and MX entries, please? I t is necessary to delete any another entries in my panel for a office 365 domain configuration? Best regards,
October 27 2021
Hi there, if you're looking to use Office 365 as your email provider, you would need to make sure you don't have any other MX on your DNS zone. Additionally, you what DNS are propagating for your domain on WhatsMyDNS. Then once they're done propagating, you can go ahead and verify them from Office 365. If the DNS doesn't seem to propagate well, I'd suggest to get in touch with your host or domain registrar :)
March 07 2022
Not working at all IMAP : imap.hostinger.com 993 SSL/TLS smtp.hostinger.com 465 SSL/TLS please help me
March 09 2022
Hi there, if you're using Hostinger emails and this tutorial wasn't helpful, please contact our Customer Success team - they'll be happy to assist you!
April 11 2023
Hi! Please help. I need to be able to: 1. Connect my Titan Calendar to outlook. (my email was free) 2. Be able to add attachments to my calendar events. Could you please tell me how to achieve this or what plan to buy? Please help! Thanks so much
April 14 2023
Hello there! I can see that it's possible to export Titan Calendar to use with Outlook. Resource for that can be found here. Keep in mind that you can only view the events of the Titan Calendar on your external calendars. As for adding attachments to calendar events, Titan doesn't support this feature yet. All of the available calendar event features can be found here.
October 27 2023
i am filling all the details correctly but not able to login
November 09 2023
Hi there! I'm sorry to hear that. Don't worry, it happens sometimes. To get back in, clear your browser's cookies and cache. If it persists, try a different browser to rule out browser compatibility issues. Hope it helps! ?
February 08 2024
Hi there! I managed to setup everything in Outlook. But I am struggling to send an E-Mail from my alias from Outlook. From the hostinger webmail it is possible and how about Outlook? How can I do this? Thanks!
February 20 2024
Hello! To send an email from your alias in Outlook, you'll need to add your alias as an additional account or as a new email address for your existing account. When composing a new email in Outlook, you can then choose your alias from the "From" dropdown menu. Hope it helps ?