How to Install Maven on Ubuntu: Using Apt and Official Website
Software development is one of the most challenging areas to work in. Fortunately, the right tools can make the development process more streamlined and efficient.
Apache Maven is a build automation tool mostly used for Java projects. It focuses on the simplification and standardization of the building process. One of Maven’s main aspects is providing a comprehensive, maintainable, and simple model for projects.
This tutorial will cover the two methods of installing Apache Maven on Ubuntu and how to set up an environment for it.
A Brief Overview of Installing Maven on Ubuntu:
| Required Knowledge | Basic Ubuntu server management, Java installation |
| Privileges Required | Root or sudo user privileges |
| Difficulty | Intermediate |
| Main Goal | Installing Apache Maven using APT and directly from the official website |

What Is Apache Maven?
Apache Maven is a free and open-source project management tool based on the Project Object Model (POM). Maven contains XML files or pom.xml, which include configuration details and project dependencies. Maven automates building, publishing, and deploying stages. It lets you work and manage several projects simultaneously.
Here are the main benefits of Apache Maven:
- Extensive dependency management.
- Provides a standardized project structure to streamline team collaboration.
- Automatic dependency updates.
- Lets you download third-party libraries.
- Occupies less project space than other similar tools.
- Centralizes all configurations in a single XML file.
- More efficient debugging.
- Lets you remove duplicate dependencies.
- Offers detailed analysis of project dependencies and reports missing ones.
- Easy to test and deploy.
How to Install Apache Maven on Ubuntu
Before installing Apache Maven, your system must meet the following requirements:
- User with sudo privileges
- OpenJDK 1.7 or above installed on your computer or virtual private server
- SSH client if you are using VPS services

Users can install Apache Maven using the Advanced Package Tool (APT) or through the official Apache Maven website.
Let’s start with the APT method.
Method 1. Install Apache Maven on Ubuntu Using APT
The official Ubuntu repositories contain Maven packages by default. Thus, the most convenient way to install Apache Maven is by using the APT package manager.
However, the Maven package version in Ubuntu repositories may differ from the official one. It may also not be the latest release.
- Update the package index with the following Linux command:
sudo apt-get update
- Install OpenJDK:
sudo apt install default-jdk
- Verify the installation by running the following command:
java -version

- Install Maven using the command below:
sudo apt-get -y install maven
The default Maven installation directories are /usr/share/maven and /etc/maven. Verify the Apache Maven version using the following command:
mvn -version
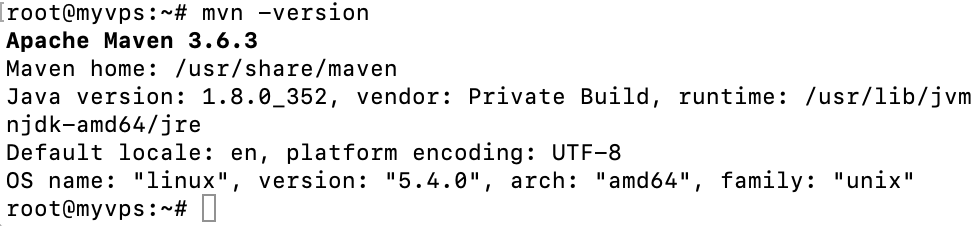
If you see a similar window, you’ve successfully installed Apache Maven on your machine.
Method 2. Install Maven on Ubuntu Using the Official Website
The second method is to install Maven from the official Apache website.
Java Installation
- Enter the following commands to update the package index and install the default OpenJDK package.
sudo apt-get update

sudo apt install default-jdk
The installation might take a few minutes to complete.
- Verify the OpenJDK version using the following command:
java -version
The terminal will display the installed Java version.
Download Apache Maven
- Open the Maven official page to check the latest release. At the time of writing, the latest release is 3.8.7. Download it using the wget command to the /tmp Maven installation directory:
wget https://dlcdn.apache.org/maven/maven-3/3.8.7/binaries/apache-maven-3.8.7-bin.tar.gz -P /tmp
- Extract the newly downloaded tar.gz file to the /opt directory with the following command:
sudo tar xf /tmp/apache-maven-*.tar.gz -C /opt
- To ensure Maven works properly, configure a few environment variables, including JAVA_HOME, M3_HOME, MAVEN_HOME, and PATH. To do this, create a file named Maven.sh inside /etc/profile.d/ directory with your preferred text editor.
sudo nano /etc/profile.d/maven.sh
- Fill in the file with the following environment variables: export JAVA_HOME=/usr/lib/jvm/default-java
export JAVA_HOME=/usr/lib/jvm/default-java
export M3_HOME=/opt/maven
export MAVEN_HOME=/opt/maven
export PATH=${M3_HOME}/bin:${PATH}
- Save this file and provide the required execute privileges:
sudo chmod +x /etc/profile.d/maven.sh
- Refresh and execute the file with the following command:
source /etc/profile.d/maven.sh
- Confirm the Maven installation by checking its version with the following command:
mvn -version
Conclusion
Apache Maven is a great tool to improve project management and make the development process much smoother.
In this tutorial, we’ve covered two methods to install Maven on Ubuntu and showed you how to set up environment variables for it.
We hope that you found this tutorial useful. If you have any questions or insights, leave them in the comments below.
Learn What Else Your Ubuntu System Can Do
How to List Packages in Ubuntu
How to Change Timezone in Ubuntu
How to List Users in Ubuntu
How to Install Python Pip on an Ubuntu System
How to Change Hostname in Linux
How to Install Java on Ubuntu
How to Install Jenkins on Ubuntu
How to Install Node on Ubuntu

Edward is a content editor with years of experience in IT writing, marketing, and Linux system administration. His goal is to encourage readers to establish an impactful online presence. He also really loves dogs, guitars, and everything related to space.

Ignas takes great satisfaction in helping people tackle even the most complex technical issues. His current goal is to write easy-to-follow articles so that these issues will not happen at all. During his free time, Ignas likes to play video games and fix up things around his house.